Barbed wire is a great addition to any sci-fi or historical battlefield, like Warhammer 40K or Bolt Action. It can be used to enhance a base or terrain piece, or on it’s own as a simple barricade.
I’ve seen a number of methods for creating razor wire or barbed wire, but other than the brass etched stuff I haven’t seen any that quite fit the look I was going for so I came up with my own method for DIY barbed wire.
So, here’s my DIY barbed wire tutorial!

Create a Three-stranded Wire
The first thing you will need is wire. I happen to be using 34 gauge wire from the beading section of the craft store, but you can use whatever gauge looks best to you.
You should be able to find a spool like this for around $2.

Start with a length of wire about four times as long as you want to finish with. You are going to lose length quickly in this process so you’ll be glad it’s cheap!
Take your single strand of wire, bend it in thirds, and fold the ends over to create a three-stranded wire.
This will leave a loop at each end that might be handy later. Here is a diagram to show what I’m talking about:

Add Knots to the Wire
To create the barbs I start by tying an overhand knot into the wire, about one inch from one end.
Even if you don’t know the name you know how to tie an overhand knot, it looks like this:
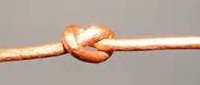
In this case just pretend the three strands are a single piece of string and tie the knot.
Make sure to pull the knot tight. If necessary you can use pliers to pull the wire from both ends so that it doesn’t cut into your hands.
It’s hard to see in the picture but you should have a tight knot with three strands coming from either side.

Continue to tie evenly spaced knots into your wire. This becomes easier after the first knot because the three strands aren’t separating as much.
I have tied my knots about one inch apart but you can make them closer together if you want more barbs on your wire.

Create the Barbs
At this point we have a three-stranded wire with knots tied in it. Between each knot you need to separate one strand from the other two.

Now use a pair of wire cutters to cut away this third strand leaving a small barb at each knot.
Continue this along the whole length and you’ll be left with a barb sticking out from both sides of each knot.
Be careful to keep track of the wire bits you cut away as they tend to be sharp. It’s not the kind of thing you want to find stuck in your foot later on!

Barbed Wire Finishing Touches
Real barbed wire is usually twisted to lock the barbs into place.
After you cut the third strand out to create your barbs, hook each end around a pencil or something similar and twist the barbed wire.
Gently pull the wire straight as you are twisting so that it doesn’t start to curl on itself.
When you’ve twisted it as much as you want to pull it taught and hold for a minute to set the twist into the wire.

You can use it straight as it is or you can wrap it around a pencil to recreate the curl from being stored on a spool.

DIY Barbed Wire Conclusion
Now you have a length of fairly convincing barbed wire. From here you can use it on your models just as you’d use it in real life. Wrap it around fence posts or tree stumps for a rural fence. Or you can use it to top concrete walls and chain-link fences for a more urban feel.
It is very versatile. Just be careful, the barbs are actually a little sharp!
If you want something safer for fingers you can use two strands instead of three and skip the step where you cut one strand out.
I also have a tutorial on making cheap and easy trank traps and miniature trees for more wargaming terrain, as well as one on a cheap wargaming table with terrain.
That’s how I make DIY barbed wire. Do you have another method you prefer?
Wargaming Terrain & Scenery Tutorials
Tutorials to help you create a great wargaming table.
- How to Make a Wargaming Table & Terrain Cheaply & Easily - November 6, 2017
- First Rebel Grot Armored Sentinel Painted! - December 19, 2016
- Assassinorum Execution Force Product Review from Games Workshop - May 6, 2015


That looks awesome, nice job.
Maybe it’s me but I find the steps hard to follow. I’m just not entirely grasping what you’re saying in relation to the images.
I can clean it up a little and add headings for each step to make things clearer. Do you think it needs more pictures, or just better organization?
Pictures. Organization is fine. For example, you say, “Take your single strand of wire and fold it over into three strands. Then tie small, evenly spaced knots into the wire.” You already lost me here. Your picture shows a single piece of wire with the knots on it. What do you mean by folding the wire into three strands? The picture, unless it’s just too early in the morning, doesn’t show what you mean. How did you put the knots on there?
So, I think just clearing up the steps with pictures would do the trick.
I’ll see what I can do. Stay tuned!
Awesome scenery and great tutorial!
Thanks, I am glad you enjoyed it.
By the way, I just finished Tarnish. It was very enjoyable!
Thank you, sir! I actually just added a new prologue to book, which you can probably read right off Amazon or any retail website as the “sneak preview.” I’d appreciate some feedback as to whether that’s a good addition or too much. :)
(And if you don’t mind throwing an honest review up on Amazon or wherever, that would help me *immensely*…)
Piece of cake! Tho, I’m just using 3 strands of wire to begin with. Easier than the folding thing you illustrated. The tying the knots bit is way easier than a couple of other methods I’d tried, for sure! Thank you! And yes, you need some pretty decent, SHARP tipped, wire cutters, to cut the ‘third strand’ nicely :)
Totally missed this comment!
That’s the beauty of the hobby, the constant adaptation and evolution of processes by hobbyists. Eventually you end up with something that’s easy for everyone and looks great.