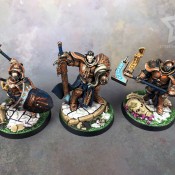
Shadespire is a great game. It’s also really easy to paint up a warband for it since some of them are only 3 models, like these Stormcast Eternals – Steelheart’s Champions. The fun part with that is it’s a great time to experiment with painting techniques, to try something different, like this rust effect technique I decided to use on the miniatures.
I’m not a bit fan of the good guys in games. I prefer those who walk a grey to black line, not a white one, so when it came time to paint Steelheart’s Champions, I decided I wanted to change it up. Instead of the typical gold armor with Stormcasts, I opted for something gritty, something that didn’t scream we are humankind’s saviors.
I saw a great tutorial on painting corroded armor and I knew I had to use that for my Shadespire warband. I didn’t have all the paints that were used in that tutorial, so I knew I had to do some minor adaptation, plus put my spin on it.
I present to you my tutorial on painting a realistic rust effect metal/armor. It’s very easy to do for painters of all levels from beginner to veteran.
Disclosure: Some of the links below are affiliate links, meaning, at no additional cost to you, I will earn a commission if you click through and make a purchase. The commission earned helps maintain this site.
Rust Effect Tutorial
When I mention paints by name I will either include (GW) for Games Workshop/Citadel, or (V) for Vallejo. Those are the two paint lines I used in this tutorial.
Also, most of the brush work in the tutorial is done with a Citadel Medium Layer Brush. I find it’s a good size to get reasonable coverage and be able to handle the light blending I’m doing.
Time needed: 30 minutes
Here’s the 6 simple steps to painting rust.
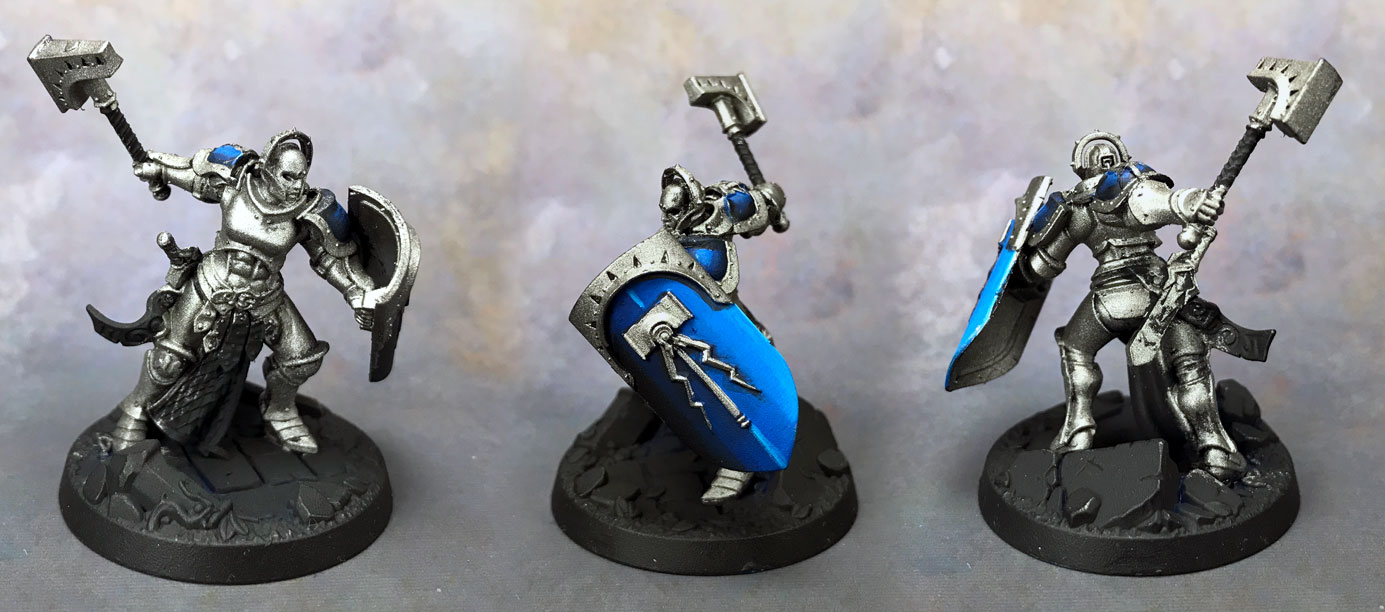
- Apply the Basecoat
The armor is base coated with Leadbelcher (GW).
The shield and shoulders have some really simple blending on it starting with a base coat of Regal Blue (GW), blending up to Enchanted Blue (GW), with a little Electric Blue (V) at the highest point.
The shading was done by mixing in some Abaddon Black (GW) with Regal Blue.
You could totally skip painting any part of the armor in a color and just leave it all metal. I did it to see how well I could weather it to match the rest of the armor. Plus, I thought it would give a little visual interest in places to break up the rusted look. - Apply the Wash
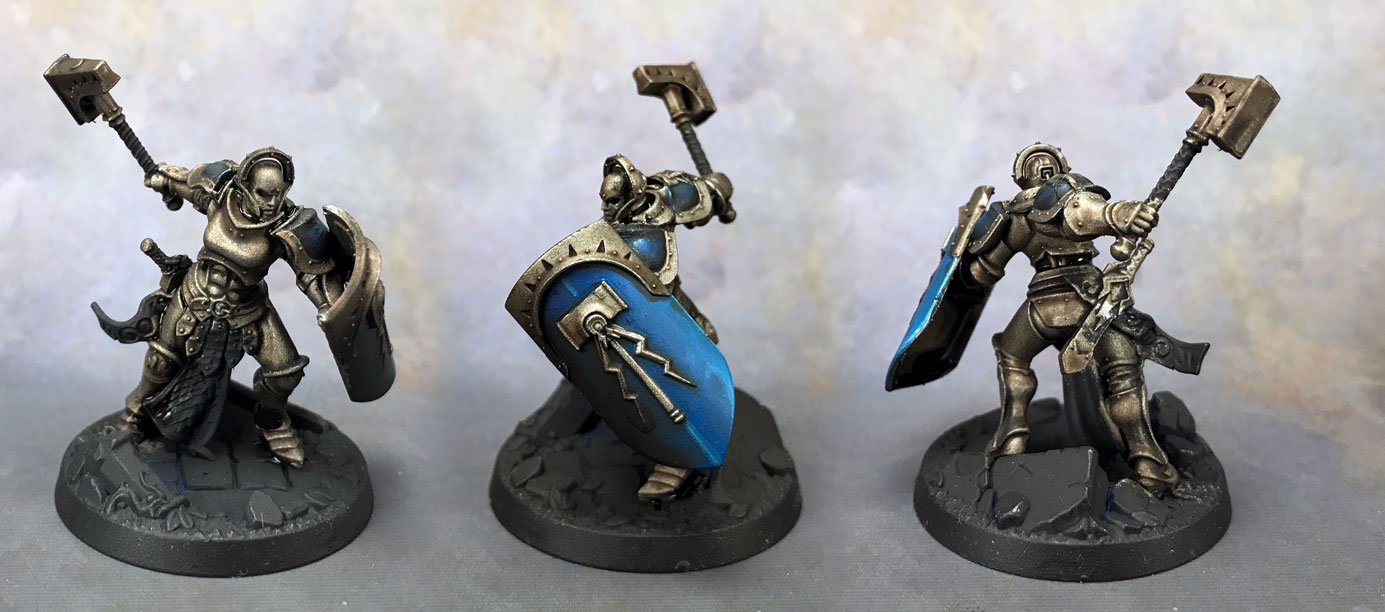
The easy step, just wash everything with Agrax Earthshade (GW).
It’s a pretty heavy wash as well. I’m aiming for dirty and gritty, so go as heavy as you like here.
The brown wash over the blue does well to dull it down and give it a dirty feel.
Really, just wash everything with this, well unless it’s not meant to be rusted.
I also like to use the Citadel Shade Brush for this. It has a large belly, so it can hold a lot of wash, which saves you from having to continually load up the brush. - Add Some Corrosion
Games Workshop has a great technical paint called Typhus Corrosion. It has little granules in it, so when it dries it leaves a gritty texture. It makes it perfect for weathering.
I take Typhus Corrosion and apply it in the recessed areas of the armor, anywhere that I feel would retain moisture and in turn corrode the armor.
I did this in a few layers to build it up in spots and make it extra gritty.
At the same time, I also took Rhinox Hide (GW) and mixed it with Abaddon Black (GW). I then stippled that onto the shield to create chips in the paint. You could also use a sponge if you don’t want to stipple.
I apologize about the lack of pictures on this step. I took less than I intended, but you should be able to see the Typhus Corrosion around the shield lip and parts of her armor in these shots. - Start the Shading
Now, it’s time to start getting the rust effect look on there.
For this step I use Terracotta (V), which is a ruddy, reddish-brown, and thin it out with Lahmian Medium (GW) – about 50/50.
The medium creates a glaze with the Terracotta so I can apply it in even thin coats easily. It also gives you a lot of control over how strong it goes on.
The recesses are where I focus the most as that’s where armor is more likely to rust.
I do this in a few layers to blend it. I start further out and pull the paint into the recesses. The next layer starts closer and pulls back, then again, etc. This builds it up to a nice reddish-brown closest to the recesses.
On the shield and shoulders I apply this in the chips I created earlier. I apply the paint in the middle of the chips to leave a shadow around it.
- Time to Get Rusty
Another great technical paint Games Workshop makes is Ryza Rust. It’s a textured rust paint that’s intended to be dry brushed onto the model.
However, instead of dry brushing, I put some on my palette and mix in some water to thin it out – about 50/50. I then apply a very thin coat over most of the armor to tint it orange.
After that dries, I come back in with the Ryza Rust and do some stippling with it to intensify the orange. I focus more on areas away from recesses for this step.
I did this with stippling to create a textured look and not something smooth and consistent. Rust is more convincing when it appears textured in my opinion.
If you wanted something quicker then you could simply dry brush the Ryza Rust on for this step. A few layers of this dry brushed would look good as well.
On the shield and shoulders I add some of the Ryza Rust into the middle of the paint chip to keep that depth I created. I also dragged a few lines down from the chips to add some rust streaks. - Add Some Highlights
The final step!
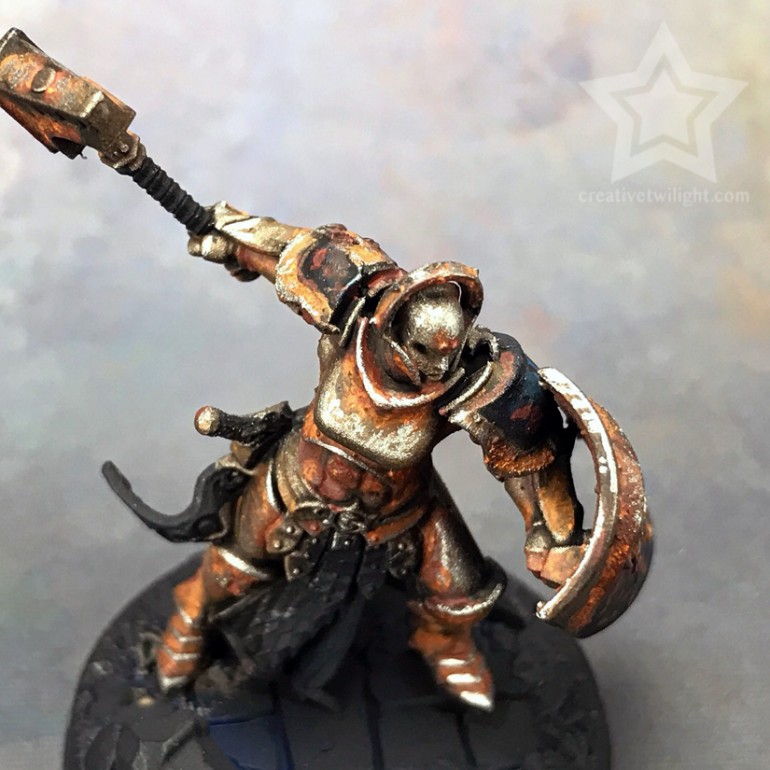
I take Leadbelcher (GW) and do some edge highlighting. The other thing I do is some stippling with it in areas that would see more light to brighten it up in spots.
Doing this with stippling helps keep the textured look I’ve been working on. You could, however, use dry brushing instead if you’re more comfortable. Dry brushing could hit all your edges for you and some flat surfaces. It would give a more dusted look instead of the deeper textured look of stippling.
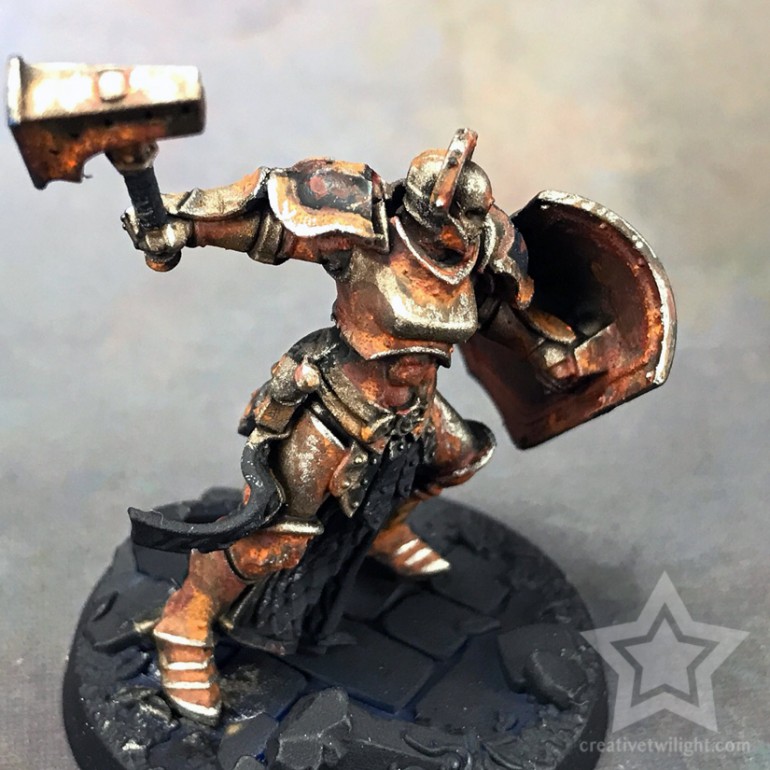
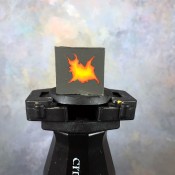
Here we arrive at the final result of all the work.
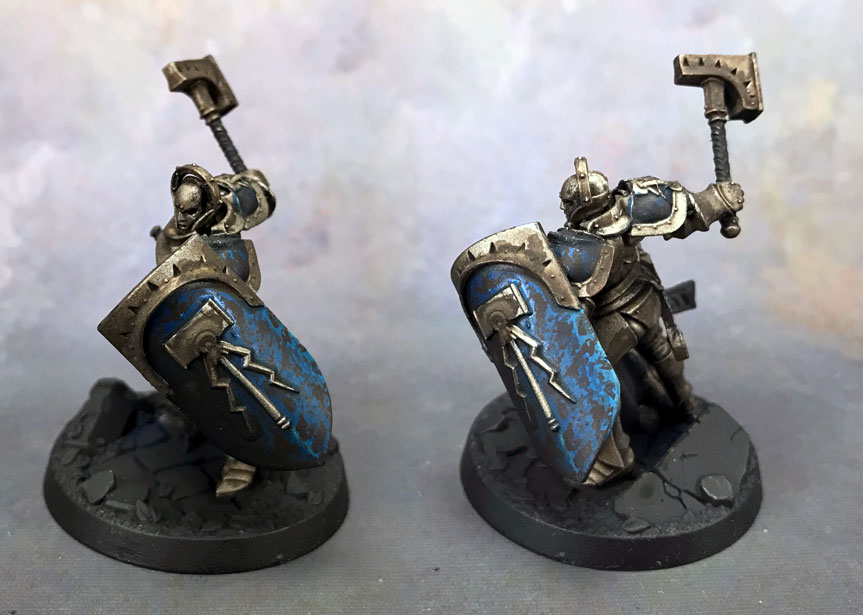
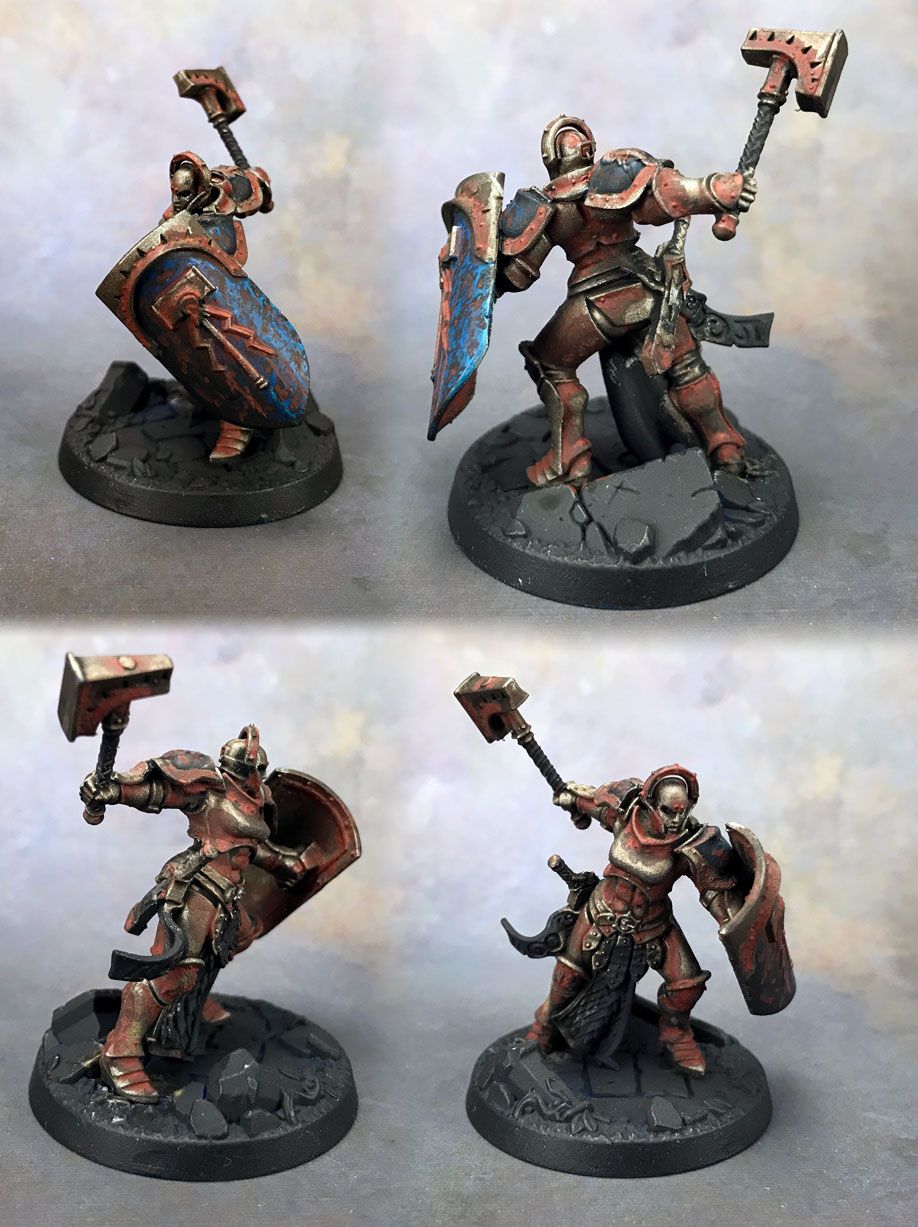
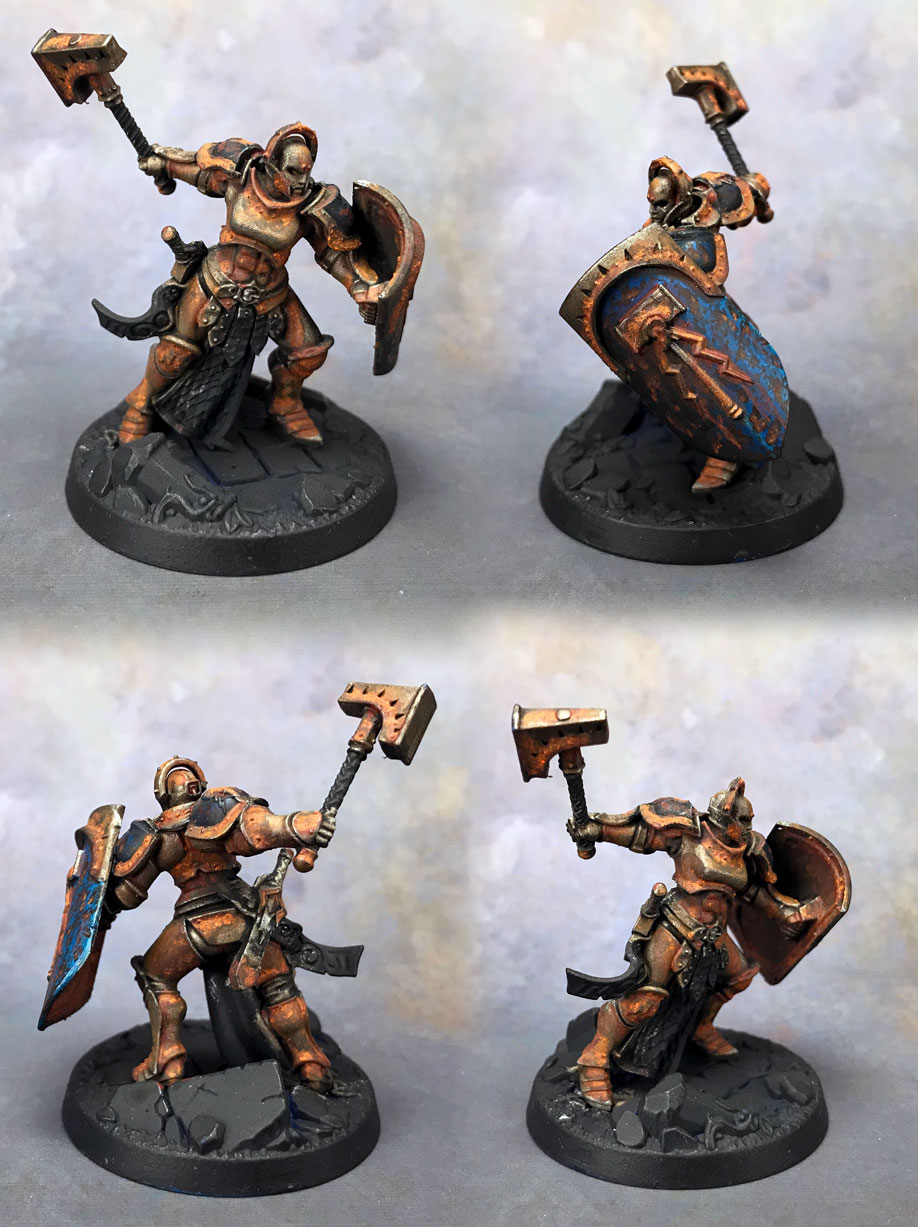
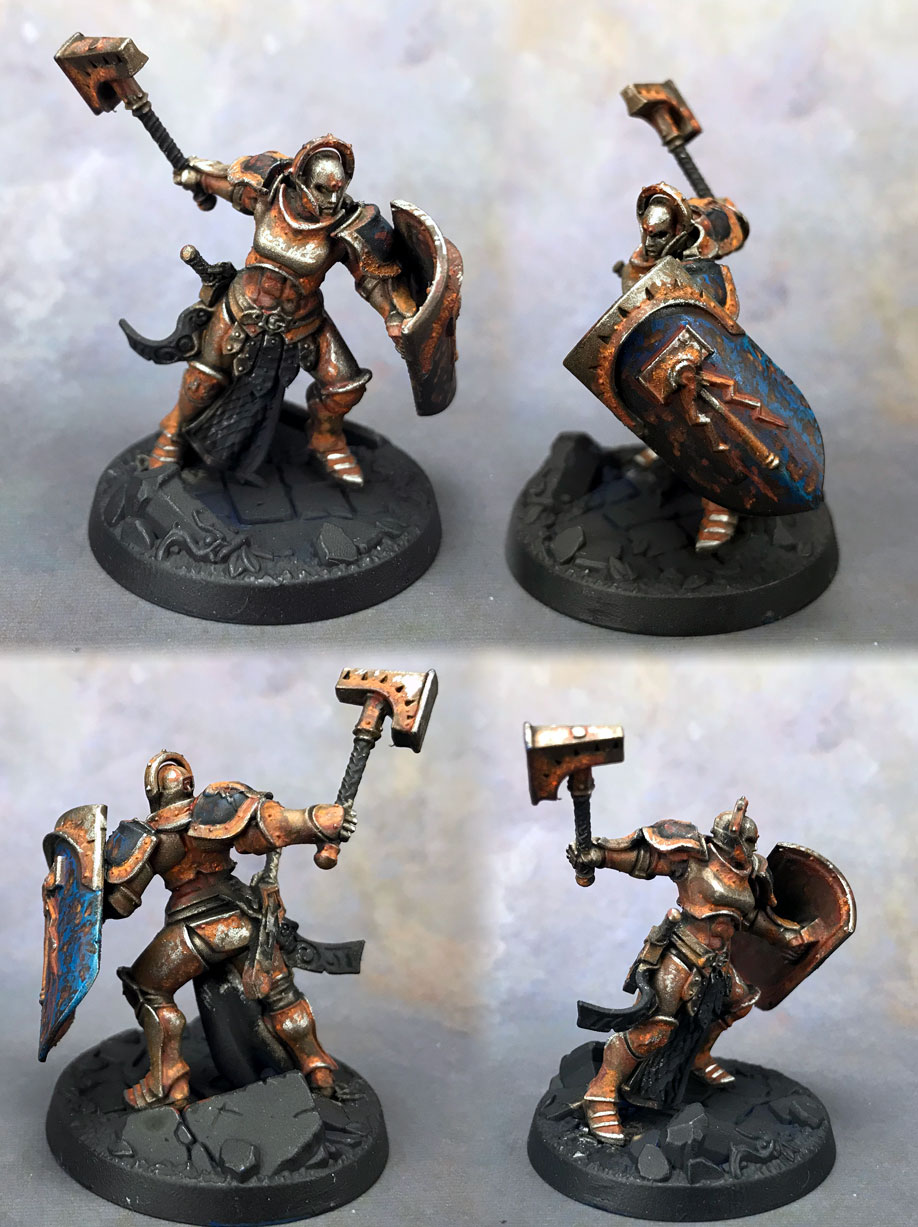
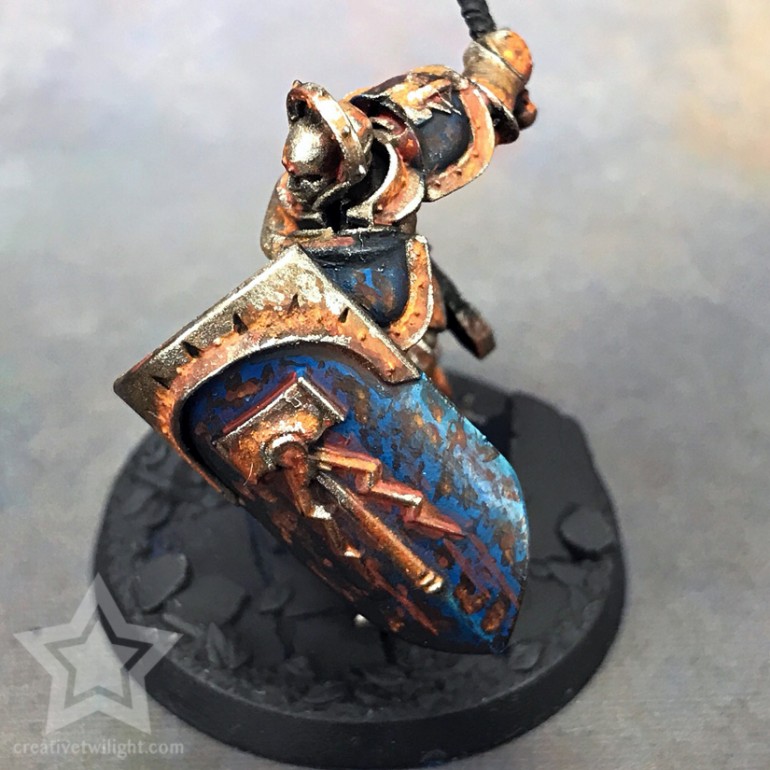
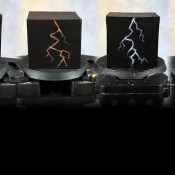
Close-ups
Here’s a few close-ups to better show you that textured look I’m talking about, and the rust in general.

Conclusion
This was my first time doing a rust effect technique like this, so it may not be a perfect recipe, but I think the results are pretty convincing. Normally I do a technique a few times before I do a tutorial on it, but I thought it would be fun to document my process and write it up.
I do have a tutorial on battle damage and weathering that covers the concept and technique in a more generalized sense. Rust is great, but sometimes you just want some basic weathering.
Also, if you want to see the effect applied to some other miniatures, or to see this completed model, check out my Steelheart’s Champions painting showcase.
If you’re a newer painter, then definitely check out my list of supplies every painter needs, also I have some tips on becoming a better painter as well.
I hope you’ve enjoyed the tutorial and there’s more you’d like to see me cover then fire away in the comments.
Specific Painting Techniques & Tutorials
Check out these other tutorials covering specific techniques.
I love painting miniatures and teaching people how to paint. I also really love blogging, so I've combined those two passions here.
- Creative Twilight’s Future and My Thoughts (Feedback Welcomed!) - December 4, 2021
- My Top Gift Ideas for Miniature Painters & Hobbyists + Gifts to Avoid - December 2, 2021
- The Year That Was 2020 and Where I’ve Been - January 17, 2021
That is a great tutorial. Thanks for sharing it, I know a few ways I can take advantage of it.
Thank you.
I realize it may have more depth than some want for painting rusted stuff (making glazes, blending, stippling, etc), so hopefully the alternatives I mentioned will help people out after something quicker and I in turn help everyone with it.
There are some great tips there for general rust and for people wanting to go the extra mile there are plenty of things as well.
Ana’s tutorial was my jumping-off point for rust as well. Great to have so many different variations shown out there, because rust can be so variable, and this gives all kinds of different options for people trying to find just the right rust look for their particular project.
Yeah, I saw your comment on there when I stumbled on the article ;)
You’re absolutely right – there’s so many variations of rust and it’s just a matter of what suits you. I did a lot of rust image research (real rust) and honestly, there’s no wrong way to do it.
That looks great! My rust technique is so-so, so I’m gonna follow this next time I do some
My previous technique for rust was very half-assed. I wouldn’t spend this much time rusting up squads for 40K. However, when you’ve only got 3 models to do, it’s time to step it up a bit :)
And thanks!
Yeah. It’s okay. Could be more detailed though.
Well done on another great tutorial. These are not the easiest things to write and you do a great job of it.
Thanks.
One of these days I’ll get setup to shoot video while I paint. That way I can demonstrate techniques I discuss. There’s a few tutorials I’d love to do but they won’t work in picture form.
Videoo: the final frontier! It is another level of stuffing around to do right and easy to do wrong.