One of my favorite elements in Warhammer Underworlds (Shadespire and Nightvault) is that you can buy a new warband, have a whole new way to play, get cards to help other warbands, and have some awesome models to paint for only $30. For me, buying new Warhammer Underworlds warbands is like Pokemon – ‘Gotta catch’em all!
So, what I thought I would do is to provide a complete list of all the Warhammer Underworlds warbands with some in-depth info on each, along with tips and tricks for them.
If you have some tips on the warbands then please share it below in the comments. I’d love to hear what you’re doing with them.
Also, WestRider has been kind enough to help me out with this. I wanted to give solid advice, so I solicited her to help with me with the warbands I’m not familiar with. You should also definitely check out her blog as well, Cascadian Grimdark.
Kenny also covered The Chosen Axes, so thanks!
Speaking of, there’s a few warbands I have not yet covered below: Spiteclaw’s Swarm and The Farstriders. If you’d be interested in contributing those to the article then I would love to add it in and give you full credit for your work. You can let me know in the comments and we’ll touch base.
Disclosure: Some of the links below are affiliate links, meaning, at no additional cost to you, I will earn a commission if you click through and make a purchase. The commission earned helps maintain this site.
Warhammer Underworlds Warbands
Without further ado, here’s all the current Warhammer Underworlds (Shadespire and Nightvault) warbands. I’ll keep this list updated as more come out.
Garrek’s Reavers (Bloodreavers) (Index)
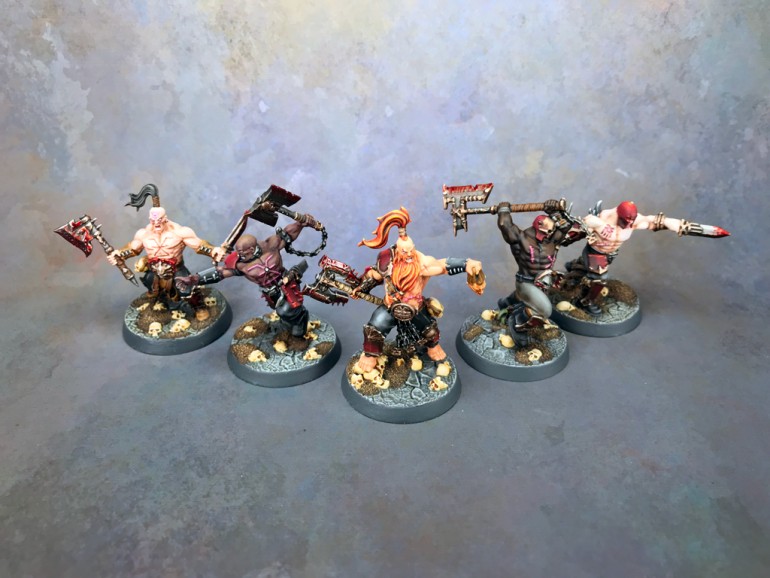
Garrek’s Reavers are a very lightly armored warband that is fast. Each fighter has 4 Movement. When they inspire, each fighter gets 5 Movement, tying them for the fastest warband in the game with Spiteclaw’s Swarm.
Speaking of inspiring, Garrek’s Reavers inspire when there’s 3 fighters out of action. Note, that’s any 3 fighters: yours, your opponent’s, or a collection of both.
Other than the mentioned speed boost, most of the inspired fighters gain more attacks and a boost in damage.
It’s that fast movement that’s crucial to success with Garrke’s Reavers. With each fighter only having Dodge 1, defense isn’t their strong suit. So, you need to isolate the enemy and pile into them.
Breakdown
The warband has a good mix of fighters. There’s Targor and Arnulf who are your cannon fodder. When inspired, even those two can do reasonably well, but the problem is they don’t often live long enough to become inspired at only 2 Wounds each.
Then you have my favorite, Karsus. He’s the most versatile in the warband with the ability to throw his axe (range 2), or do a whirlwind attack (hit all adjacent enemies) when he’s inspired. With a damage Upgrade or Ploy, Karsus can be a serious threat.
Saek is the hammer of the warband at 3 Wounds and able to do 3 Damage. With a few Upgrades, Saek can run down any fighter your opponent has. As such, he’s often the most targetted in the warband.
Of course there’s Garrek himself, who is no slouch. I feel the warband works best when Garrek is getting himself bloody and taking heads, not sitting back. The warband is too much of a glass cannon to let anyone play defense.
Tips & Advice
My general approach is to setup with Targor and Arnulf forward, followed by Karsus, then Saek and Garrek. This lets the grunts take the initial charges, gives Karsus range to throw his axe, and lets Saek and Garrek counter-charge as needed.
Everyone loves Saek, and with a few Upgrades the guy is a beast, but Karsus is easily my favorite in the warband because of his versatility. Keep Karsus in the middle of warband and he can use his range, or get in to spin around if needed.
For attacking you need to stick together to work in pairs ideally. With most of the Reavers needing Swords to hit, you need all the assistance you can get – literal Assists that is.
Plus, being on the low-end with damage (barring Saek), it’s going to take more than one Bloodreaver to pull down an enemy typically.
So, use the speed of the warband, stay in pairs, and single out enemy models that stray.
You’re going to lose a lot of your warband, and often quickly, so be sure you’re utilizing cards that reward you regardless of who dies, as well as utilizing Score Immediate cards for making Charges and successful Attacks.
Overall
I really like playing Garrek’s Reavers. Their faction cards are great and their aggressive nature suits my playstyle. I’m also a fan of disposable models (Targor & Arnulf) for the sake of serving the larger plan.
I find the Reavers to be a lot of fun, but an aggressive playstyle is very dependent on dice rolls. So, you’re going to have games where you win 20-5 and games where you lose 5-20.
You could certainly build Garrek’s Reavers out for objective play, they’ve got the speed and bodies for it, but they lack the defense to hold long, and really don’t have any cards to benefit them in this regard.
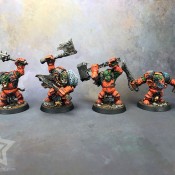
Ironskull’s Boyz (Orruks) (Index)
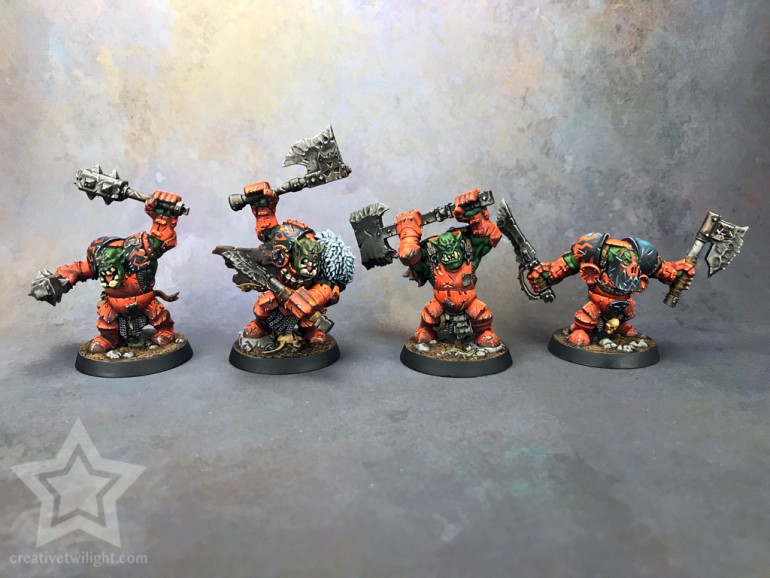
Green iz best!
Ironskull’s Boyz are a slow-moving, heavily armored warband. Each fighter has 3 Move. So, they aren’t the slowest, but they aren’t winning any races either.
The Orruks are pretty tanky with each fighter having at least 4 Wounds, and Ironskull himself having 5.
Now, Ironskull’s Boyz aren’t as tanky as Steelheart’s Champions, they lack the Defense, but there’s 4 Orruks compared to 3 Stormcasts.
Speaking of, it’s through taking damage that the warband inspires. When inspired there’s a Damage boost for everyone except Gurzag, and he gets a re-roll on his Attacks.
Orruks aren’t a high damage warband, so the Damage boost for them, while nice, isn’t necessary either. Well, unless your deck is built for killing lots of stuff. So, it makes them one of the few warbands that doesn’t need to Inspire. Inspired Orruks probably aren’t going to alter the game significantly.
Anyway, being Inspired is always great, but don’t worry overly much about it with these guys.
I find the warband plays well with a mix of control Objectives, their racial Objectives, along with some other generic ones. Basically, I don’t find Ironskull’s Boyz able to pour out enough damage to be super aggressive, though they can if needed, and they arne’t quite defensive enough, nor fast enough, to just play for board control.
So, I tend to play them as a jack-of-all-trades really, and it tends to work well – though I am admittedly still working on their deck.
Breakdown
Other than Gurzag, the warband starts off with pretty modest damage. Hakka and Basha do 1 Damage, Bonekutta does 2, and Gurzag does 3. Orruks are a warband where you want your leader (Gurzag) in the fight and not holding back. With 5 Wounds and 3 Damage, he’s a monster, and aurguably the best leader in the game.
While Hakka and Basha aren’t amazing, they are useful. Hakka gains Cleave on crits, and Basha gets Knockback 1 on crits. So, they have some utility to the warband, and they’re also the boyz that are leading the charge.
Bonekutta is the hammer of the warband, starting off with 2 Damage and Inspiring to 3 Damage. As noted above, Gurzag is 3 Damage, so him and Bonekutta will do the heavy lifting. Putting Damage Upgrades/Ploys on either of them can get them to 4 Damage, able to take out most enemy fighters.
Tips & Advice
I generally deploy with Hakka and Basha up front, followed by Bonekutta and Gurzag for counter-charges. I also try and keep everyone together, as much as my cards will allow for. The low damage of the warband means you often need at least 2 Orruks to bring something down. So, each member should be able to quickly support another as needed.
I’ve had pretty good luck with a more defensive oriented build with my Upgrades and Ploys, taking cards for additional Wounds, better Defense, healing, etc. I just find those cards play better to Ironskull’s Boyz than offensive ones, though you could certainly go offensive and do well.
As I mentioned above, I mix my Objectives for a bit of everything, though I really don’t take any killing focused ones. If you can keep your opponent guessing what you’re doing, since Ironskull’s Boyz can do most anything to some degree, then you’re going to be much better off.
Overall
I’ve had some tough games with Ironskull’s Boyz, but rarely do I ever find myself getting blown out of the water either. Orruks can take a hit, dish them out as needed, and have enough mobility to do what needs to be done.
The warband is less focused compared to others, but that’s just as much an asset as a disadvantage as well. However, it does take some getting used to honestly. I don’t find Ironskull’s Boyz to be a warband you pick up and play the first few times and do well with. Yet, they are a lot of fun to play once you get the hang of them and they can be very rewarding.
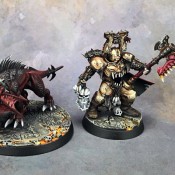
Magore’s Fiends (Blood Warriors) by WestRider (Index)
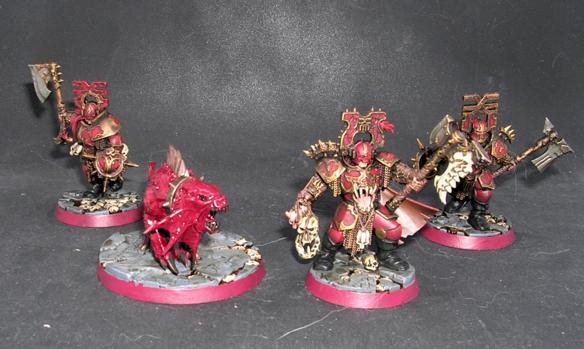
Magore’s Fiends are a combat warband with more varied profiles than most, thanks to Magore’s pet Flesh Hound, Riptooth. In contrast to the other Khorne Warband, they’re solid brawlers who can go toe-to-toe with any other combat warband, while also having speed to match anyone else in Riptooth. To top it off, they’ve got some really great Faction-specific cards that work very well with their brutal, aggressive playstyle.
Breakdown
The three Blood Warriors are fairly standard brawlers, not terribly different on the surface from their counterparts in Steelheart’s Champions or Ironskull’s Boyz: three Move, one Shield, and four Wounds for defense; two Hammers and two Damage on their attacks.
The one real noteworthy point before they Inspire is that the two goons have Bloodfists, which keep them from being Driven Back by drawn combats, and can make a Reaction attack when an attack on them fails.
Each member Inspires when they succeed in an Attack, which tends to happen fairly quickly, and then they all gain an extra point of Movement, and the goons get one more die on all their attacks, while Magore gets extra damage on his.
The extra speed is very helpful in hunting down Leaders or Objective campers hanging out in the backfield, and three Hammers is a ridiculously good attack roll.
The big difference between the Champions or Boyz and the Magore’s Fiends, tho, is Riptooth. With a profile more like one of Garrek’s Reavers, Riptooth is fast and dangerous. Starting with four Move and three Swords for his attack, he can Inspire pretty easily, which is nice because, in addition to the extra Move and Damage, he gets a second defense die, which actually make his Dodge save more reliable than the single Shield that the rest get.
Especially once they inspire, Magore’s Fiends actually have a very even distribution of hitting power and durability, and only Riptooth really stands out in terms of mobility.
I like that spread, because it gives a lot of redundancy. You’re never going to end up in a situation like an Ironskull or Chosen Axes player with their Leader down, because difference between Magore and the other Fiends is so much less.
Tips & Advice
Without getting into too much detail, the Faction-locked cards for Magore’s Fiends are also a very important part of their functioning. In particular, they have more “Score Immediately” Objective cards than any other Faction, and can actually accomplish most of them fairly easily.
Because those are replaced as soon as they’re scored, it’s not rare to score as many as 4-5 Objective cards in a single phase. Combined with some of the very helpful Upgrades they have access to, this can quickly snowball into a nigh unstoppable spiral of scoring and equipping.
When Deploying, if against another aggressive warband, I generally put the two grunts up front, Magore slightly behind them, and Riptooth somewhere central to use his speed to react to the opponent’s early moves.
Against a control warband, Riptooth goes up front to get stuck in as soon as possible, hopefully with some mobility buffs (Hidden Paths is amazing here) to get him some backup quickly.
Either way, Riptooth is really the star of the show. He can get to just about anyone, has some great unique Upgrades, and with a damage boost (whether from a Ploy or Upgrade), can one-shot just about anyone in the game.
There’s an Objective card for him taking down a Leader, and it’s usually pretty reliable for him to score that. Use the rest of the Warband to protect and support him, because he’s the least-replaceable member.
Overall
Magore’s Fiends are a strong contender for the title of Best Combat Warband. Because combat involves more dice than Control builds, it’s inherently less reliable, and Control Warbands will probably keep the edge in a purely competitive sense, but Magore’s Fiends are certainly capable of holding their own. And they’re much more fun than just sitting in the back and piling on Katophrane Relics.
Steelheart’s Champions (Stormcasts) (Index)
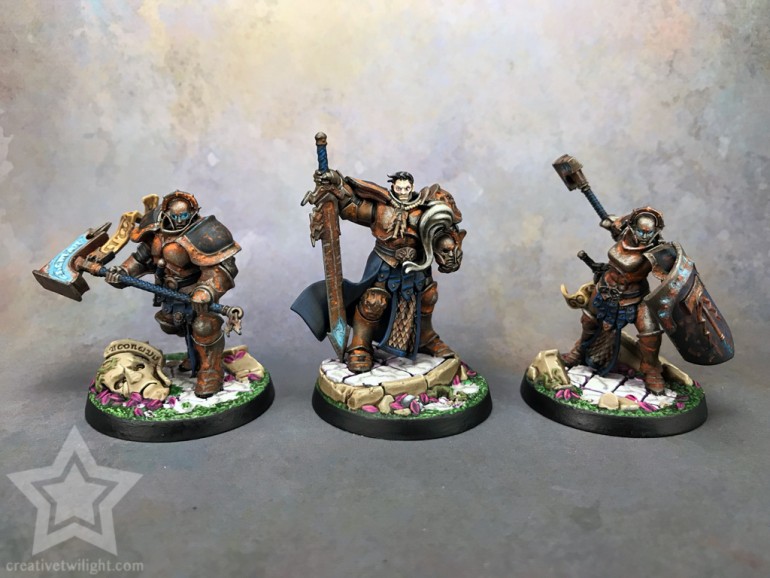
Steelheart’s Champions are a very versatile warband who has a lot crammed into just 3 fighters.
Each fighter has 4 Wounds and 3 Move. Everyone is hitting on Hammers and Inspires on rolling a Shield or Crit for Defense. Once Inspired, every fighter in Steelheart’s Champions rolls 2 Defensive (Shields) instead of the 1 Defense they start with. This makes the warband the most defensive one in the game.
When you combine a great defense with a great offensive (two fighters deal 3 Damage, the other deals 2 Damage, and all on Hammers), you’ve got a warband that can do whatever you want them to. This means when it comes to building a deck, there’s little that Steelheart’s Champions can’t do.
Breakdown
While Steelheart’s Champions only have 3 models, each one is a threat. You have Brightshield who throws 3 Hammers for Attacks, while only doing 2 Damage, she’s a consistent damage dealer. When she Inspires, she also gains a party attack where if someone fails their attack then she swings back, and she can’t be driven back. This makes her great at getting into objectives and staying there.
There’s the hammer (literally) of the warband with Obryn. He does 3 Damage and when he Inspires he gains a Cleave Attack and a Knockback 1 Attack. With a +1 Damage Upgrade, Obryn makes a reliable killer against most warbands.
Finally, there’s Steelheart himself. Steelheart also does 3 Damage. When Inspired, he also gets a swing Attack that targets all adjacent models. The swing attack is only 2 Damage, but that’s perfect for clearing out more horde style warbands like Garrek’s Reavers, The Sepulchral Guard, and Spiteclaw’s Swarm.
As I said, Steelheart’s Champions can play offense just as well as defense. With 2 of the 3 models doing 3 Damage, it’s easy to get them to 4 Damage and one-shot a lot of opponents. Likewise, with 2 Defense when Inspired, and Ploys to go on Guard, they can become an immovable object and hold on to objectives. Add in +1 Wounds, a Healing Potion, and you’ve got a warband that’s hard to remove.
Tips & Advice
I find it’s best to keep the warband together. If you spread out too much it becomes easy for a smart opponent to isolate a member and take them out. Plus, there’s Ploys and Upgrades for Steelheart’s Champions to get Defense bonuses by being adjacent to another friendly model.
I will often concede first turn to my opponent to see what they are planning. With only 3 models, you have to plan your activations well in advanced. I like to use the warband to disrupt my enemy’s plan.
Try not to focus too heavily on Objectives that rely on offense. While the warband is good at it, great in fact, only having 3 Models and 4 Activations means it’s going to be hard to take out a lot of models in a single turn, unless your opponent is feeding them to you.
The big thing, as mentioned above, is carefully planning your turns. Until Inspired, Steelheart’s Champions can be taken out by a good opponent just like any other warband. Plan ahead, don’t get too aggressive too early, and wait for the time to strike.
Overall
With the ability to do anything, Steelheart’s Champions are a great warband for anyone. Some bad Defense rolls early on can spell your doom quickly though. I’ve played games where I lost 2 models on the first turn; there’s no coming back from that. However, if you get those Defense rolls early on then you can walk into most anything and survive.
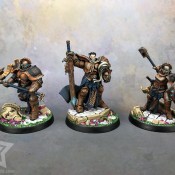
The Chosen Axes (Fyreslayers) by Kenny (Index)

The Chosen Axes are one of the toughest war bands you could have. Also, they could be the most fragile if not played properly.
Each fighter, other than the leader, starts with 3 wounds. Grimnar Starts with 4 wounds.
The chosen axes have one of the easiest ways to Inspire. All a dwarf has to do is hold an Objective at the end of the action phase. When dwarves Inspire they gain 1 Wound and their weapons gain 1 Damage.
Once Inspired the dwarves will give anyone a hard time. With only 1 Shield as Defense, they can still get killed, but multiple fighters will have to try to get one dwarf dead after they inspire.
On that note, when a dwarf is not Inspired, keep them away from the front lines because they can’t take a hit and they can’t hit back at all.
Breakdown
The key players for the The Chosen Axes team in order are, Your leader (Grimnar), Tefk, Vol, and then Madem.
Grimnar being the leader is the best, as he should be. He starts with 4 Wounds, 2 Attacks hitting on Hammers, 3 Damage and 1 Defense die. Once Inspired he becomes 5 Wounds, 2 Attacks hitting on Hammers with Cleave, and 1 Defense die.
You want to spawn him next to an Objective just to inspire him quick. Then he can one-shot kill most any fighters, especially those darn Stormcasts.
I generally Upgrade Grimnar with Regeneration, and some sort of Attack reroll and Defence re roll.
Tefk is my next favorite when he Inspires. Before then he isn’t that great. Before he Inspires he is 2 Movement, depending on the weapon you choose, 2 or 3 Attacks hitting on Hammers for either 1 or 2 damage, and 1 Defense die looking for Shields.
Once Inspired he is 3 Movement, 3 Attacks hitting on Hammers, on a Crit roll his Attacks gain Cleave, and 1 Defense die.
I generally upgrade him with Concealed Weapon (giving him +2 Damage on a Crit), +1 Attack or +1 Movement. He is a solid #2 guy for the The Chosen Axes.
Vol is a solid number 3 because of his Knockback ability when he Inspires. Like all other dwarves, he is 2 Movement, 2 Attacks hitting on Hammers for 2 Damage, and 1 Defense die.
When he Inspires he is 3 Movement, 4 Wounds, 2 Attacks hitting on Hammers, 3 Damage, and Knockback 1, and 1 Defense die. He is very good at getting your enemy out of your territory to score that Denial at the end of the game. I hardly upgrade him, but if I do it’s generally an Attack reroll or +1 Damage.
Madnok I believe is the weakest dwarf. He has 2 Movement, 3 Wounds, 3 Attacks hitting on Swords for 1 Damage, and 1 Defense die looking for Shields.
Once he Inspires he has 3 Movement, 4 Wounds, 3 Attacks hitting on Swords with one reroll and 2 Damage, and 1 Defense die looking for shields. Usually his is in the front lines holding anyone up so the other 3 dwarves can Inspire. I do not upgrade him.
Tips & Advice
Dwarves love the defensive game. So, always have defend Objectives. Even have Supremacy and Denial.
For Ploys and Upgrades have Movement and Wounds addons, and Healing Potions.
Also, preventing Knockback helps to so you stay on your Objective.
The Chosen Axes are a slow-moving warband to start, but can pick up speed and have plenty of Movement cards included in their box.
You should play them as a defensive warband keeping enemy’s off of your side and have them come to you. You should never go to your enemy because they are slow enough where you would be picked apart one dwarf at a time.
The Sepulchral Guard (Deathrattle) by WestRider (Index)
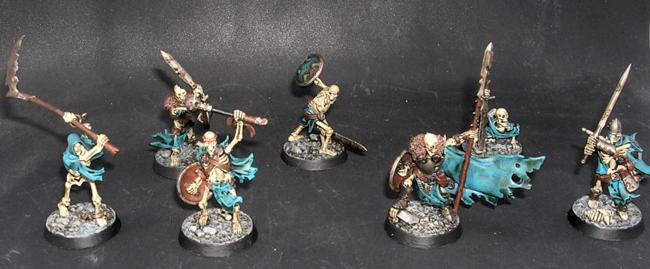
The Sepulchral Guard are the most numerous Warband in Shadespire, and have a slow but relentless playstyle that makes them one of the best-suited to Objective/Control play.
Breakdown
The Guard can be divided into three groups.
First, the Petitioners, the lowest of the low. With the worst statline in the game, they won’t be dealing much damage themselves, but can still prove incredibly useful as Objective campers and assists for the actual damage dealers.
Next are the higher-ranked minions, who held a position of greater importance in life, and thus retained somewhat more of themselves in death: The Champion, The Harvester, and The Prince of Dust. These three are still not particularly impressive in terms of their stats, but each still has a useful role.
The Champion is the best actual damage dealer of the three, and with some Upgrades and an assist or two, can be a fairly dangerous combatant. The Harvester and the Prince of Dust are more specialized support, with the threat of the Harvester’s Whirling Scythe discouraging your Opponent from grouping up, and the Prince’s Knockback clearing Objectives, taking away opposing assists, and generally being a nuisance to your Opponent’s positioning.
Finally, there is the Leader, the Sepulchral Warden. The Warden’s abilities are what make the whole Warband function much better than their underwhelming statlines would seem to indicate. As such, even tho he is nearly the equal of the Champion in combat, he’ll usually end up hanging back, often behind a couple of Blocked tiles, keeping everything going and only occasionally poking at those who get too near with his spear.
As mentioned, his abilities are the secret sauce that makes the Warband work. The first takes advantage of the Guard’s numbers by letting two other Fighters (three with the Ancient Commander Upgrade) make Move Actions as a single Activation. The other mitigates the frankly pathetic defensive stats of his underlings by bringing one of them that has been slain back into the game, on any Starting hex on your board, with any Upgrades they may have gained, and Inspires them to boot. The Warden himself Inspires once he has restored minions twice, whether that was bringing two different ones back, or one back twice.
When Inspired, each member of the Warband gets pretty much the same benefits: A very welcome third point of Move, and an extra die on their attack. The Prince and Warden also gain an extra point of damage on their attack, but that’s not usually particularly relevant.
Tips & Advice
While the Guard are certainly capable of dragging down foes who underestimate them, they’re not going to be winning many games by slugging it out. They win by focusing on Objective cards that reward positioning and holding Objectives.
When preparing for a game, keep in mind that you are never going to finish setting up first (except in a mirror match), but you can take advantage of this by using your early deployments for obvious or non-critical placements, and then put down your key Fighters once you’ve seen the Opponent’s full Deployment.
I typically use the board with the arc of three Blocked hexes surrounding a Starting hex, and put the Warden back there, along with an Objective. Then I generally put down the Petitioners, and by that point, most other Warbands will be finished, so I can put the three named minions where they’ll be the most use, subject to the remaining Starting hexes, of course.
Against Combat Warbands, I usually put a couple of Petitioners up front, with the hitters somewhat behind them, ready to counter-attack. Against other Control Warbands, all the Petitioners go in the back to camp Objectives or whatever, and the big three mass up front for a push into enemy territory.
Overall
The Sepulchral Guard are inarguably one of the best Objective/Control based Warbands. They aren’t complete pushovers in combat, but will do far better for you sitting on Objectives and working towards positioning-based Objective cards. This makes for a very strong playstyle because you rarely need to rely on the vagaries of the dice, and can control much of the other randomness by how you tune your decks.
The big thing you need to watch out for is Great Concussion. Even more than Earthquake, that card can mess up your whole game plan. Other than that, they have very few weaknesses in their area of focus.
In Closing
If you’re considering getting into Warhammer Underworlds then you absolutely should. It’s a great game that’s easy to learn, but has a level of complexity that makes every game different.
Hopefully we’ve provided you with some useful information to help you with your warband, or choosing a warband if you’re new. I’m sure this will be an ongoing piece where we continually make updates, to be sure to keep checking in.
I love painting miniatures and teaching people how to paint. I also really love blogging, so I've combined those two passions here.
- Creative Twilight’s Future and My Thoughts (Feedback Welcomed!) - December 4, 2021
- My Top Gift Ideas for Miniature Painters & Hobbyists + Gifts to Avoid - December 2, 2021
- The Year That Was 2020 and Where I’ve Been - January 17, 2021
Thanks fir the advice, I need to get in more games if Shadespire. Really enjoyed the stuff I have played since far.
Nice breakdowns on the factions I have and haven’t played.
Such a great game. I can’t say enough good things about it, and the Nightvault expansion is shaping up to be awesome.
I want to get my dog minders done up and out to play and all.
Aren’t you forgetting the best warband? Spiteclaw’s Swarm? Racist much!
PS. I have them. I am painting them. Slowly, and have not gamed with them (surprise, surprise). Tactics and advice would be awesome. I don’t really think that you’re a racist towards Skaven.
haha! I don’t own them yet, though they’re on my list to get, and nobody offered to cover it in this article. They’ll get added in eventually…
I love Spiteclaw’s Swarm, but I haven’t managed to get them to work, so I don’t feel comfortable giving people advice for them. They’re wonderful Models, and I feel like they should have good Control potential, but I haven’t got it to click yet.
I have the feeling that we’ll see some more control style cards with the new set. The Nighthaunts seem perfectly suited for it.
Oh, yeah, that seems a safe bet. The questionable part is whether or not I’ll be able to figure out how to make Spiteclaw’s Swarm work, with or without I use the new cards.
Thanks for the advice on Shadespire… was finding the orruks pretty frustrating to play, but turns out I was probably being way too aggressive with them (using all their charge objectives etc.)
I know the feeling. I picked up Orruks after lots of play with Garrek’s Reavers and did the same thing, which was completely frustrating as it’s not their best play. It’s not to say you can’t, but you have to focus hard on it and then I find you’re losing out on what makes Orruks great, their ability to take a punch. I definitely found them more rewarding with a more rounded approach.