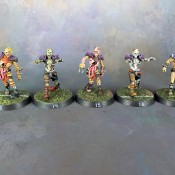
I’m working on my Nighthaunt warband for Warhammer Underworld, Thorns of the Briar Queen. So, I decided to shoot a video tutorial on using the Hexwraith Flame Citadel Technical Paint for getting that cool ghostly look.
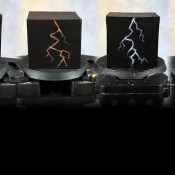
It should be noted that you can do this as well with the Nighthaunt Gloom paint that Citadel has as well. I just thought I’d do green ghosts :)
Nighthaunt Painting Video – How to Use Hexwraith Flame
Also, if you aren’t subscribed to us on YouTube then please subscribe. I’d love to grow that channel more.
If you don’t want to watch the video, the process is actually really simple.

All you need to do is mix in Lahmian Medium with the Hexwraith Flame at about a 50/50 ratio. Then you apply that over a white base coat on the model.
The reason for the medium, instead of pure Hexwraith Flame, is to get a bit more control with it, but also to thin it out. If you go pure Hexwraith Flame then you’ll get a darker green and not an eerie, glowing green. So, you create a glaze with it.
Time needed: 14 minutes
Here’s the breakdown on using Hexwraith Flame. It’s fast to do, but there is some waiting on drying time between coats.
- Base coat
First layer over the white.
- Second Layer
Second layer I start lower on the model to start blending it to a darker green at the bottom.
- Third Layer
Third layer is the same as the second but starting even lower.
- Final Layer
The fourth layer is pure Hexwraith Flame and basically just the very bottom of the model.
I also add more glaze to the recesses where it didn’t darken enough to my liking during that process.

The last thing I do is take some thinned out white and do a few select highlights.
That’s it. If you follow those steps then you’ll get a good looking result.
I also recommend the Citadel Shade Brush for the glazing/blending. I only picked one up recently and it works really well because it has a huge belly to hold the glaze/wash/whatever. It lets you cover a lot of area and not have to keep loading your brush.
Really though, you can use any brush you like, but I do recommend a larger one so the glazing is smooth.
Conclusion
Simple tutorial today but hopefully useful to some of you out there.
I hope to do some more quick and easy tutorials like this in the future, so if you have any ideas then I’d love to hear them.
Specific Painting Techniques & Tutorials
Check out these other tutorials covering specific techniques.
I love painting miniatures and teaching people how to paint. I also really love blogging, so I've combined those two passions here.
- Creative Twilight’s Future and My Thoughts (Feedback Welcomed!) - December 4, 2021
- My Top Gift Ideas for Miniature Painters & Hobbyists + Gifts to Avoid - December 2, 2021
- The Year That Was 2020 and Where I’ve Been - January 17, 2021