If you’ve arrived here, than you’re after information, guides, tips, and tutorials regarding miniature painting.
Whether you’ve picked up your first miniature and are learning to paint, or you’re a long time hobbyist looking for ways to improve your painting skill, I’ve got you covered.
I have put together a comprehensive guide that covers the hobby of miniature painting, and helps guide those new and interested in the hobby towards resources to get you started. I also have advanced information for veteran painters too.
Disclosure: Some of the links below are affiliate links, meaning, at no additional cost to you, I will earn a commission if you click through and make a purchase. The commission earned helps maintain this site.
What is the Miniature Painting Hobby?
Odds are you probably know what miniature painting is if you’re here. But, for the sake of those who don’t know, let me explain. If that’s not why you’re here, then feel free to bounce down.
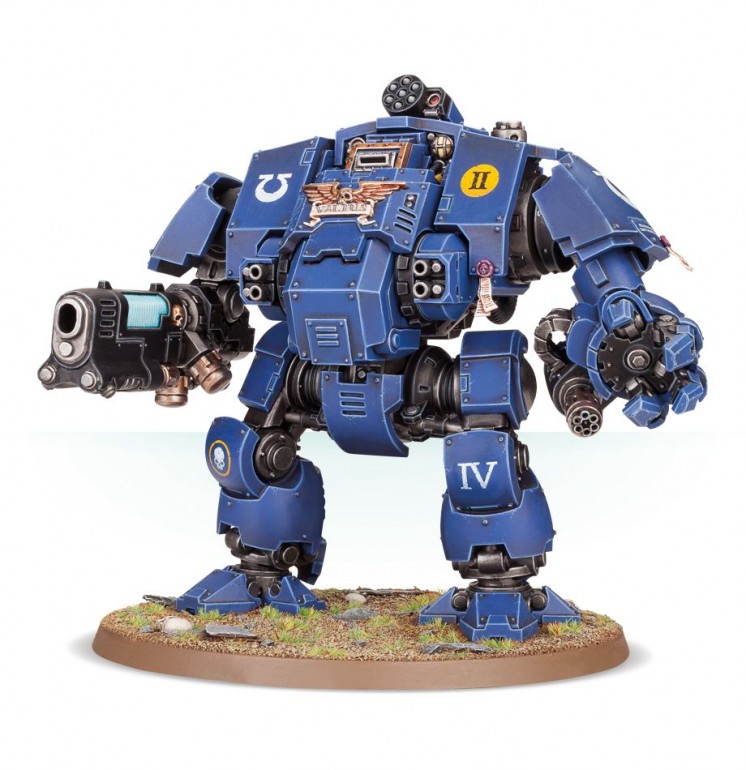
Miniatures are small models in various scales used for different things. Commonly most who paint miniatures are doing so for a game they play. Popular games, to name a few, are Warhammer 40K, Age of Sigmar, Infinity, Warmachine and Hordes, and countless more.
Those type of games are considered wargames. A wargame is a miniature game that pits two or more people against one another in a battle. Most often those games involve using dice to determine outcomes of things like shooting, melee combat, etc.
For those wargames you have to buy the miniatures, be it individually, or as a squad or unit. Those models almost always come unassembled and unpainted.
Hobbyists need to build the miniatures and get them painted for use in their games.
Other Miniatures
Wargaming isn’t the only place you’ll find miniatures. There are a lot of board games that have their own miniatures. People who enjoy the hobby of painting will paint those miniatures to make them more interesting and give them life. Often the miniatures that come in board games are unpainted (typically cast in a single color), or are painted horrendously.
Busts are another form of miniature painting that is becoming more and more popular. Just like a bust from a traditional sculptor, you can find scaled down busts of various things that people enjoy painting just for enjoyment and to showcase.
There’s countless sources of miniatures but I’ll leave it there.
Miniature Painting Preparation
Depending on the miniature will depend on the preparation needed. Some models come as snap-fit figures, which are very simple to put together and don’t require glue.
There’s other kits out there, namely those from Games Workshop, that are multi-part miniature kits. The multi-part kits have a lot of pieces, often various options, and require more work to assemble.

In either case, you’re going to need something to cut the parts for the model from the sprue. You can buy expensive sprue cutters for this, or you can get some at a craft store pretty cheap. The craft store will often have these in the jewelry section and refer to them as flush cutters.
Of course, you can also find these online as well.
Also, you will need a hobby knife. X-acto is a go-to knife in the miniature hobby because it’s affordable, easy to find, and works very well.
The big thing you’re going to use the hobby knife for is to clean the mold lines off the miniatures. Mold lines are visible lines on the model from the molding process to create the miniatures.
You want to remove these mold lines from the model and you can do this very easily by using a hobby knife and scrapping the mold lines.
Here’s a video from Games Workshop on the process as well. They use their mold line remover for the process, but it’s the exact same with a hobby knife. I’ve never used their mold line remover tool but I do hear it works great.
You’ll also use a hobby knife for cleaning up seams from gluing together your models. Here’s another video that shows what I’m talking about, and again you can use a hobby knife for this despite them using their mold line tool.
Cleaning mold lines and seams may seem unnecessary, as often they aren’t all that obvious, but this is a habit you really want to get into. It might not seem like much at first, but once you start painting a miniature, then all those mold lines and seams stand out. I have seen amazing painters not clean mold lines off a model and it just ruined the whole look.
Among a sprue cutter, super glue, and a hobby knife there are some other hobby tools you’re going to want eventually. I do have an article that covers hobby supplies like this to help you through understanding what you need.
Priming Miniatures
Once the model is cleaned of mold lines and ready to be painted it’s time to prime it.
Primer creates a bonding surface for your paints. An unprimed model, whether it’s plastic, metal, or resin will not hold paint well. The paint has nothing to grip to and so the paint will rub off.
However, primer is made to stick to surfaces like plastic, metal and resin and it’s also made to create a surface to receive paint. Do not make the mistake of not priming your miniatures.
There’s a few ways to prime miniatures. The easiest for most people is a spray (rattle can). There are also primers you can buy for an airbrush, as well as brush-on primers.
This is a subject I won’t cover too fully here only because I have an article that covers using primer in much more detail. If you’re new to the hobby, or are unfamiliar with primers, then definitely check that out.
If you want to see the process then check out this video from Games Workshop.
I also have a quick overview of my favorite primers.
Accounts
Free Trial
Projects
SSL
Gesso
$
Brush-on
Requires Mixing
Cheapest Option
Brush-on Primer
Easy Cleanup
Badger
$$
Airbrush
Use As-is
Very Affordable
Airbrush Primer
Easy Cleanup
Brite Touch
$
Spray
Use As-is
Very Affordable
Spray Primer
No Cleanup
Painting Miniatures
This article won’t tell you exactly how to paint miniatures, that’s a guide all its own, but instead get you on the road to painting miniatures of your own.
Basically, I want to help you get setup with the tools you need and some basic knowledge going into it. I will, however, give a few tips with painting miniatures.
On a related note, there’s a lot of mistakes new painters make. It’s natural and we all do it. Learning something is best done through practice and experience.
That being said, if you’re interested in common painting mistakes, and how to avoid them, then be sure to read that article. The article will help you avoid bad practices and make your road to painting miniatures a bit easier.
I do want to say that the paint brushes you buy will have an impact on your ability to learn painting miniatures, as well as how quickly you improve, and ease of learning new techniques.
You don’t need the most expensive paint brush there is, but you also definitely do not want to buy cheap ones either.
This is a subject I’ve covered about miniature paint brushes. That article breaks down what a brush is, how to care for your brushes, and recommended brushes to buy.
Basic Miniature Painting Techniques
There are some basics that everyone painting miniatures should know.
Learn Layering
Layering is a basic technique where you build up the paint on a model to creating shading and highlighting. It’s one of the first things most people learn and something I have a guide covering.
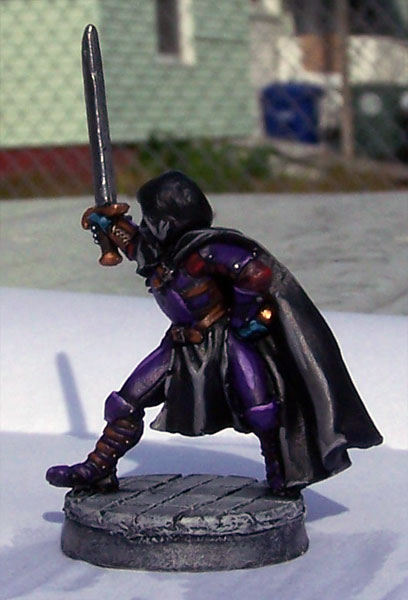
That Drow is a model I painted back in 2011 when I was very new at painting. What it shows you pretty clearly is what layering is.
You can see the colors painted on top of colors to create highlighting and in turn depth.
Shading and Highlighting
Along with that is the general principle of shading and highlighting. Miniatures are small, so as painters we tend to exaggerate the shadows and the highlights to make them visible to the eye from a distance.
This is another subject I have a guide to help you with, painting and shading miniatures.
Edge Highlighting
A specific form of highlighting is edge highlighting. It’s the process of putting a highlight on the edges of models to show where light would catch the strongest, and also to create some visual separation on miniatures.
While I consider edge highlighting a simple technique, it can be a bit tricky to learn to do. That tutorial will take you through the tips and tricks to make learning to edge highlight easier.
Washes
It’s worth mentioning washes for shading miniatures too – link to a tutorial. Washes are a very quick and simple method for getting shading on your models. You load a wash on your brush and drag it over your model (basically).

I realize not the greatest picture (click to enlarge), but this was some work I did in 2009. These were painted with some basic layering and washes. Such an easy thing to do that gives great results.
I also have a video tutorial I did on using washes.
Dry Brushing
Another basic technique that a lot of painters learn early is dry brushing. This is a very simple way to create highlights on your miniatures, and it’s extremely effective when dealing with textured surfaces.
Every painter should know how to dry brush, and you guessed it, I’ve got a tutorial on how to dry brush miniatures.
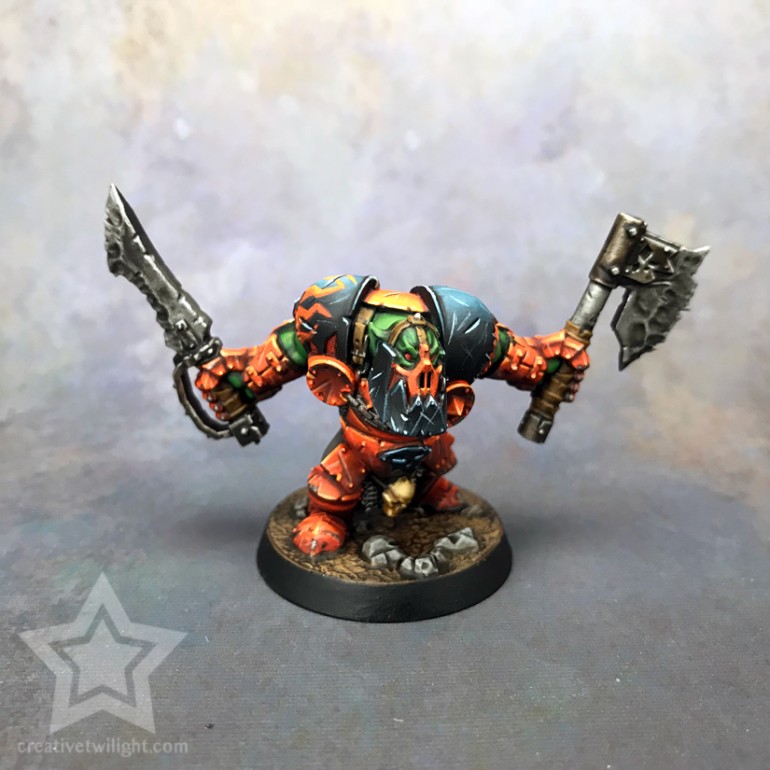
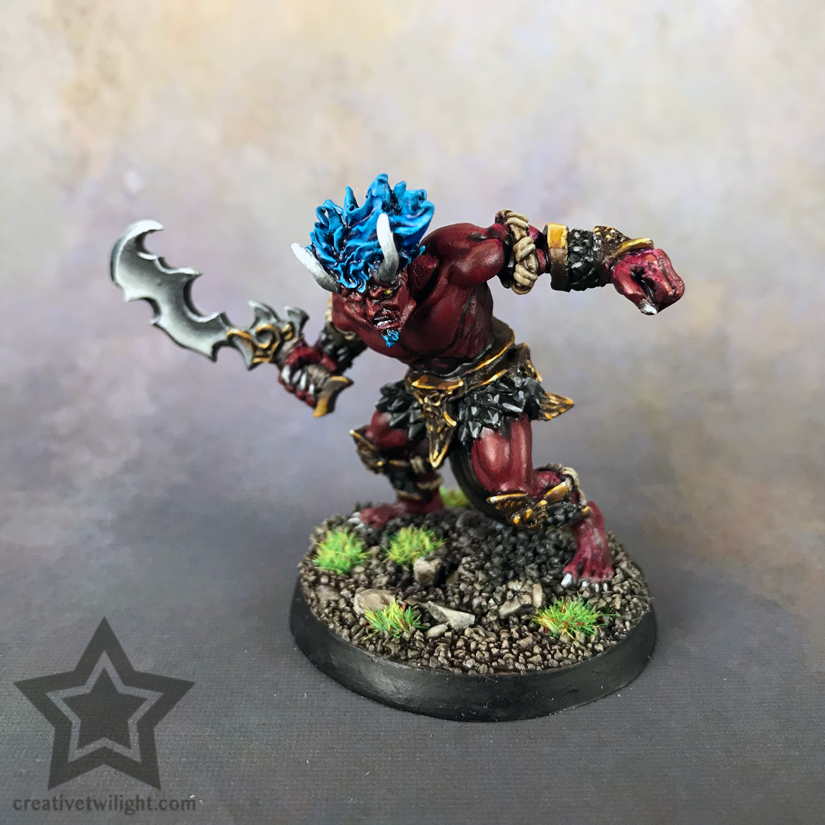
The fur on Gurzag’s left shoulder was painted using simple dry brushing.
Intermediate Painting Techniques
Stepping up from the basics are the things to start working with once you’ve got the essentials down.
Glazing Miniatures
Glazing is a method where you apply a glaze (translucent, thin paint) over an area to change the tone of the paint. This is very useful for smoothing out color transitions (basic blending), and for just giving more visual interest to something.
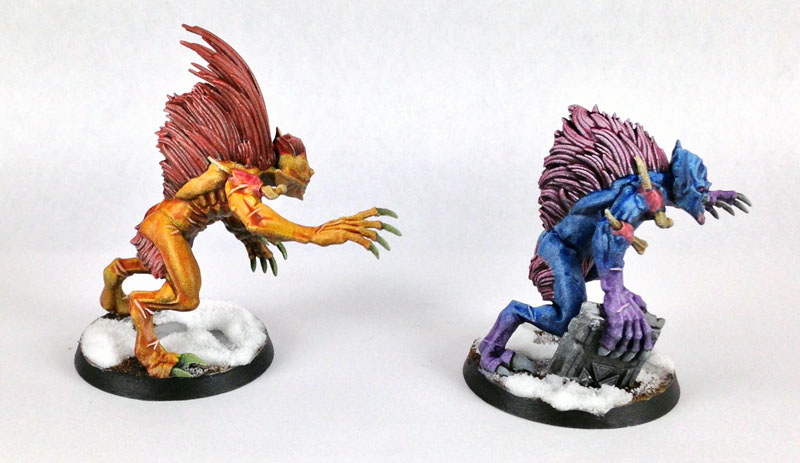
Those Chaos Spawn were painted entirely with glazes, and some washes, to give the look you see. It’s relatively simple to do and can give you some nice results.
I have a tutorial on using glazes that will guide you through how to do it.
Battle Damage and Weathering
An awesome way to add more interest to your models is by adding battle damage and weathering. Having your miniatures look like they’re taking part in the battles you’re representing is fun and really makes them stand out on the table.
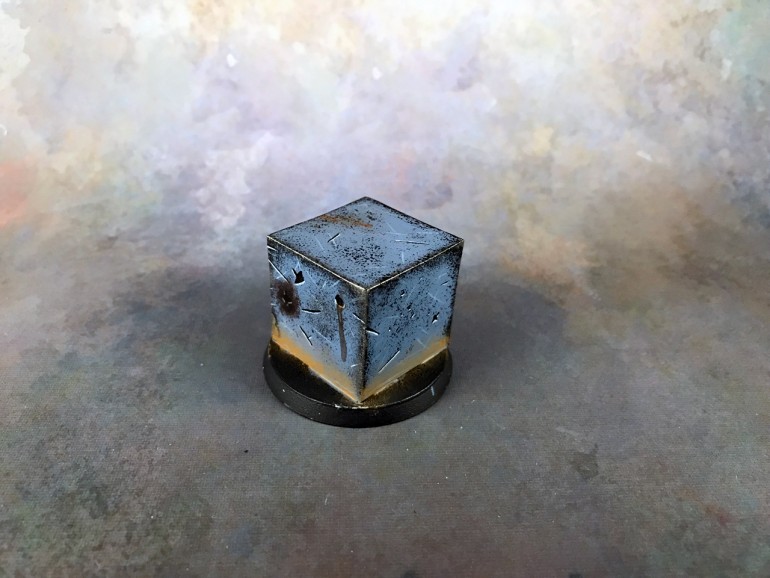
That’s Cubie. I used him in my tutorial on painting battle damage and weathering.
Had I not done any damage or weathering on that, then Cubie would look like a very plain and basic cube. But, as you can see, it’s much more interesting to look at now.
Painting Freehand
Painting freehand on miniatures can range from basic to advanced, so I thought I’d drop this in the intermediate area.
This is a technique that often intimidates painters. So, I did a tutorial on freehand that breaks it down and shows you how easy it actually is to do.
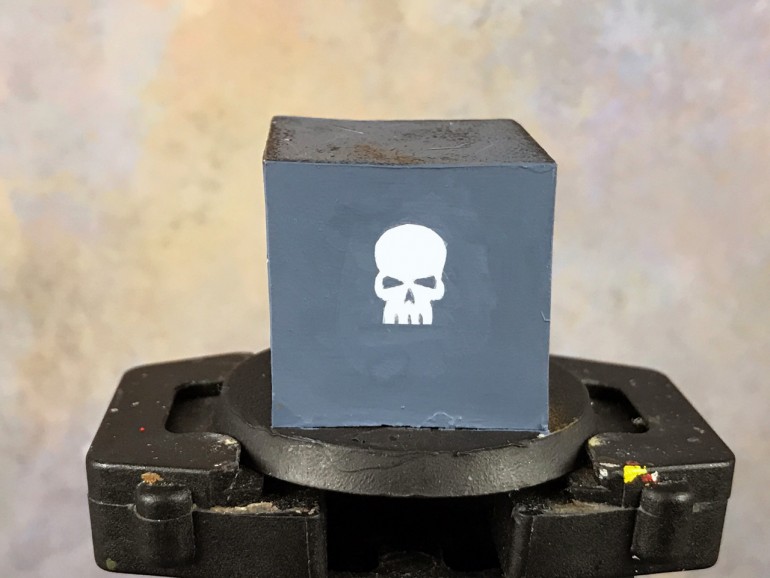
That freehand skull is from the above tutorial and is a nice example of something you can learn to do with a little practice and understanding.
Advanced Painting Techniques
The above section should lead you through the basics of miniature painting, but what about the advanced stuff?
Blending Miniatures
A technique you can learn that will open a lot of doors is blending. Blending is the process of creating smooth transitions between layers of paint to create a gradient of color.
The change in color you see on that above model, from the bright areas to the darkest areas, was done using blending. Notice how the transition of color is smooth – that’s blending.
If you want to learn how to do blending then check out that link. That article will show you how I created what you see above. That form is blending is done with layering and/or glazing.
There are other forms of blending as well. Pirate Monkey has some great tutorials that cover other forms of blending.
OSL (object source lighting)
Another advanced painting technique, which is a form of blending, is OSL (object source lighting). In practice it’s the technique for making something appear to be glowing and casting light around the miniatures.
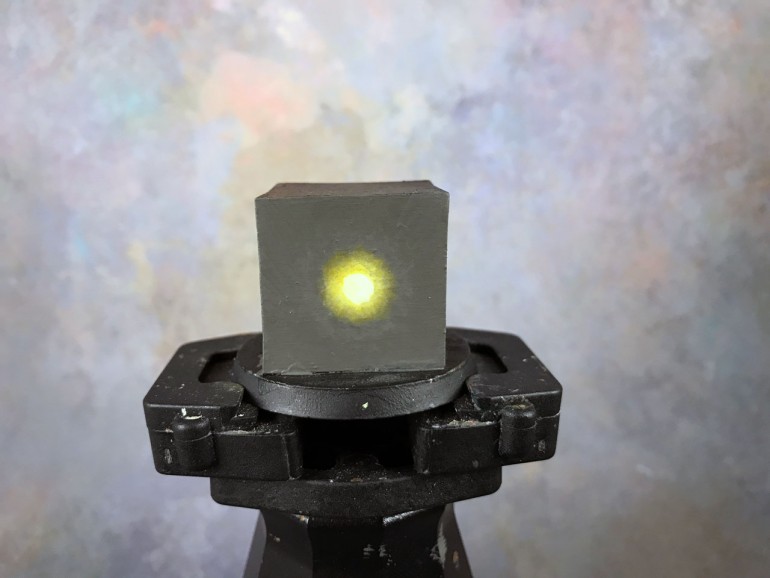
This image was part of a tutorial I did on painting OSL. You can see how it looks like it’s glowing and casting light outwards.
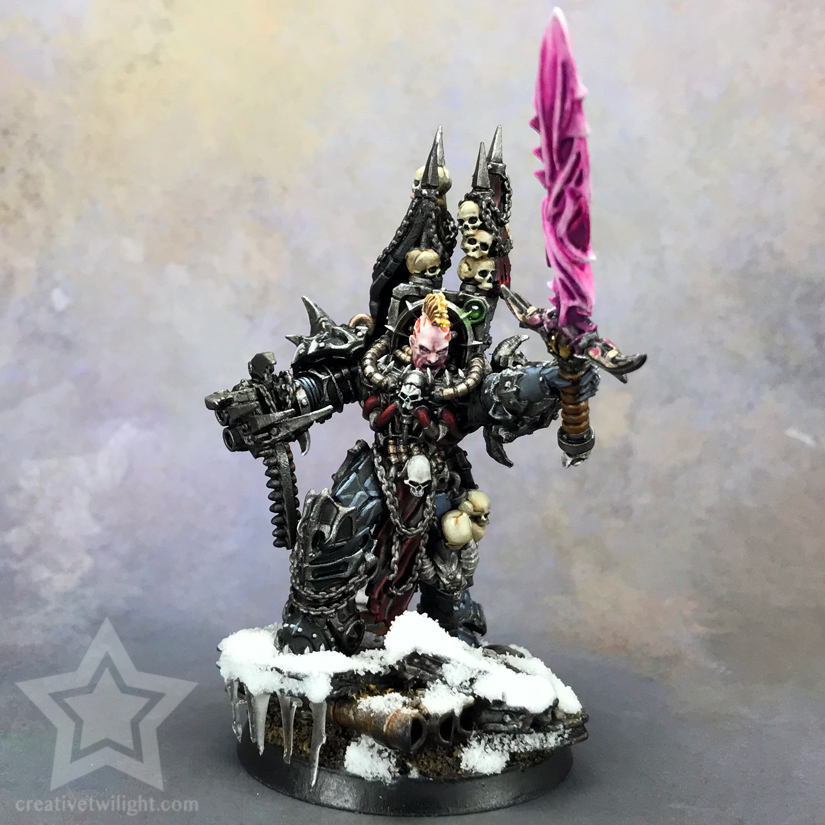
NMM (non metallic metal)
The last advanced technique I’ll chat about is NMM (non metallic metal). This is a painting technique where you paint something to appear like metal without using any metallic paints.
NMM is done using blending. See why I said blending opens doorways? Creating the illusion of metal is a simple concept but takes some practice to learn.
I’m no professional with NMM, and it’s a technique I’m always trying to improve on.
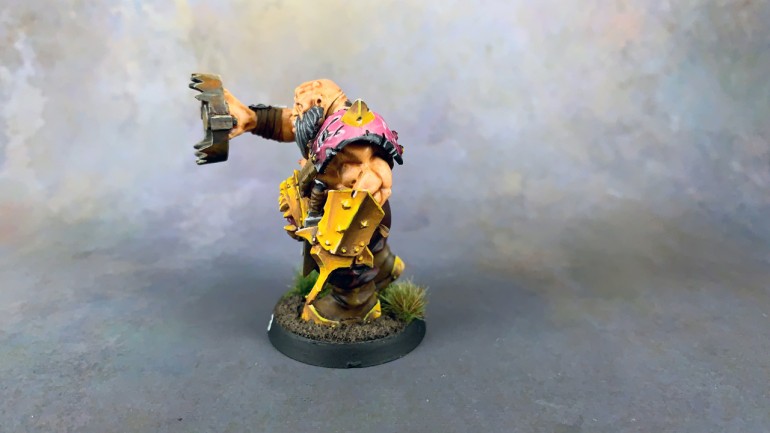
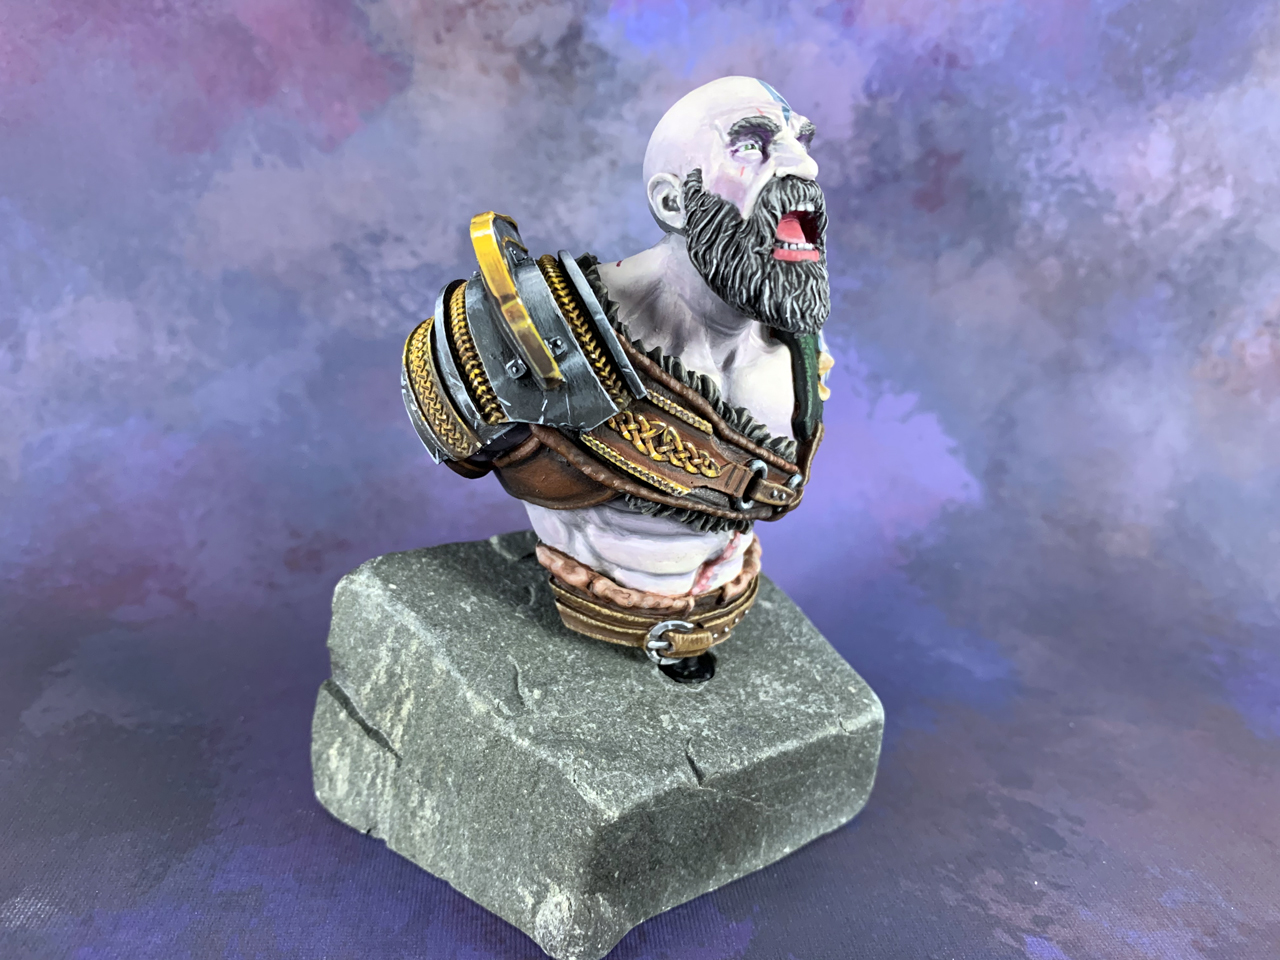
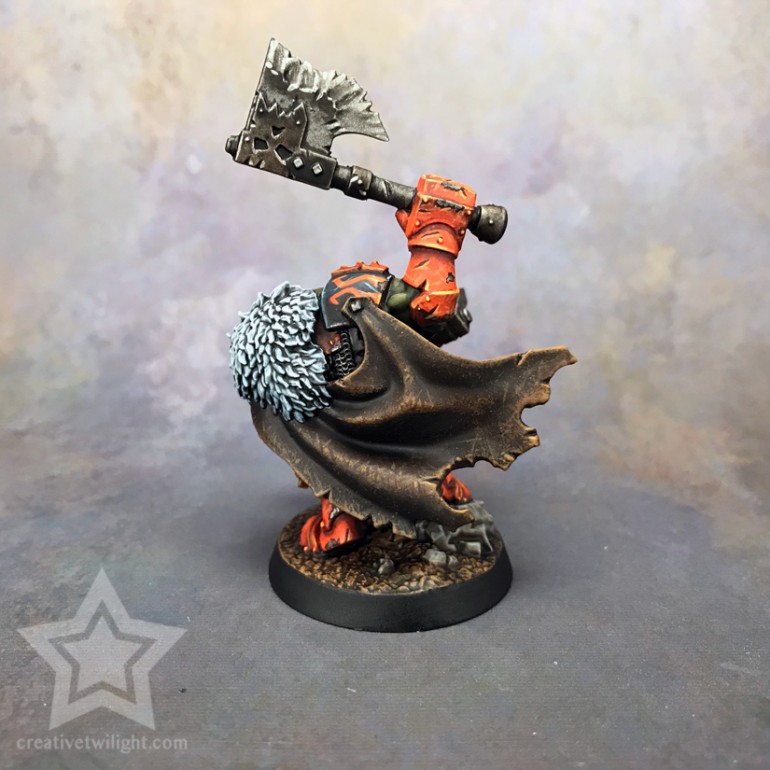
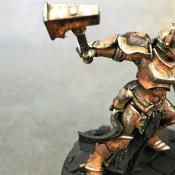
That gold gauntlet was an early gold NMM technique I was experimenting with.
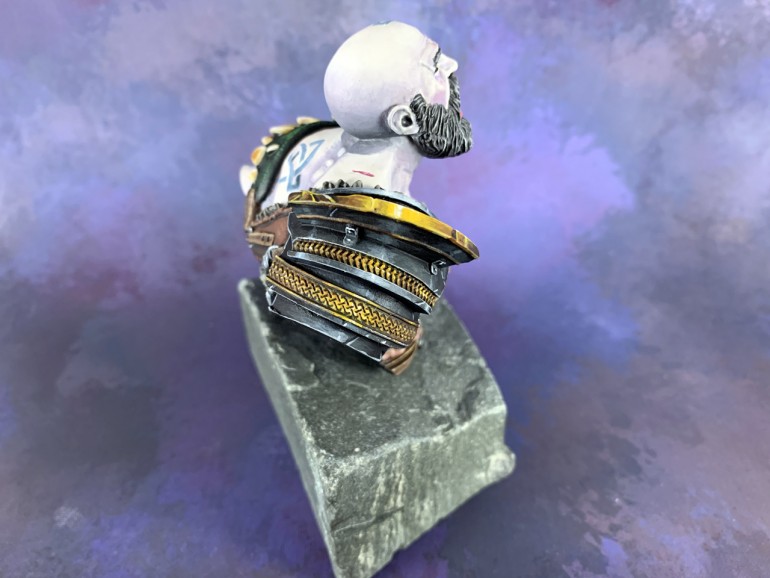
Here’s another angle on the barbarian bust from above. The gold and steel armor on the shoulder piece was done in a NMM style.
If learning to paint NMM is something you’re interested in, then check out that link. That will show you the quick and dirty way to paint NMM and also explain the concept behind it.
More How to Painting Help
Now, I do have some other articles on this subject that you may enjoy.
I have an article that covers common painting mistakes and how to avoid them. That’s a great read for new painters. It ties in very well with the previously mentioned article.
Another one is ways to become a better painter, which offers tips and advice I’ve learned over the years. That one is about the mindset of painting miniatures and not about having expensive tools. You should enjoy it.
Paint Brush Information
I didn’t want to spend too much money on brushes when I got into miniature painting just in case I didn’t care for it. Plus, I really didn’t know any better either and thought a brush was a brush.
I will also say that my choices for miniature paint brushes was a lot, I mean a lot, narrower than it is today. You’re almost spoiled for choices now.
Anyway, I picked up a cheap pack of brushes at a local craft store and started to learn how to paint.
The brushes I picked up wore out quickly and needed constant replacement. More importantly though, they made me seem like a worse painter than I was.
Trying to learn how to edge highlight with those cheap brushes wasn’t easy. Painting nice clean freehand with those brushes was very frustrating. The one thing those brushes are good for is dry brushing since you don’t want to ruin expensive brushes for that task.
Basically, a bad brush makes a simple task hard. So, I figured I just wasn’t good at painting when the reality was that I was fighting myself with those brushes.
As mentioned earlier, there are a lot of solid choices for miniature paint brushes now. It’s a lengthy subject, so I’ll point you towards my article on miniature paint brushes.
I also have a quick list of my recommendations here as well.
CHOOSE
Your Plan
Disk Space
Databases
Domains
Users
Price
Loew-cornell
Beginner painters
Cheap
Easy to find
Low Quality
Short lifespan
3
value
citadel
intermediate painters
Inexpensive
easy to find
Good quality
Good lifespan
7
value
Raphael 8404
advanced painters
expensive
harder to find
Great quality
Long lifespan
10
value
Brush Cleaner Will Save You Time & Money
Man. I came to this very late in the game. I must have painted for a good 12 years before I realized the value of a brush cleaner. Don’t make my mistake.
The brush cleaner I use is The Master Brush Cleaner. It’s a brush soap that you use after each painting session to clean your brushes. Also, if you have any really junked up brushes, then this stuff can help save them.
You can snag this off of Amazon, online art stores like Blick, and even find it in most local art stores.

By getting into the habit of using this after each time I paint, I have increased the life of my brushes. Not only do my brushes last longer, they stay in peak condition and wear out much more slowly. That of course saves me money.
There’s not a ton to say on the subject, but I do have an article that shows you how to use brush cleaner if you want a bit more info.
If you’d rather watch, I also have this video on using brush cleaner.
Use 2 Water Pots for Cleaning Brushes
If you’re painting and using metallic paints, then you want to use two water pots for brush cleaning.
Like everyone, I used one water pot for cleaning my brushes. I noticed that sometimes I would get metal flakes on non-metal areas I was painting. Also, the finish on the paint would be kind of cloudy and dirty at times.
The simple solution is to have a water pot for cleaning your brush of normal paints, and then one for metallic paints. That prevents cross-contamination with your brush and the different paints.
Simple!
Paints for Miniatures
At the end of the day, the paint you use is personal preference and convenience of buying it. However, there is one recommendation I have for anyone, and that’s do not use craft paints.
Buy Good Miniature Paints
Buying paints from Citadel, P3 Paints, Vallejo, Army Painter, etc., is more expensive by comparison to craft paint, but it’s not prohibitively expensive.
You’re going to pay more for quality paint; paint that is intended for use on miniatures. While those paints may seem small stacked up against craft paint, I assure you that they still last a very, very long time.
What I did to build up my painting stock was to buy 1-2 new bottles/pots of paint every few weeks when I went into my local gaming store. That way I wasn’t spending much in one shot. Then, in a few years, I had nearly 200 paints in my collection!
But Why?
What makes the paints from gaming companies and miniature companies so much better is that they are higher pigmented paints. The density of color is intense, which means you need less coats of paint to get even coverage.
You can blend with the paints by thinning them using water or a medium. When thinned out, those paints do not break down, unlike craft paints. This means you can get nice coverage with thinned out paints instead of it glooping and pooling like craft paints do.
Proper miniature paints are also water proof. I know that may sound odd, and it did to me at first to, until I realized why.
Most of us when we’re learning to paint will hold a model in one hand and paint with the other hand. You’re handling the miniature and human hands have moisture. That moisture with cheap paints will cause the paint to rub off very easily.
This happened to me a lot with craft paint. A waterproof paint won’t have as much of an issue with this. You can still rub off paint from over handling a miniature. However, the paint won’t just come off by holding a miniature.
Proper miniature paints will dry fast. Craft paints can take 10-15 minutes to dry, more if you tried thinning them out. Good acrylic paints for miniatures will dry in like 5 seconds if not thinned out. This means no sitting around waiting on paint to dry.
What Paints to Buy?
There are some companies who sell paints for miniatures that you may have heard of. The major companies are: Citadel (Games Workshop), Vallejo, Privateer Press (P3), and Army Painter.

There’s certainly more than that, but those are the ones you’re most likely to see and hear about.
For many of us, the choice of paint comes down to the ability to buy it. I really like Vallejo paint, however, I have much easier access to Citadel paint. So, most of the paint I use is from Citadel.
When it comes to paint I like to be able to see it in person and gauge it. I could of course buy any of the paints online, but there’s no substitute for actually seeing the paint in person. I’m picky.
So, the paint you go with may be subject to availability to you. Any of those companies mentioned are great choices for miniature paint. Learning to paint with quality paint will make learning much easier.
Saving Money on Paint
Of course, you can buy almost anything off Amazon, so you’ll find a lot of paint options there.
Some good options for starting off and saving money are:
- Army Painter Miniature Painting Kit
- Army Painter Paint Set
- Citadel Base Paint Set
- Vallejo Game Color Intro Set
- Army Painter Complete Paint Set
The price ranges quite a bit in those sets, but each of them will offer you a savings in buying paint and all are quality paints. It’s a great way to go if you just want to jump in with both feet.
Basing the Miniature
The final step, though some people do this first, is to base your miniature. Basing is the process of adding decorative elements to the base of the model to make it seem like it’s in a setting.
The basing could be desert, snow, rubble from a city, an alien swamp, and an endless list of things limited only by your imagination.
Here’s a few of my models so you can see the variety of basing you can do.
Probably the most basic basing most of us learn is to put PVA glue all over a base and dip it in sand. It’s simple, and when painted it looks good.
That reminds me, most of the basing is done before you prime the miniature. I have it last on the list because it’s the last element I like to work on, painting it that is, but the process of adding features to the base is done sooner.
The reason for that is because even if you’re going simple and gluing down sand, you want to prime the sand and paint it. I know it sounds weird if you’re new to the hobby. I mean, who paints sand or dirt? We do!
There’s a few reasons you paint things like dirt, or whatever other real life things you glued down to the base, like twigs, rocks, etc. A big one is to preserve the elements. By priming, painting, and sealing a twig you glued to a base, you are preserving the twig so it won’t decay and fall apart on you.
The other side of it is to give you control over the colors. This lets you paint those elements to compliment the model. Maybe you want a purple rock on the base because it would look cool, but what are the odds of finding a purple rock to use? So, we paint these things to be what we need them to be.
Here’s a good video from Miniac that covers basing your miniatures.
You can also find bases for your miniatures that are already decorative as well. Not everyone enjoys creating the bases for their models, so buying awesome looking bases is a great alternative.
Plus, some of the scenic bases you can buy just look amazing and do things beyond the skull of many of us.
The takeaway here though is to spend a little time on the base of your miniature, whether you create the scene or buy it. Those decorative elements really help set the scene and bring everything to life.
Sealing/Varnishing Miniatures
Once your miniature is painted you want to protect it. A sealer, or varnish as some areas refer to it, adds a protective coating over your miniature. It prevents the paint from rubbing off from use, as well as adding a protection should you drop your miniatures.
Nobody wants to spend time working on a model and have that work ruined because they didn’t protect their paint job.
Same as primers, sealers come in many forms: spray can, airbrush, and brush-on versions all exist.
There can certainly be some nuances to sealers and I have another article that thoroughly covers the topic of sealers that I suggest checking out.
Here’s a quick rundown on some sealers if you don’t want to browse that article.
CHOOSE
Your Plan
Disk Space
Databases
Domains
Users
Email Accounts
Vallejo
brush-on
CHeap
Brush-on
Dries dull
Good quality
hard to find
Krylon
spray
cheap
spray
dries dull
good quality
Easy to find
Testors
spray
Expensive
spray
dries dullest
great quality
easy to find
Getting Better at Miniature Painting
As you’re learning to paint do not get discouraged when you see the work of others, even other beginners. It’s easy to see an amazingly painted miniature, compare your skill to that person’s, and just want to give up. Don’t.
Some people pick up painting very quickly. Others take a longer road in their progression of skill. It doesn’t matter which you are. It’s going to take practice and experience to get better. The more you paint, the more you try to improve each time, the better you’ll get. There are no shortcuts.
Here’s two models I painted. The first is one I painted in 2006 and the second is one I painted in 2018.
Pretty notable quality improvement! It’s just a matter of time and practice.
I talk about this all in length more in my article on painting tips, so do check that out. It will really help motivate you.
A Wet Palette Will Change Your Life
There is so much I could say about a wet palette, but I will try and keep it short.
I painted with a normal dry palette forever. I didn’t start using a wet palette really until I began to learn how to do blending.
The value of a wet palette for blending can’t be emphasized enough. However, it still has a ton of value for painters who aren’t blending.
I was constantly frustrated with how much paint I was wasting when using a normal palette. The paint would dry up in 5 minutes or less.
Sometimes when I’d put paint on my brush I would get dried little flakes of paint in there. Those dried flakes would brush off on the miniature and dry into the paint.
Overall, a dry palette was something I continually fought with and didn’t like, yet I kept at it for way too long.
DIY Wet Palette
One day I decided to make my own wet palette. Actually, first I bought one, but it was way too large for my painting desk. So, I had to create one appropriately sized for my desk and miniature painting.
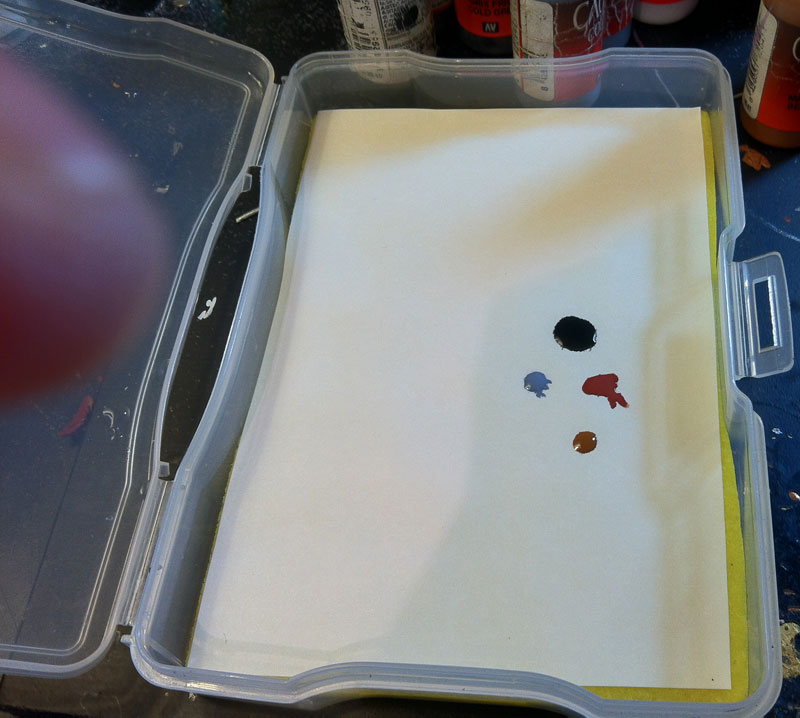
Making your own wet palette is very simple to do. That link will show you how to build the exact one I’m using.
The Value of a Wet Palette
A wet palette keeps paints workable for damn near forever. They do not dry out during a painting session. I can work on something for hours and keep going back to paint I put on there earlier in the day.
Less paint drying out means less money spent on paint.
By keeping your paints wet, they become much more workable. The moisture of the palette will naturally thin out the paints a bit. This helps you get a nice, smooth coat of paint on your model with no work at all. No more dried paint getting brushed onto the model.
I noted that a wet palette is invaluable for blending too. If you have any intention of learning how to blend, and it’s something everyone should at least try at some point, then you’re going to want a wet palette.
Miniature Painting Handle
I do highly recommend getting yourself a miniature painting handle. This avoids direct contact with the miniature while you’re painting. That means you won’t rub off paint from overhandling a miniature. Also, it’s much more comfortable.

The Citadel Painting Handle is what I currently use and highly recommend. I’ve got a review of their painting handle if you’re interested.
A Good Painting Light Makes a Big Difference
I don’t think this surprises anyone, yet I fought with painting under mediocre lights for years and years. If you can’t tell yet, I can be stubborn when it comes to change.
There are no shortage of options when it comes to painting lights now. Again, when I began painting it was another matter.
I won’t tell you that you need an expensive desk lamp that has articulated movement and a magnifying glass. Those are great though and I love mine. However, even just a regular desk lamp will work. The trick is in the light bulb.
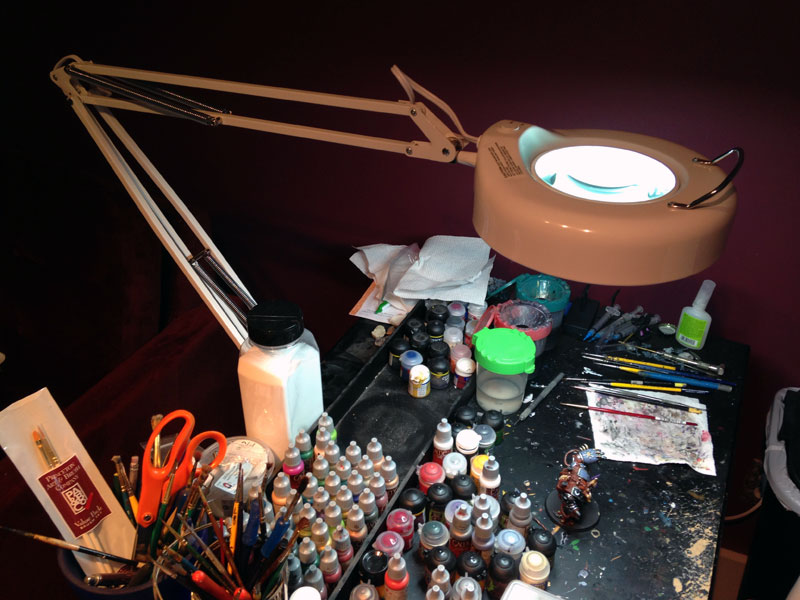
That’s the light I’m currently using. It was reasonably priced and I love it.
The Right Light Bulb for the Job
The big thing you’re looking for in a light is the color temperature. A light bulb that’s 5,000K in color temperature will give you a natural daylight look. Whether that’s LED, CFL, fluorescent, or incandescent doesn’t matter a ton.
Lower color temperatures will give you the traditional yellow look. Your old school light bulbs are like this. Going warmer than 5,000K will get you into the blue spectrum, not a very natural color to paint by either.
Find yourself some bulbs that are 5,000K and your colors will appear natural to you when you paint, and also when you take pictures to show off your work.
These are the bulbs I picked up off Amazon and I’m using to take pictures with in my light box. They’re affordable and have worked out great.

You should also be able to find bulbs like this in a local hardware store or retail store as well. The first set I bought I picked up at Lowe’s, and I know Home Depot carries them too.
Every Painter’s Road is Different
I find there’s a few phases to learning how to paint. Well, I went through a few phases anyway.
The first phase is where you’ve got the basics figured out and you’re very happy with that. You’re able to paint your army for whatever game you’re playing, or just painting whatever you enjoy. You’re proud of what you’ve accomplished.
The next phase is where you look at the work of others and begin to compare your work to theirs. I did this a lot.
In comparing myself to other painters I saw my flaws and how I had so much more to learn. I doubted my ability and it sapped my motivation to paint. There was no way I would ever paint as well as those other people!
It took years, but I started to let that inspiring work of other painters motivate me. Instead of seeing my failings, I saw what I could accomplish with enough practice.
That took me to the third phase, where I’m at now, where I continue to push myself as a painter. I’m always trying to learn new techniques. With every miniature I paint I try something new and experiment.
This has made me much happier with my work and given me something to strive for.
Trying Something Different
An element of improvement that I feel is often overlooked is simply trying something different. By that I mean to paint something outside of what you’d normally paint.
If you play Warhammer 40K, then try painting some miniatures from another gaming system. Maybe try painting a bust or a chibi.
By painting something you normally wouldn’t, especially if you play a game where you paint the same thing endlessly, you get a new perspective and the opportunity to try something different.
It’s very easy to get into a rut with painting. Personally, painting something different really opened my eyes. I painted hundreds and hundreds of miniatures for Warhammer 40K, but it wasn’t until I started playing Warhammer Underworlds when my painting really got better.
Warhammer Underworlds is a small skirmish game with warbands that range in size from 3-9 models. Once you buy a warband you have every model you need. There’s no need to keep adding to it.
It was refreshing to have so few models to paint, so I used it as a place to really try and push my skill level and learn new things.
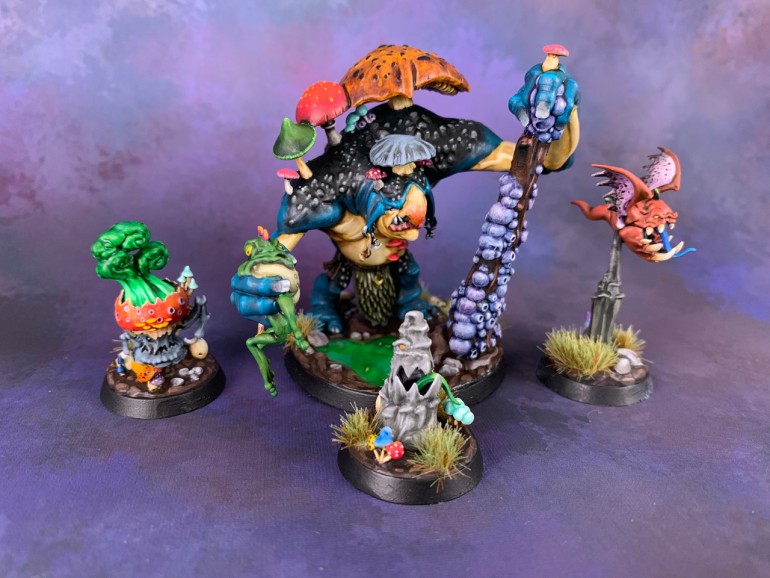
That’s a shot of Mollog’s mob. You can see it’s only 4 miniatures. Because of that I just goofed off and had fun with it. I played with colors I don’t normally use and techniques I was inexperienced with. It really helped me move forward in my painting ability.
Other Resources for Miniature Painting
There’s a lot of great resources out there to help anyone learning how to paint miniatures or looking to get better at it.
Something that will help you if you’re new to painting is my glossary of miniature painting terms. There’s a lot of acronyms and jargon used in miniature painting and that glossary will help you get an understanding of what it all is.
I have more tutorials here than I can feasibly link in one article. So, if you’re after something I haven’t talked about here, then do check out our tutorial section where we keep all the good stuff.
Other Bloggers
Miniature Hobby Tutorials is another site of mine. It’s a site that is a directory of tutorials submitted by fellow painters and hobbyists. You’ll find tutorials about basing miniatures, painting them, sculpting, creating terrain, and more.
Relating to painting tutorials and such, is an old site called From the Warp. The site hasn’t been updated in years, but Ron has a lot of really awesome tutorials that are very easy to understand that are still valuable all these years later.
I highly recommend checking that out if you’re a new painter. Lots of great stuff for veterans too.
A relative newcomer to the hobby scene is FauxHammer. Ross is a great guy and has a lot of articles covering a range of topics in the miniature hobby. He’s done a lot of comparison articles as well that are worth reading through.
Another person I know with a great site is Andrew with Tangible Day. Like my blog, and Ross’s, you’ll find some very insightful articles about painting, photography, and more. It’s a resource I recommend you check out.
Wargaming Tradecraft from Dave is also an excellent site for miniature painting. The depth Dave goes into on many of his articles is really second to none. He does an amazing job showing you how to do something, but also explaining why.
Those are my top picks for resources in miniature painting. I could give you a list the length of your arm, but I’d rather give you great resources that I can vouch for than a laundry list of everything out there.
YouTubers
There are a lot of amazing painters on YouTube and there’s no denying that videos are a perfect way to learn new painting skills.
One of my favorite YouTubers is Vince Venturella. He has some of the most thorough videos on various painting techniques I’ve come across. It was with the help of his videos that I got better with blending and had the courage to try painting NMM.
Another awesome YouTuber is Miniac. He creates awesome videos that do well to break down techniques and make them approachable. He also has the perfect personality for it.
The last YouTuber I highly recommend is Squidmar Miniatures. His channel is a bit newer than most, but his skill at painting is really incredible. He shows off his impressive painting skills, does painting tutorials, and has some all around awesome content.
Conclusion
My goal here was to help guide you to resources for miniature painting. It’s a pretty deep topic that we bloggers have written countless articles about. So, I hope you’ve found some valuable resources here.
I have an article on miniature painting supplies that will help anyone new to this hobby get started. That will give you a rundown on the basic things you should have for painting miniatures, as well as a list of premium tools that are great to have down the road.
For even more tutorials on miniature painting and the hobby in general, check out another site I have called Miniature Hobby Tutorials.
That site is where other painters, like myself, go and share our tutorials. It’s a huge directory with a ton of stuff worth reading. New articles are added all the time.
If there’s something you feel I overlooked, or something specific you’re after, then please let me know in the comments. I’d love to help everyone out!
Miniature Painting Techniques & Guides
Learn the basics, as well as the advanced techniques, of miniature painting.
I love painting miniatures and teaching people how to paint. I also really love blogging, so I've combined those two passions here.
- Creative Twilight’s Future and My Thoughts (Feedback Welcomed!) - December 4, 2021
- My Top Gift Ideas for Miniature Painters & Hobbyists + Gifts to Avoid - December 2, 2021
- The Year That Was 2020 and Where I’ve Been - January 17, 2021
I definitely agree with putting most* basing materials on before priming. The primer really helps hold them in place, and keeps you from ending up with a carrying case with a bunch of sand down at the bottom.
Also, Duncan looks really stoned in the thumbnail for the Thinning Your Paints video ;)
*Not stuff like static grass or scenic turf, but sand, pebbles, sticks, anything that’s going to get painted.
Yeah, there’s a level of common sense involved. I certainly don’t put snow on before I prime ;)
You’d think they’d have picked a better thumbnail. Poor Duncan. The man is a legend though.
The main point was that, for all other basing materials than those, putting them on before priming is a very very good idea. I was trying to reinforce your point, but maybe lost it by over-qualifying my statement ;)
And yeah, Duncan is awesome. I’m really, really not a fan of video tutorials, but he’s done a couple that work even for me.
I was just being silly.
I do like the GW video tutorials because they aren’t 20 minutes long. I usually just want a guide, not a thorough walkthrough.
Hey, thanks for the good article! May I ask where the medieval looking miniatures from the wash example are from?
Those are D&D miniatures. It was a commission job I did forever ago, so I’m not sure where my client picked them up. I’m pretty sure they are Reaper miniatures though.
You have no idea how helpful this is for a newbie like myself! I started learning painting by watching Sorastro… probably the worst way to start! Amazing skills but far above where I am right now. Thank you!
I’m glad you found it useful!
Yeah, there’s some amazing painters out there. It’s incredible to see what they’re creating, but definitely not ideal as a starting point for your own journey.
This article is extremely helpful for those looking into beginning miniature painting. As a beginner myself the way this article discusses not only materials, techniques and basics to basing shows me the many ways I can improve my own painting.
Glad you found it useful. I tried to cover the things I’d have wanted to know when I got started painting.