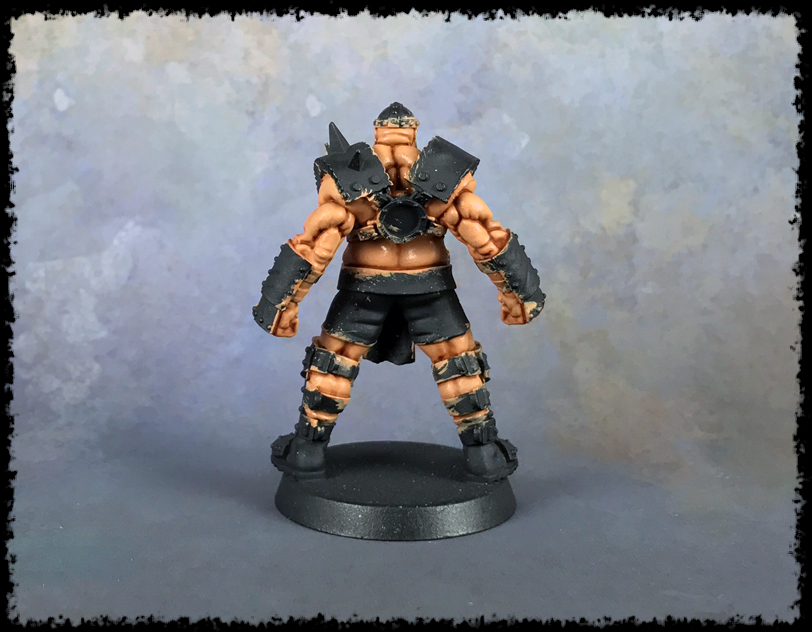
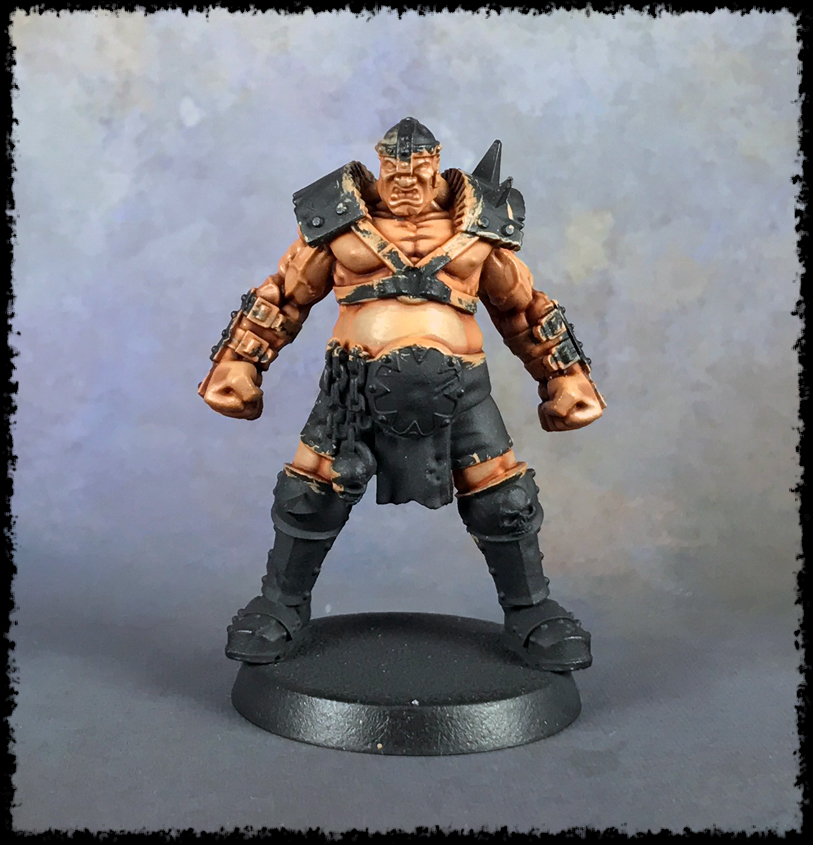
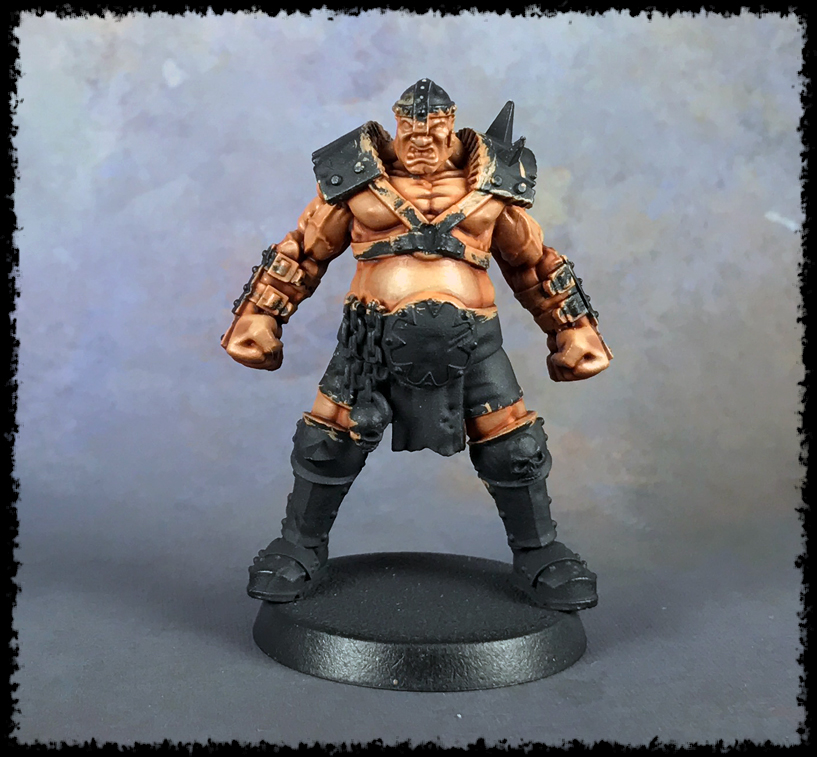
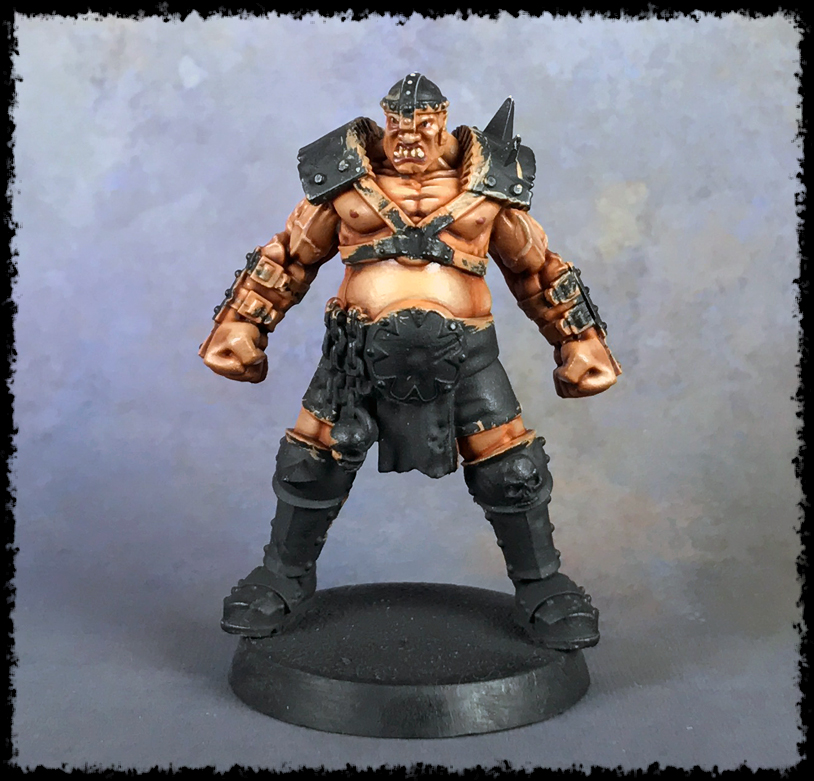
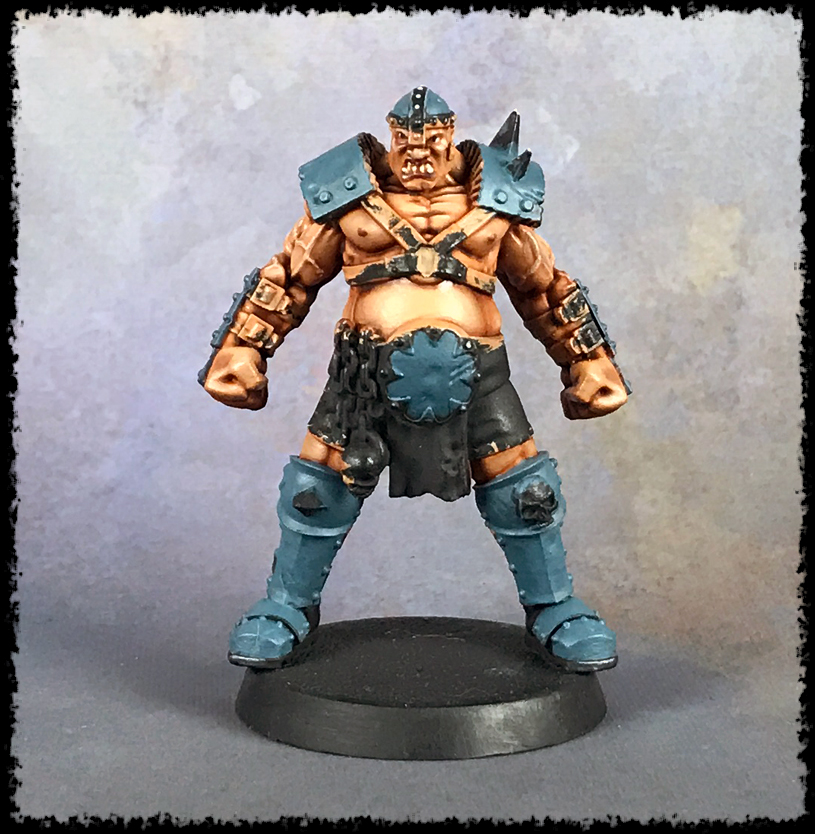
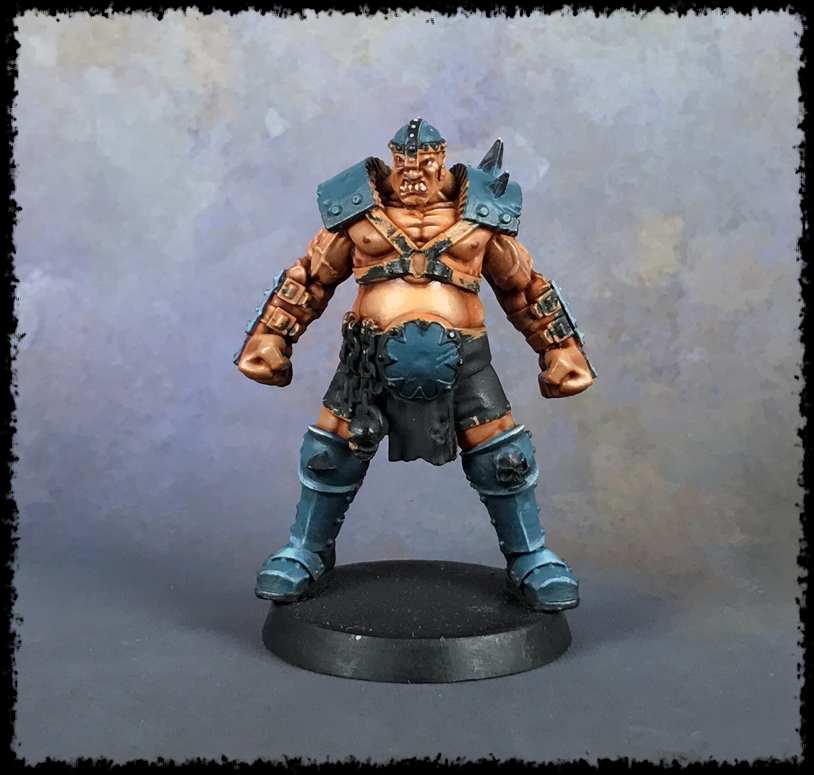
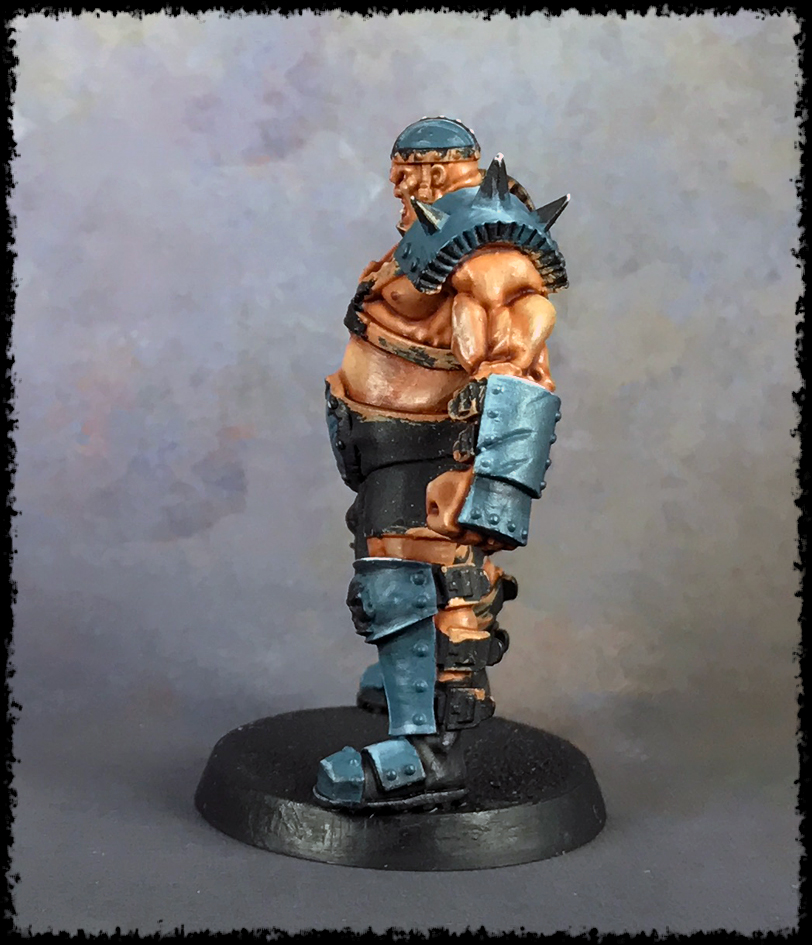
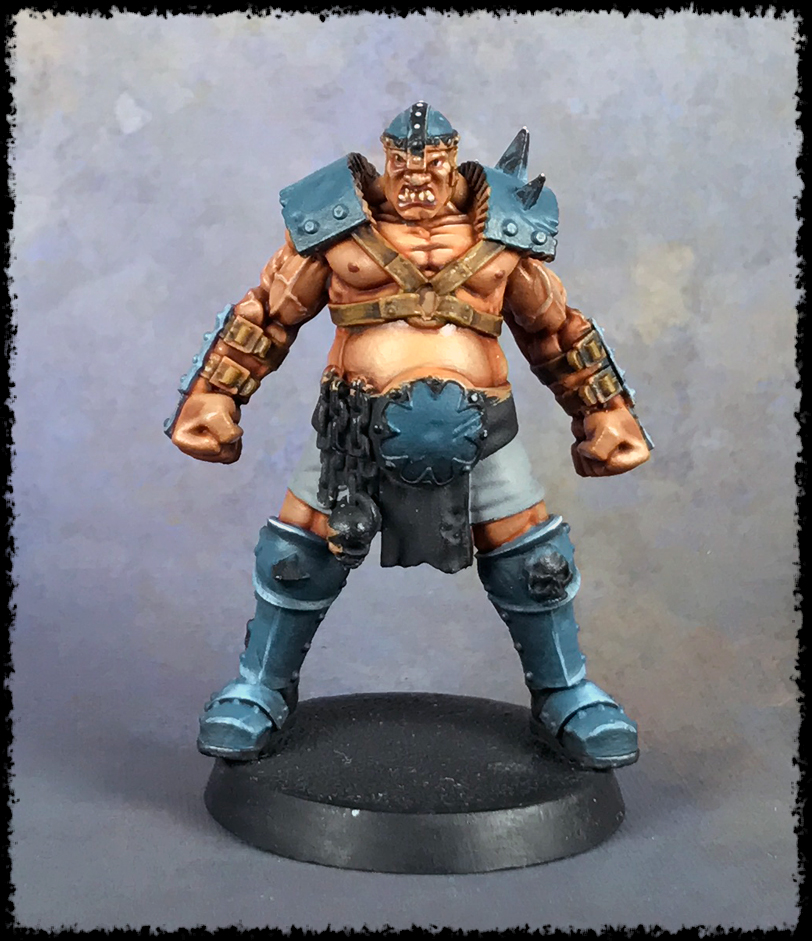
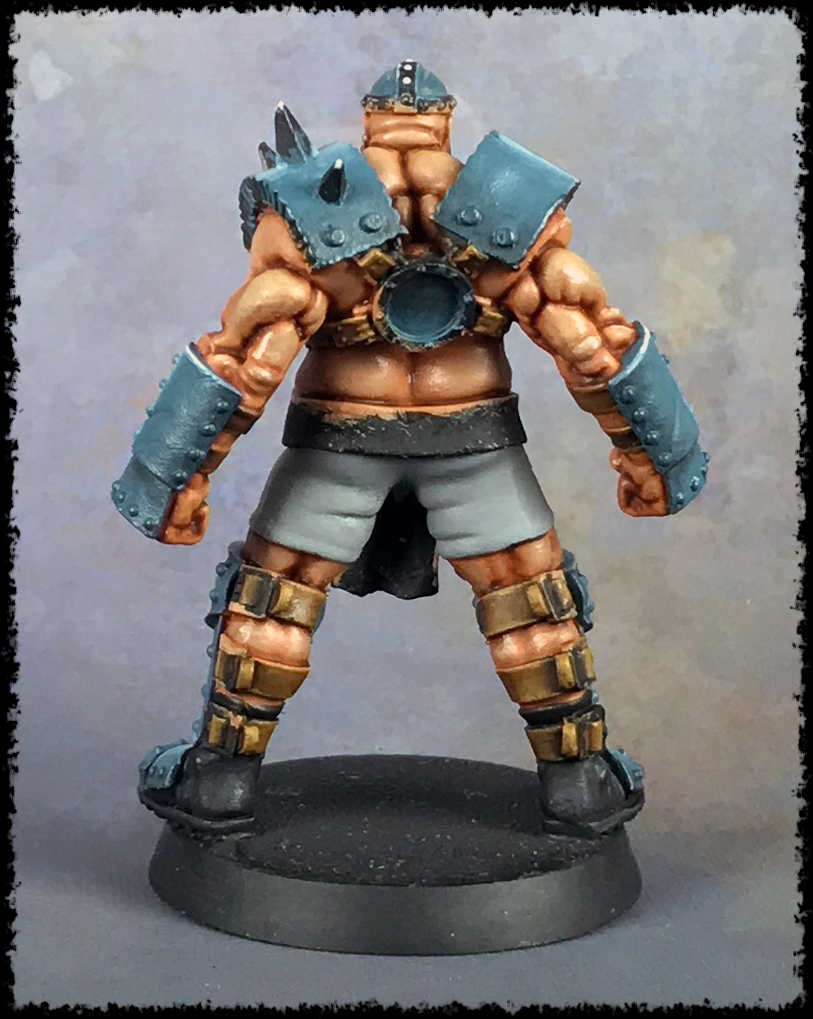
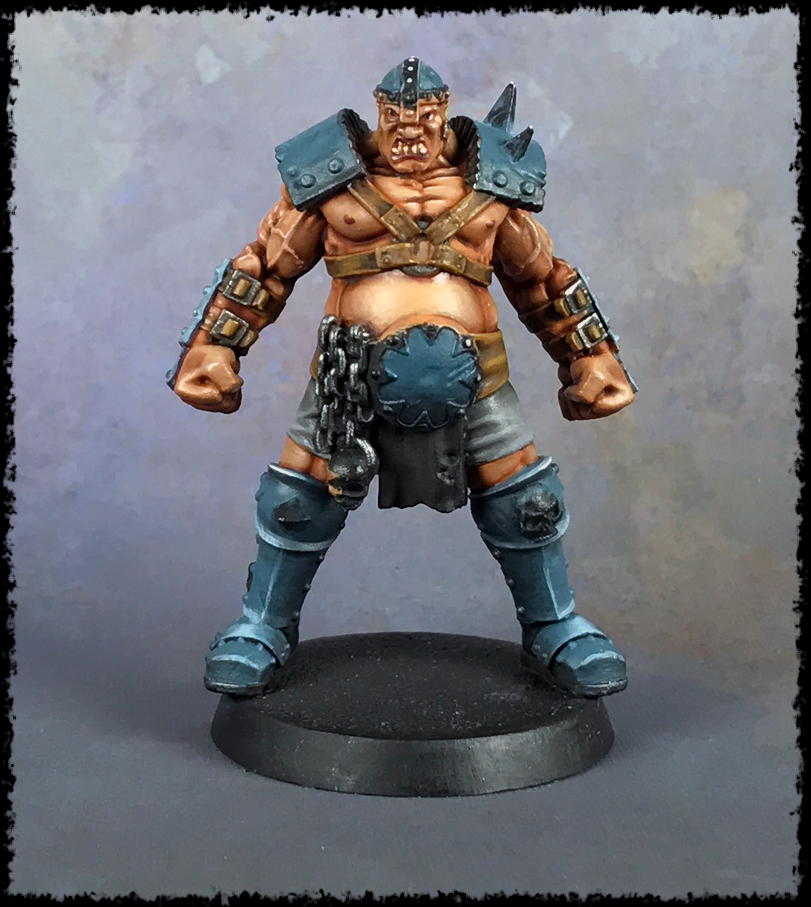
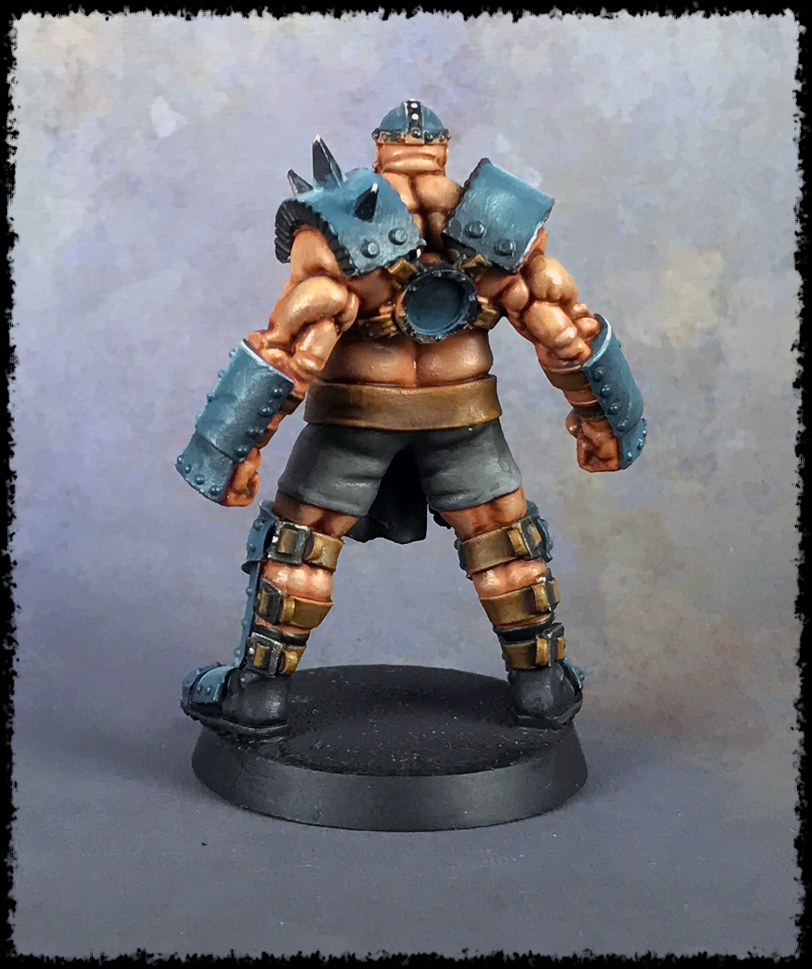
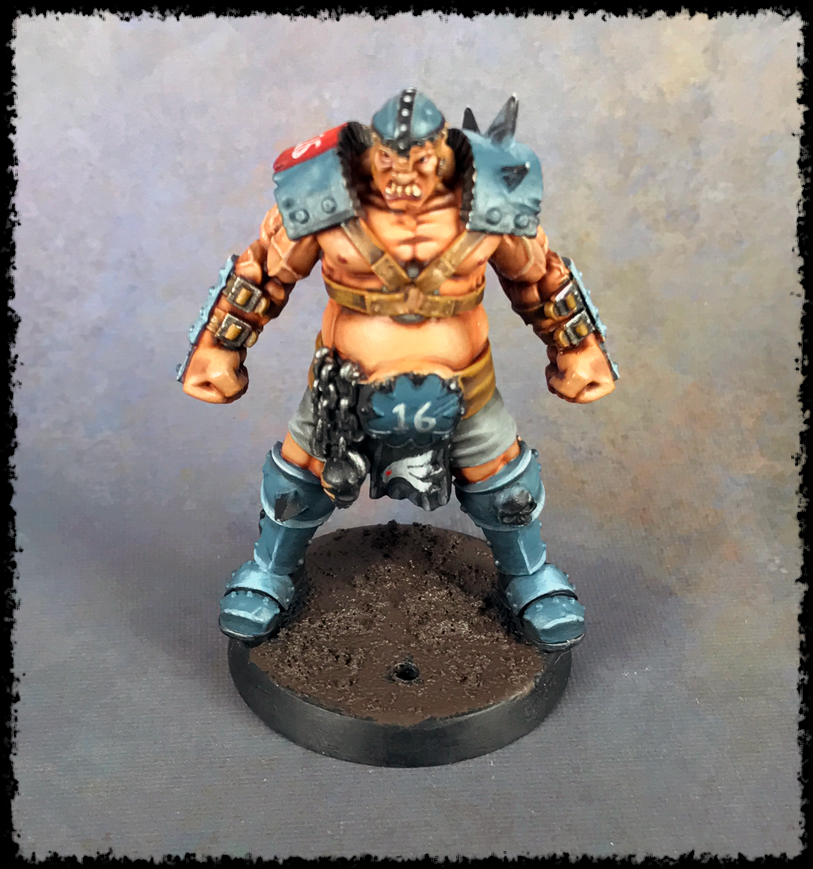
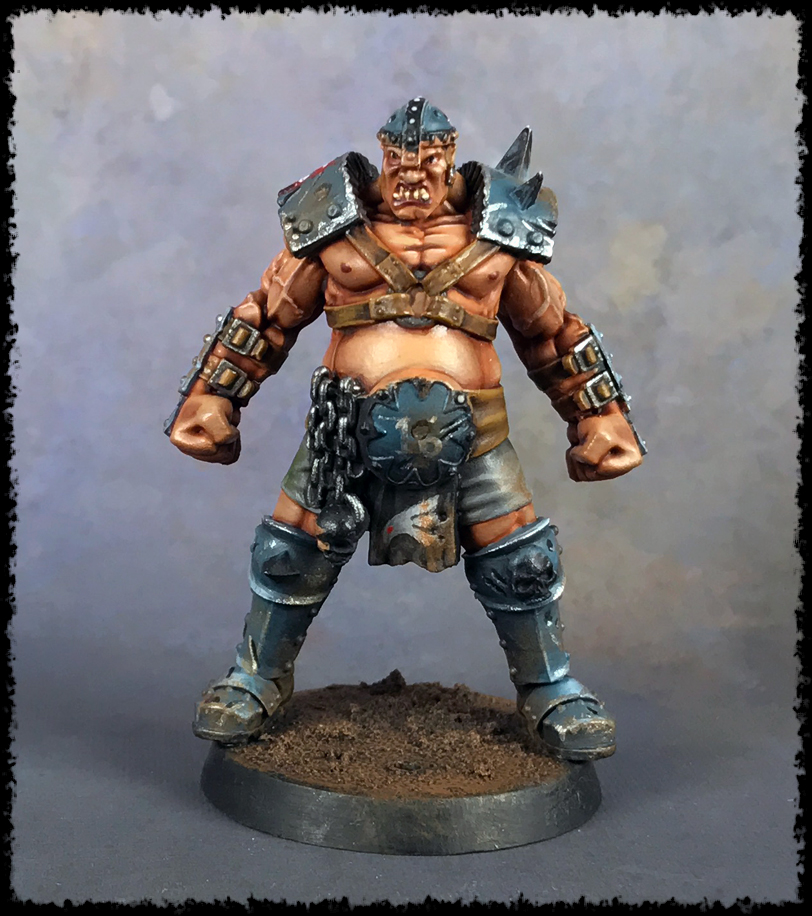
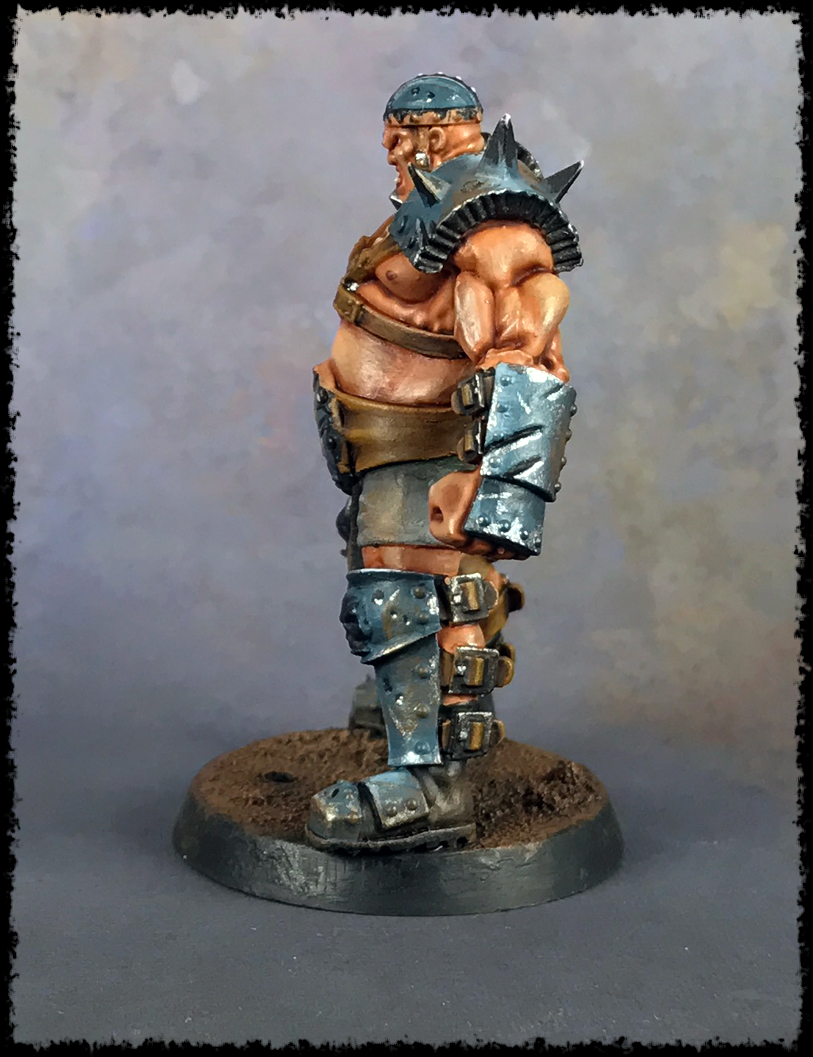
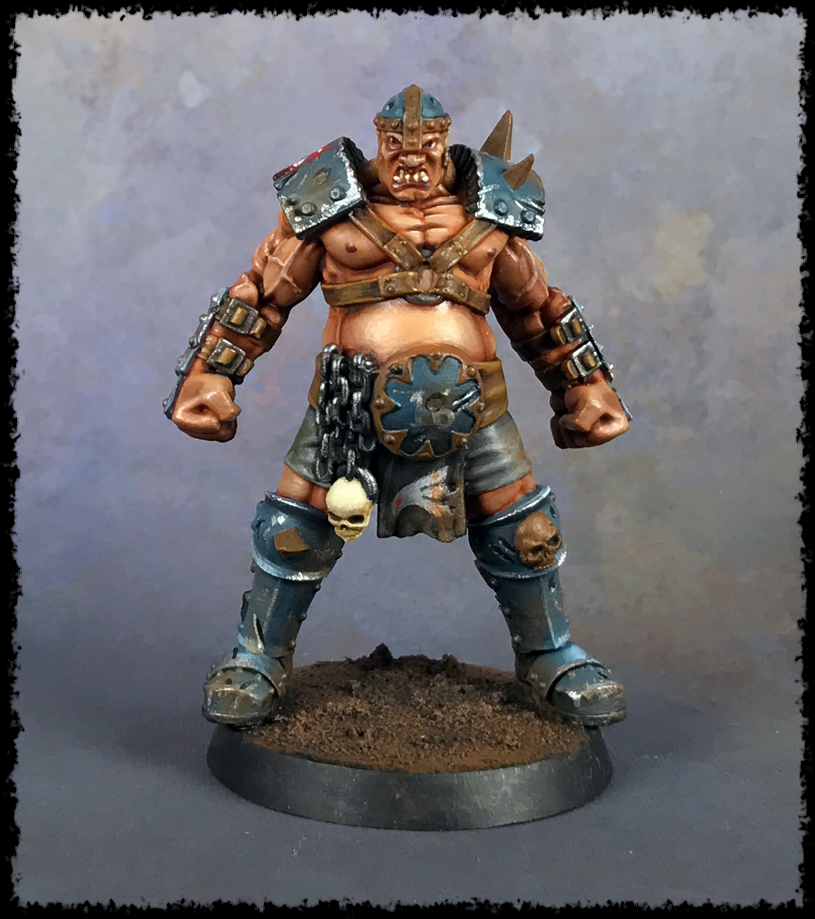
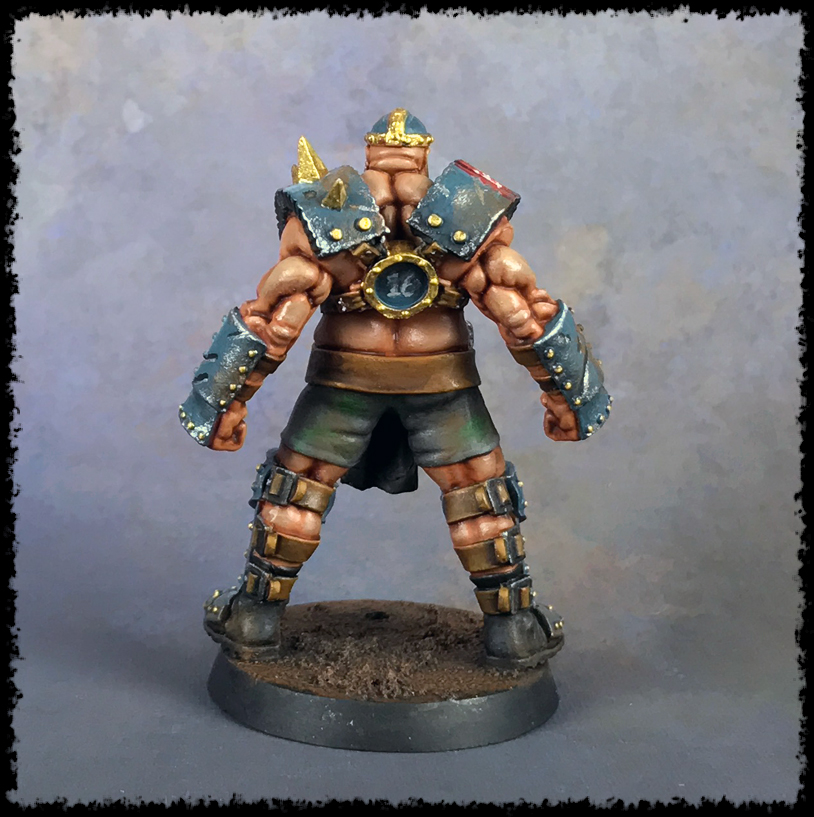
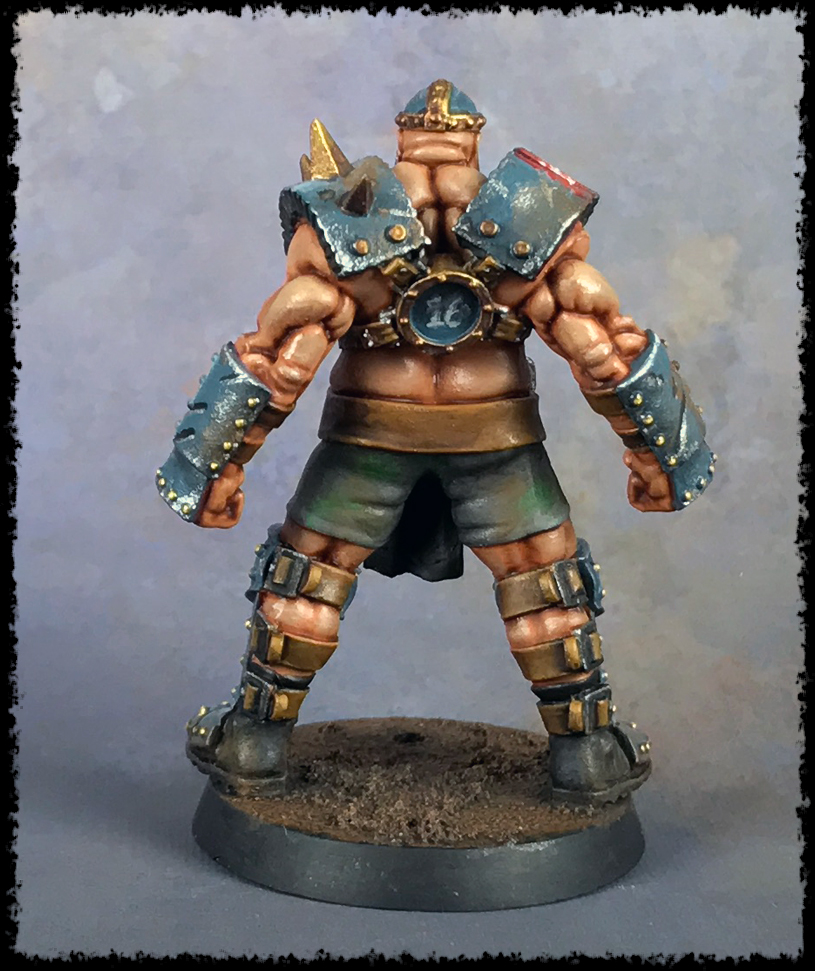
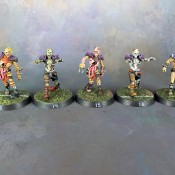
I’ve put together a painting tutorial for the Blood Bowl Ogre I painted for my Human team, the Titan Bay Thunderhawks. It’s the Blood Bowl Ogre I reviewed recently by Hungry Troll Miniatures.
Now, normally I wouldn’t do a painting tutorial for something specific, like my Blood Bowl team, but I figure there may be something of interest in there regardless. Even if you aren’t painting to match my team’s scheme – my approach, technique, etc., could be of value hopefully.
Blood Bowl Ogre Painting Sections
I’m going to break this down into different parts, but all the parts are all in this one article. That way you can easily come back to this later and know where you left off. I figure it’s easier than separate articles for each element.
Oh, if you stumbled in here looking for Blood Bowl information then I have that too :)
Disclosure: Some of the links below are affiliate links, meaning, at no additional cost to you, I will earn a commission if you click through and make a purchase. The commission earned helps maintain this site.
Part #1 – Painting the Skin
I’m going to be honest, skin has never been my strong suit. Typically I base coat the skin a flesh color, wash it, and call it a day. There’s very little skin to be seen with Chaos Space Marines. However, I wanted to step it up with this Blood Bowl Ogre because he has so much skin showing that anything less would just ruin the model.
Note: Click any image to make it larger. I’m showing them smaller because there’s a ton of them, and I don’t want it to take 2 minutes to load this tutorial :)
Step #1 – Base Coating
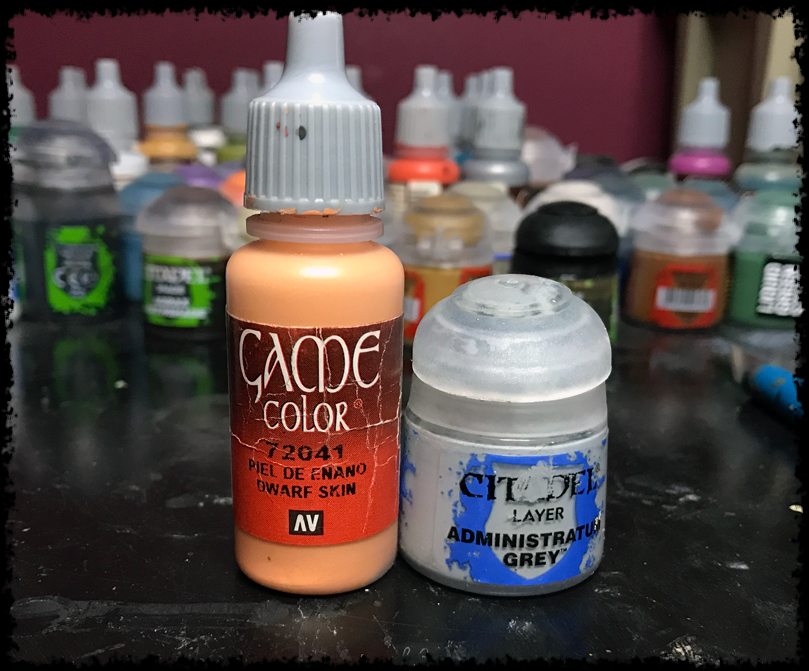
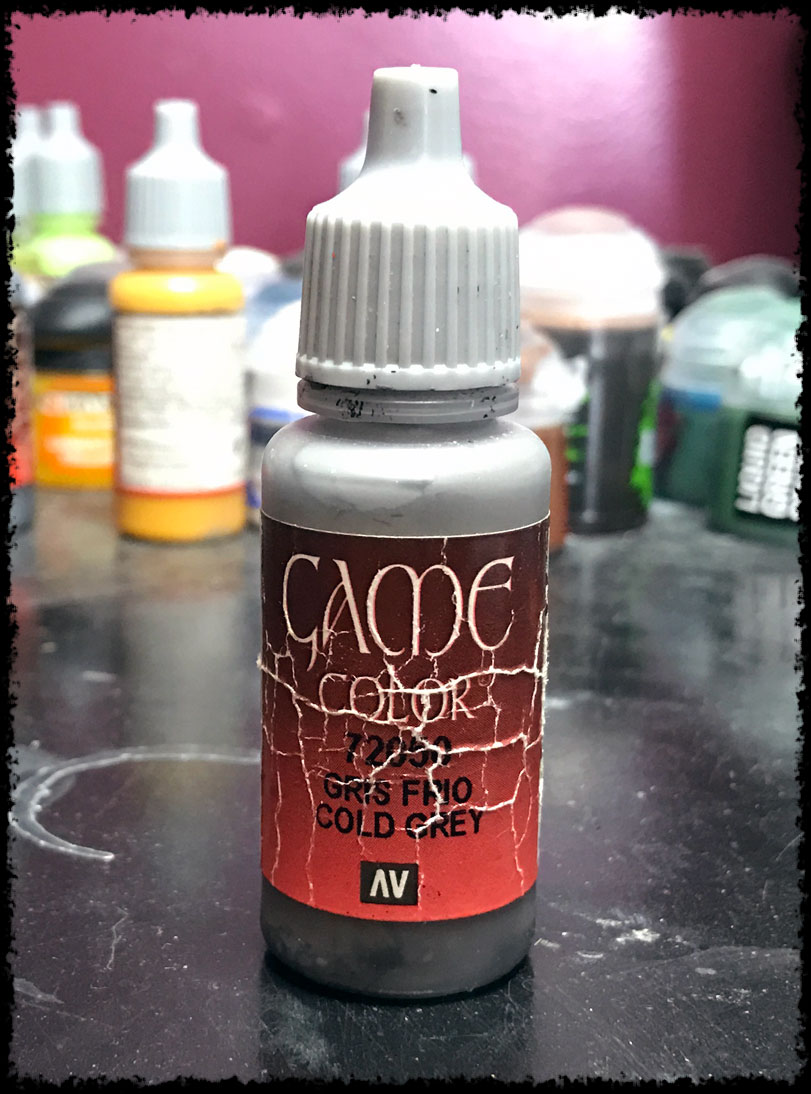
I started out by using Dwarf Skin (Vallejo), mixed with Cold Grey (Vallejo). The mix was roughly 3-1 Dwarf Skin to Cold Grey. The idea with the grey is to remove some of the orange tint from the Dwarf Skin paint to get a more realistic skin tone.
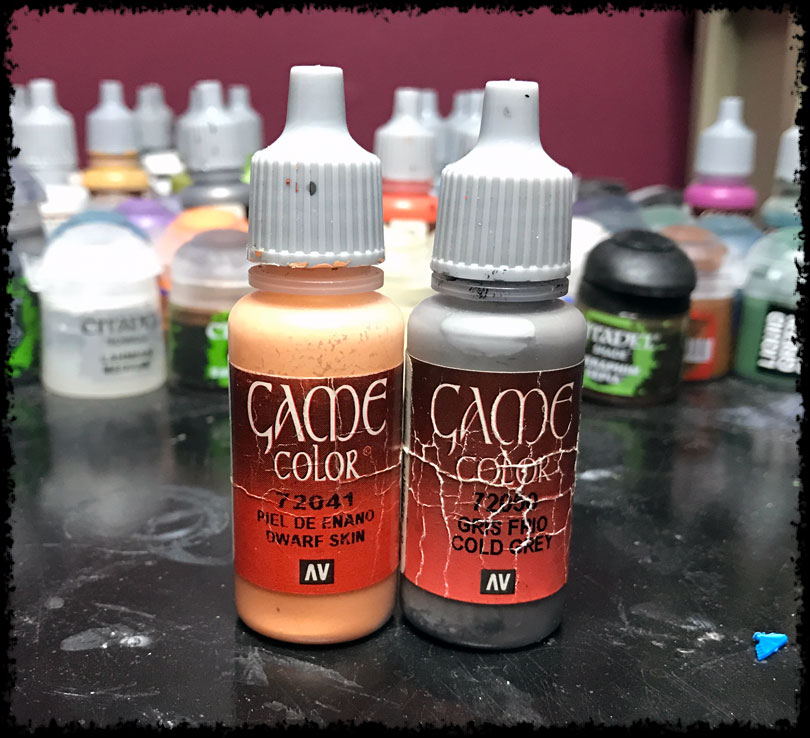
Then I went about base coating the Blood Bowl Ogre’s skin.
You can see how the grey removed the orange from the Dwarf Skin color.
Step #2 – Let’s Get Glazing
Next up is glazing the skin for my Blood Bowl Ogre. If I were aiming for easy, like I mentioned previously, I could just wash the skin. That would give it depth and pick out the details. However, I’m going to glaze the skin instead.
Glazing, if you aren’t familiar, is like using a wash. The difference is that a glaze is thinner, flows more evenly, and the idea is to tint the color it’s going over. It also doesn’t leave the streaks that wash can sometimes. You aren’t going as heavy with the glaze as you would with a wash. I will be glazing a bit heavy to force it into the recesses, like a wash, but you’ll see that a glaze is far more controlled than a wash is.

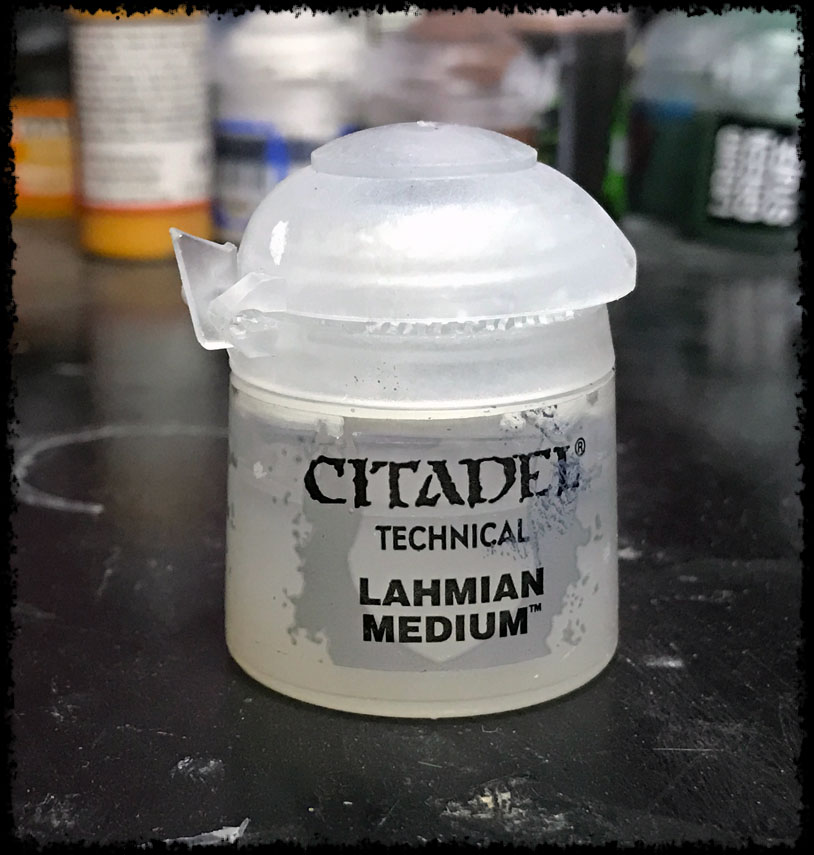
To make the glaze you simply mix in Lahmian Medium with Reikland Fleshshade. I go do a 50/50 mix to create the glaze. The Lahmian Medium will thin out the Reikland Fleshshade, and give me more control over using it.
There are other ways to make a glaze. Some people just use water, others use a flow improver. I have used those methods in the past, but once I discovered the Lahmian Medium I never looked back. It’s one of the best things that Games Workshop has created in their paint line.
When you apply the glaze you want to be sure it goes on smoothly and evenly. Unlike a wash, the glaze will move around easily, and it won’t really build up on the surface and create staining like a wash does.
Painting Tip
I once took a painting class with Golden Daemon winner Todd Swanson, and learned one of the simplest, and most valuable, lessons with blending. When you’re blending, which includes glazing and washes, the first place you set your brush on the model will have the least amount of paint come from the brush. Where the brush stops on the model will have the most amount of paint from the brush.
So, when you’re blending/washing/glazing, you start the brush at the brightest area of the model and work it towards the darker area of the model.
In practice, on the Blood Bowl Ogre I would start the brush at the top of the face and work downwards. On the arms, I started on the shoulder and worked down the length of the arm, pulling the brush into the recesses created by the muscles. Make sense? Just work the brush towards the darker areas on the model.
Step #3 – Layers
The best way to give depth to something is to create layers. So, once the glaze had dried I came back in with my skin base coat color. I added another layer of the skin tone to the higher areas of the model very thinly. I left the deeper areas alone, leaving the glaze to shade it, and built up the skin color again.

Step #4 – More Layers
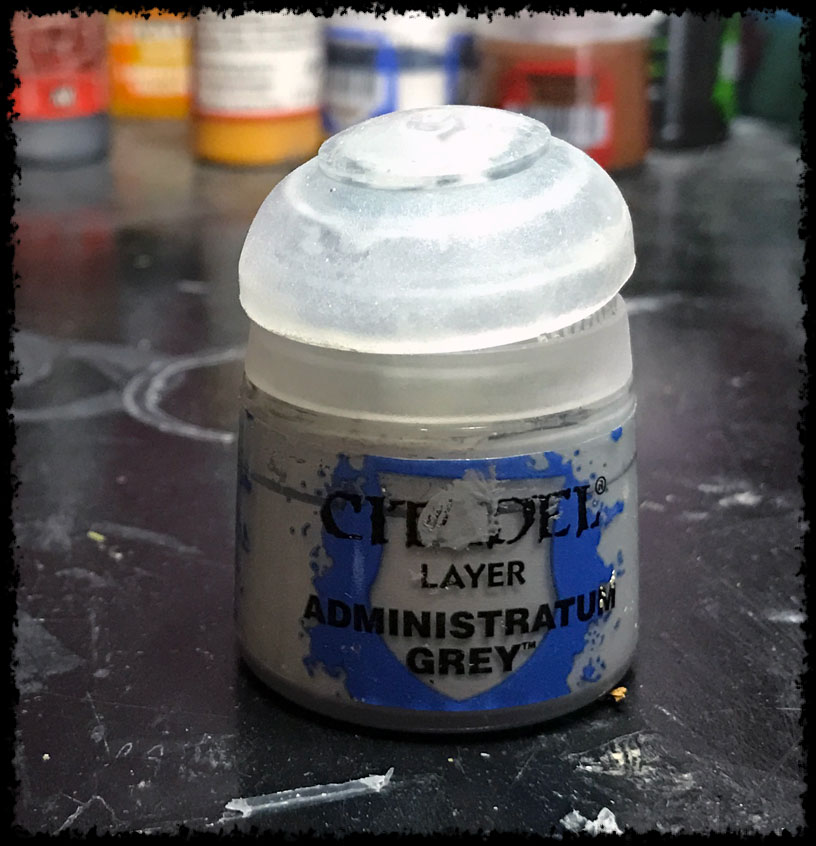
I needed to brighten the skin up in areas on my Blood Bowl Ogre, so I took my Dwarf Skin and mixed in a lighter grey this time, Administratum Grey. The ratio is still 3-1 Dwarf Skin to grey.
I took the brighter skin color and picked out the highest areas of the skin, and I left the deeper areas alone. I made sure to leave some of the previous layer showing.
The paint is kept thin by leaving the brush slightly damp, but I’m really just layering it on thinly, not blending it at this point. You’ll notice the transition isn’t smooth, but that gets dealt with later.

Step #5 – Blending the Skin
I used the same glaze I had made earlier (Lahmian Medium + Reikland Fleshshade), I then glazed over the skin. The glaze tints the layer of skin I just did, but also blends it into the previous layers. That’s why I wasn’t too concerned with blending the layers of skin, the glaze does that for me.
This process is repeated a few times. Mostly I focused on blending the layers of skin together. So, I didn’t glaze over everything. Instead I focused the glaze on the seams of the skin layers. This is where my previous painting tip above comes in really handy.
Since I was blending at that point, I didn’t load up my brush with a lot of glaze. I put very little on my brush, almost nothing, and went over the areas that needed to be smoothed out. This takes a few times, but keeping the glaze thin, and doing multiple coats, really smooths out the skin.
Here’s some shots of the glazing on the Blood Bowl Ogre. You’ll notice each time it gets a bit better. I know they all look identical, but that’s the trick with blending – smooth and subtle changes until it’s right where you want it.
Step #6 – Wrapping it Up
The skin is almost done at this point. The next step is to get some extreme highlights on here. For this I use Pale Flesh (Vallejo).
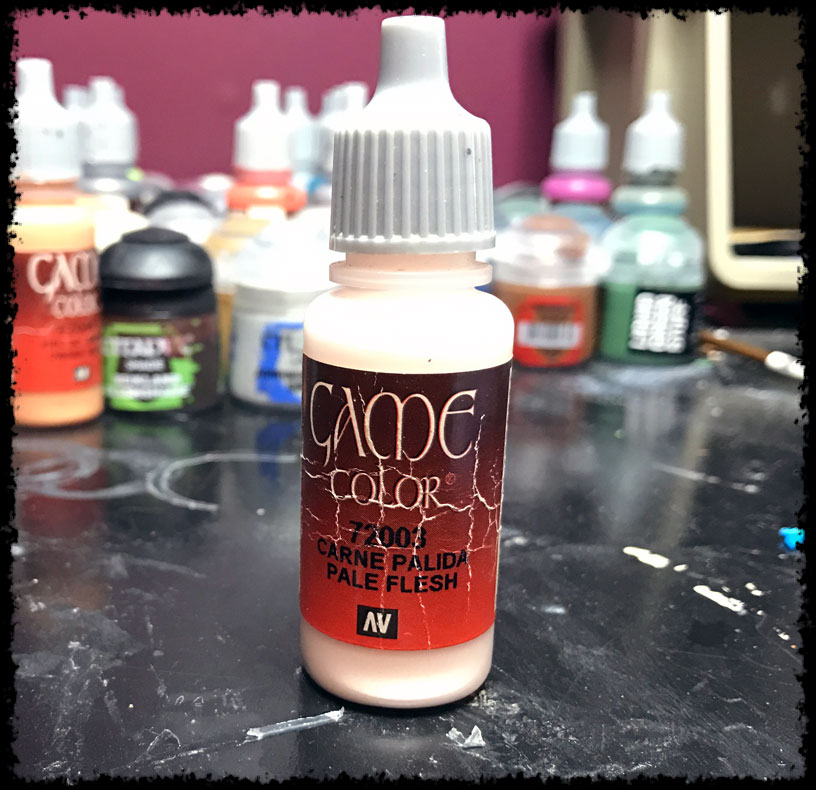
This paint goes on very select few areas; just the points on the skin that would have the most light – be the most reflective. On this Blood Bowl Ogre that would be his elbows and knuckles. I also apply it to the veins in his arms. Not that the veins are reflective, like skin stretched tight against bone (IE: knuckles), but they stand higher on the skin, so they need some separation. Again, this goes on very thinly.
I then took the glaze and lightly went over this layer as well, again to blend it into the previous layers.
The other thing I did was to darken his nipples, lips, and pick out his eyes. For this I used Carroburg Crimson, which is a reddish-purple wash.
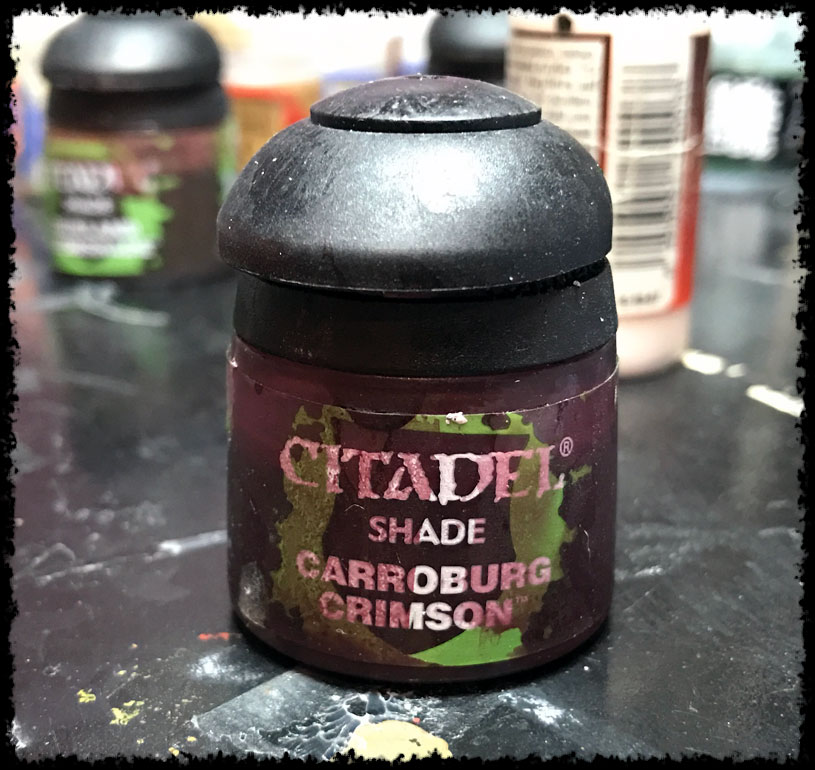
I applied this in multiple thin coats to those areas until I was happy with the color.
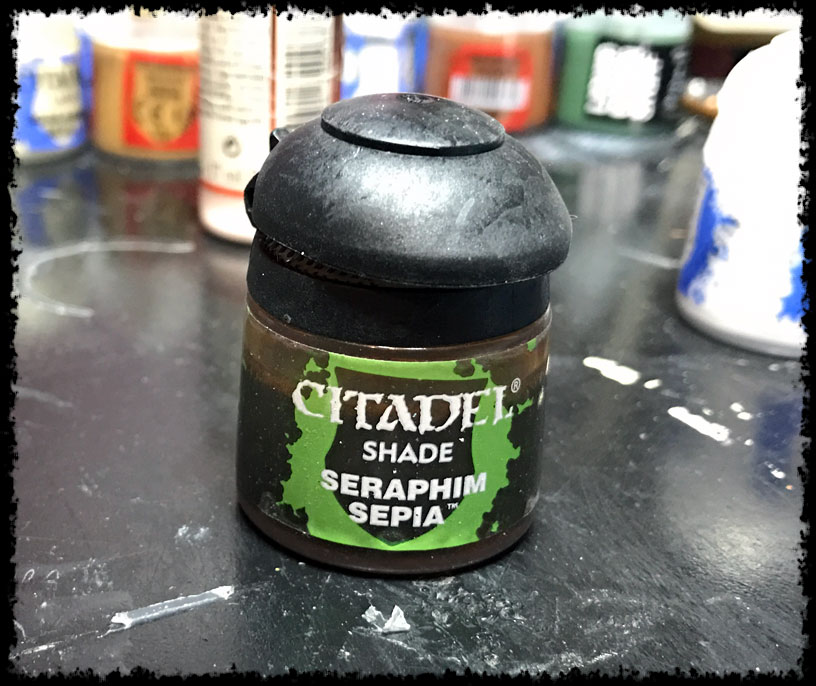
Also, I did the teeth. For the teeth I picked them out with white, washed them with Seraphim Sepia, and then picked out the top parts of the teeth again with white.
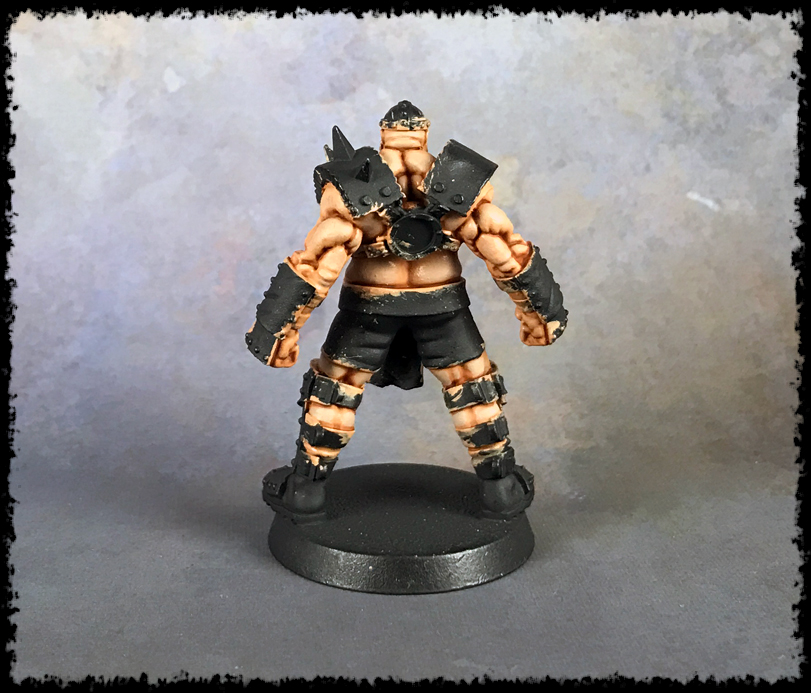
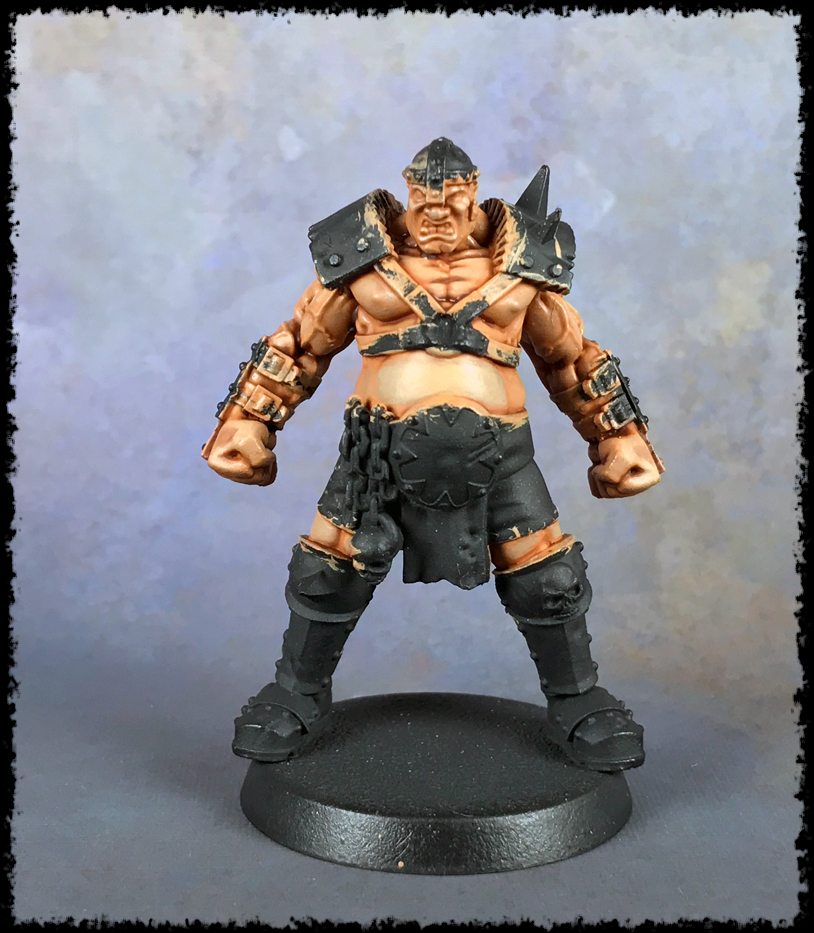
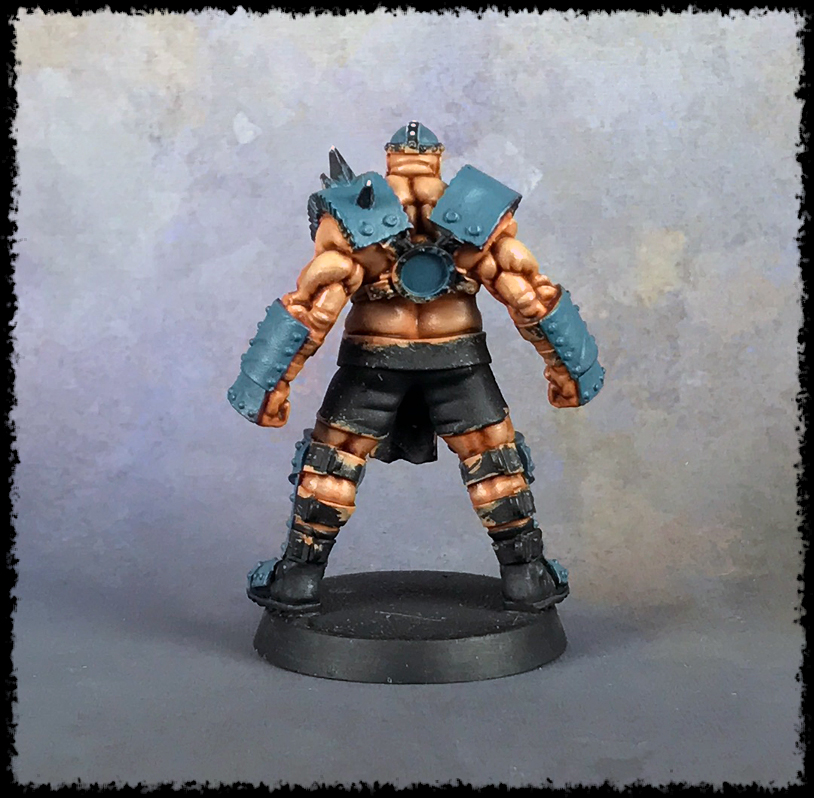
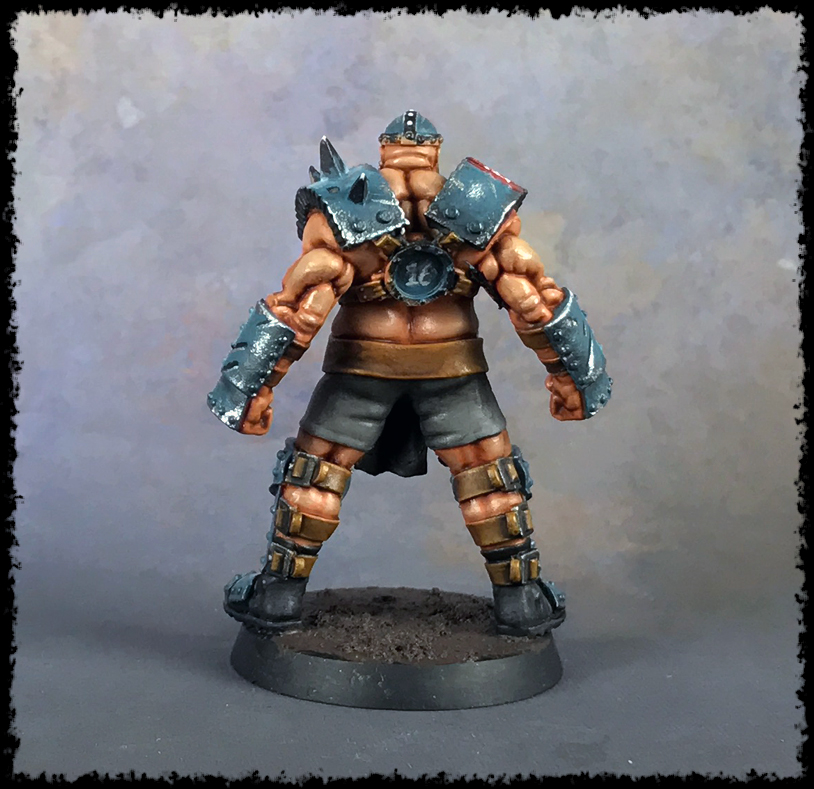
Here’s all those final details put together on the Blood Bowl Ogre.
And the skin is done!
Skin Thoughts
The skin on the Blood Bowl Ogre was honestly the longest part of the entire process. As I said in the opening, I’ve done very little work with skin, which is one of the reasons this process was as long as it was. I imagine, with experience, that I could have gotten the same results quicker and easier, but it’s a learning experience every time you paint, or it should be.
You should always be pushing yourself as a painter, trying something different, attempting a technique you feel is out of reach, because that’s how you improve.
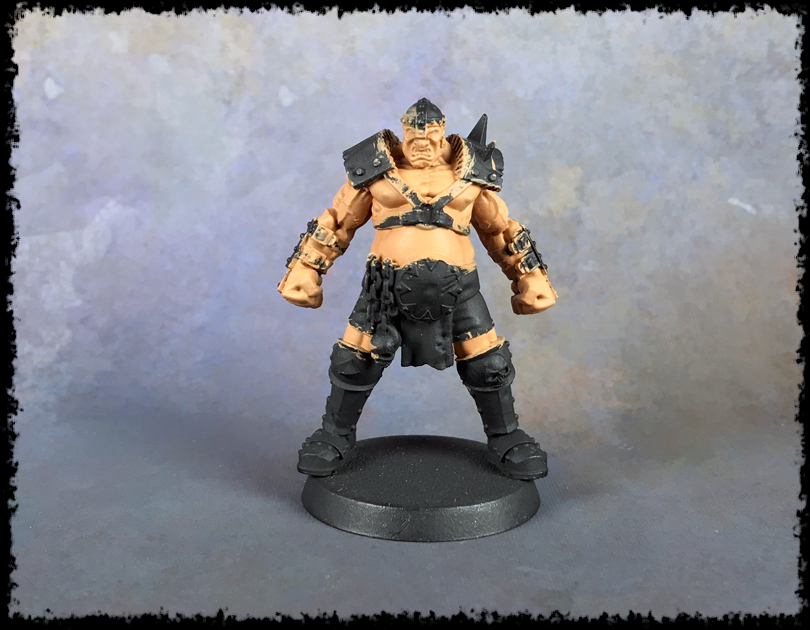
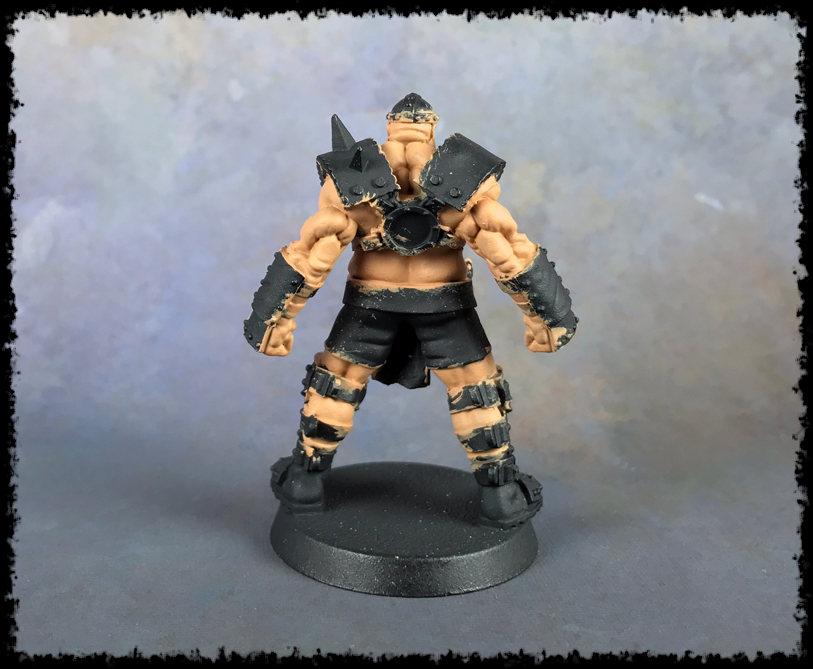
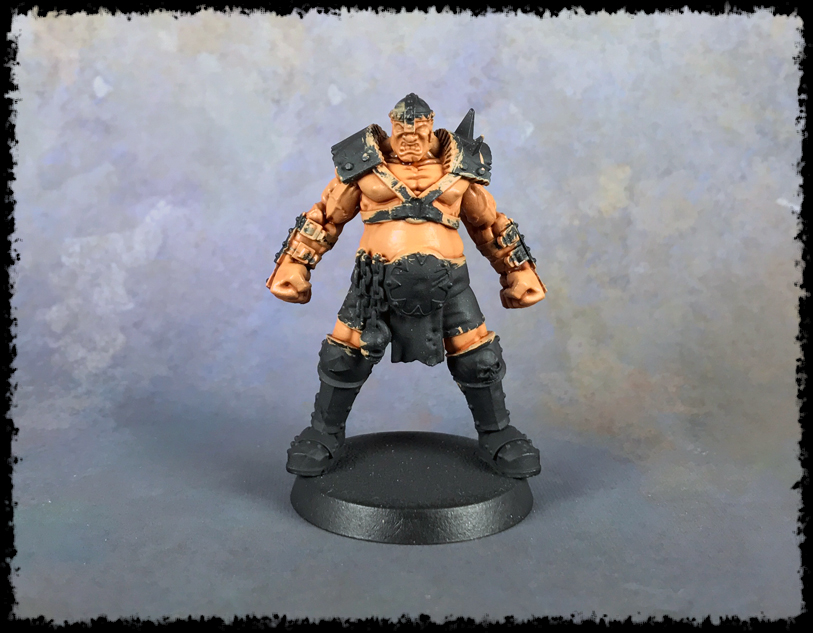
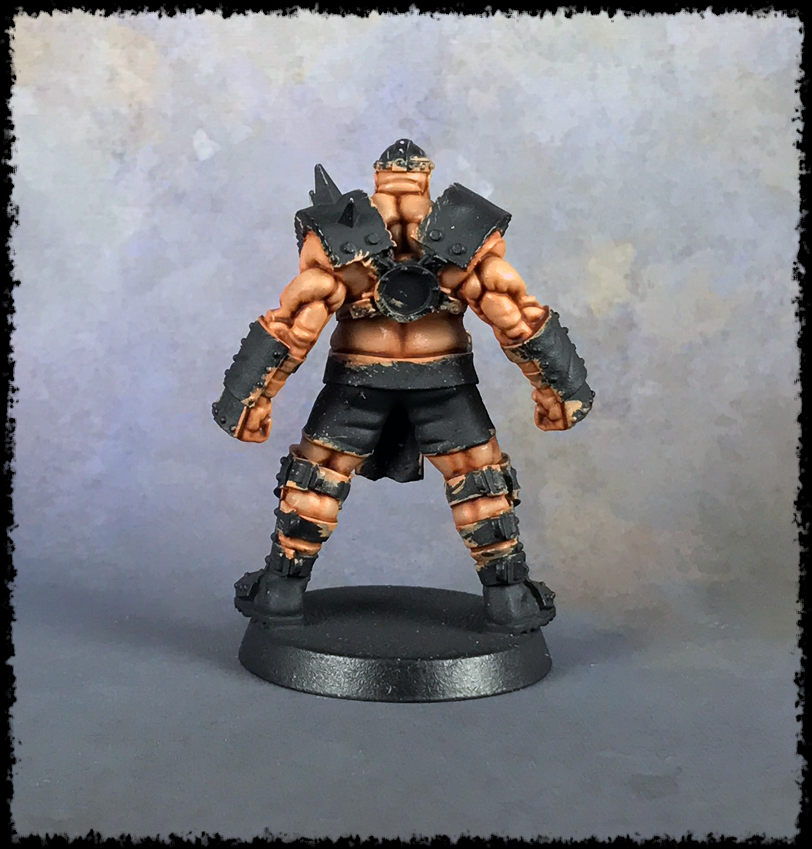
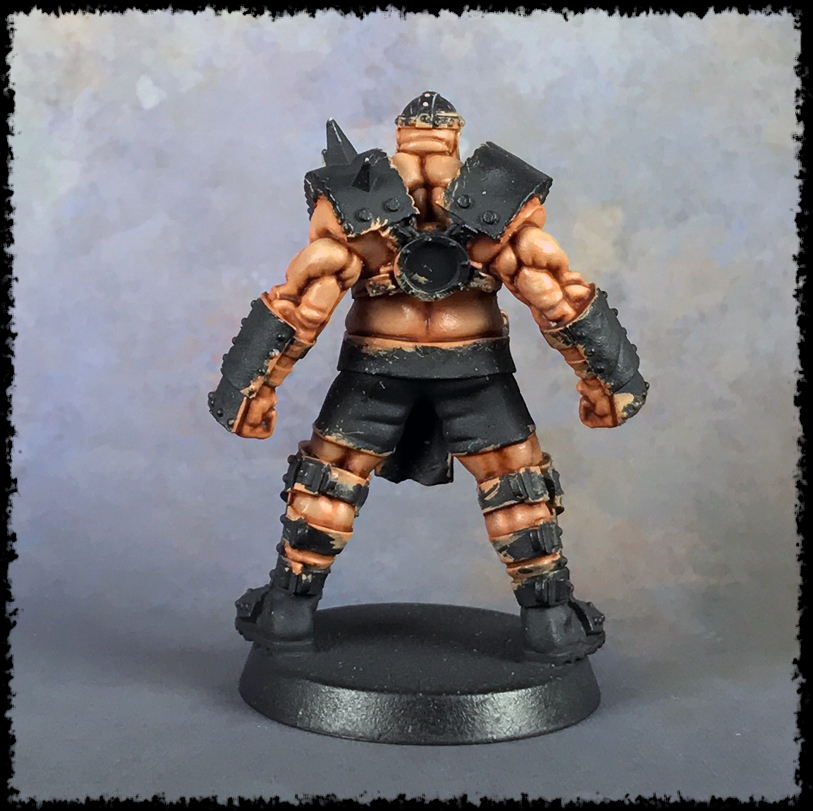
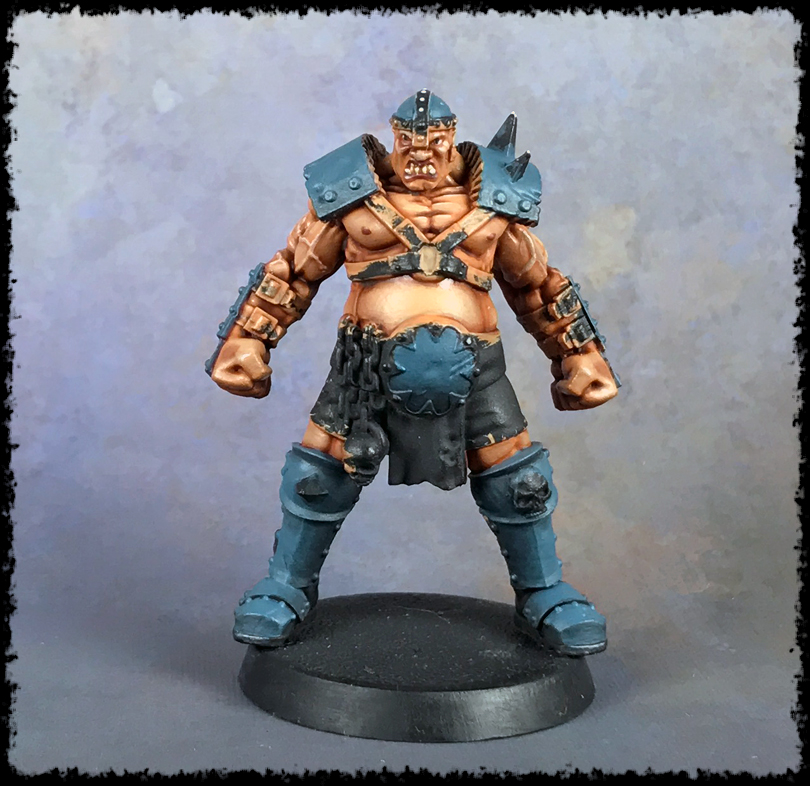
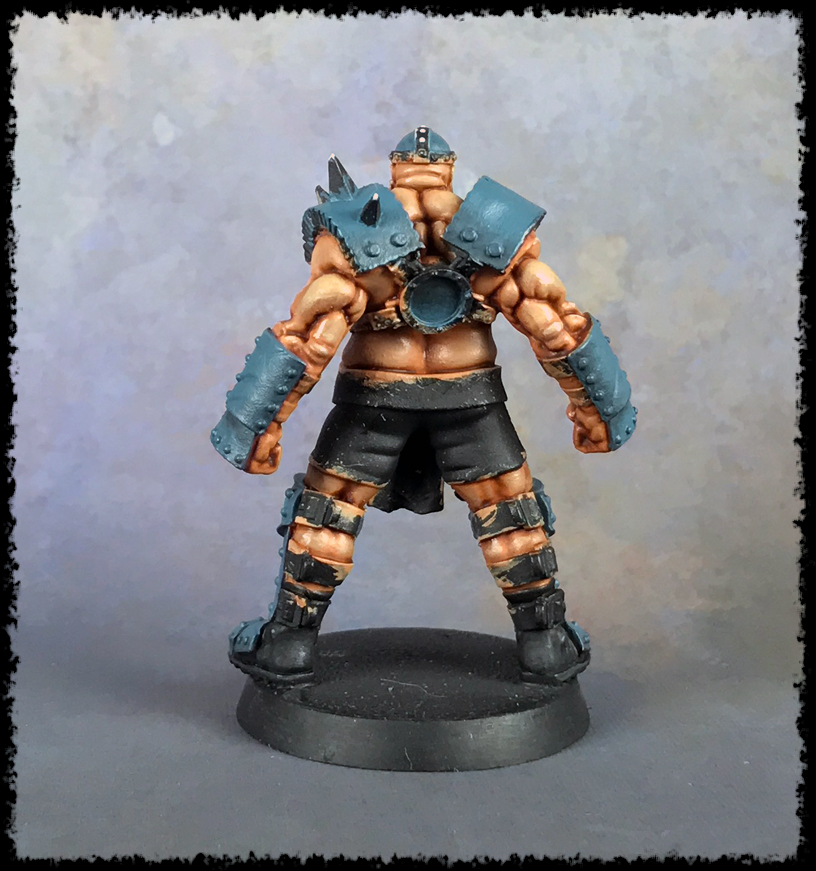
Part #2 – Armor, Leather, and Cloth
Now that the Blood Bowl Ogre’s skin is painted, it’s time to move on to the armor, and everything else really. The skin was the most time-consuming single element on the entire model, so the rest of this will fly right by.
Seriously though, the armor, leather, and cloth parts are very easy compared to the first part of this series. At the end of everything I will be doing some damage on the armor, and some dust, so perfection isn’t required since the damage can be used to hide any big mistakes.
I apologize ahead of time with things jumping around a bit below. This is the first real painting tutorial I have done, so it was hard to break my slightly chaotic painting nature for the sake of documenting the process.
Note: Click the images for a larger view.
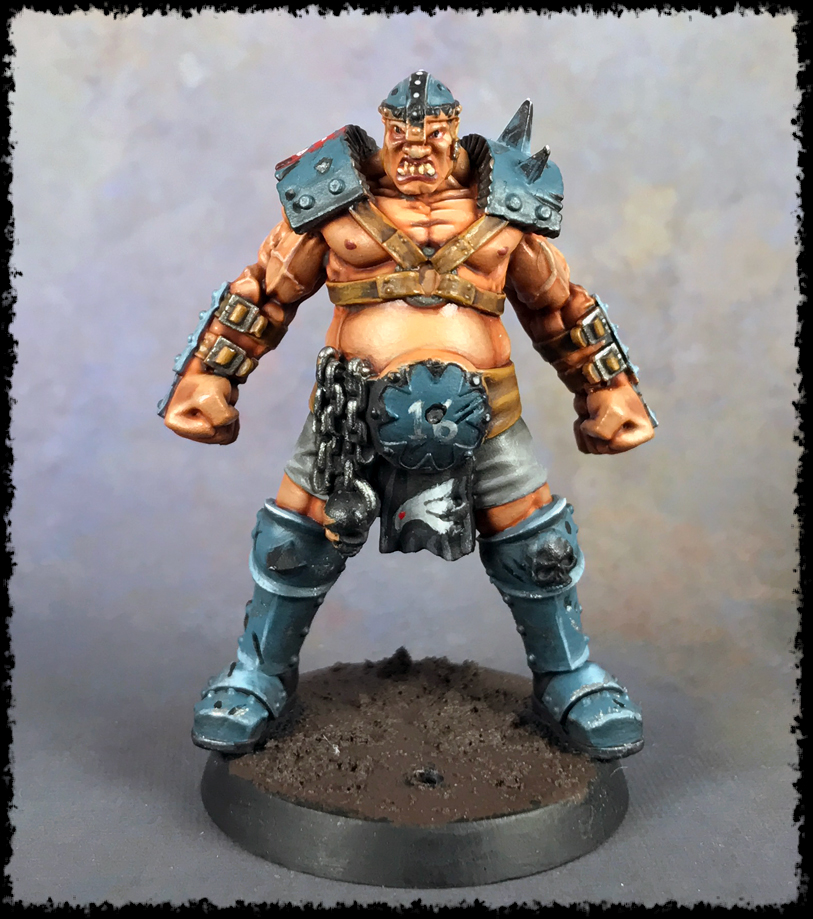
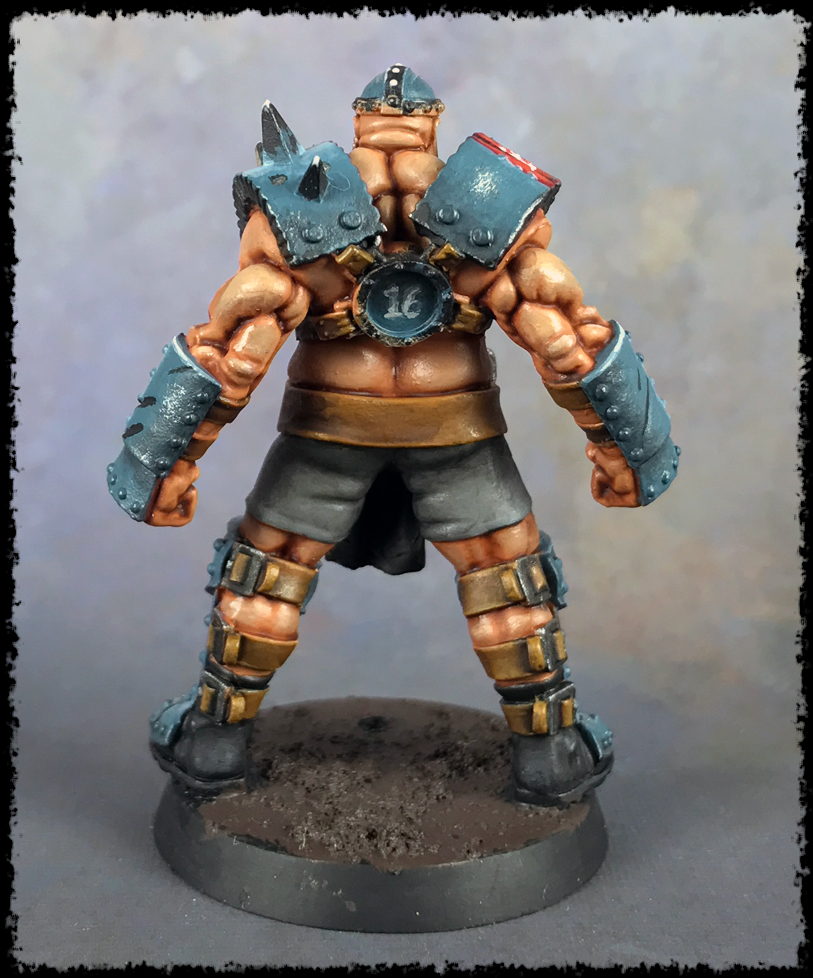
Painting the Armor
There’s 4 paints I use for the armor, as well as a wash.
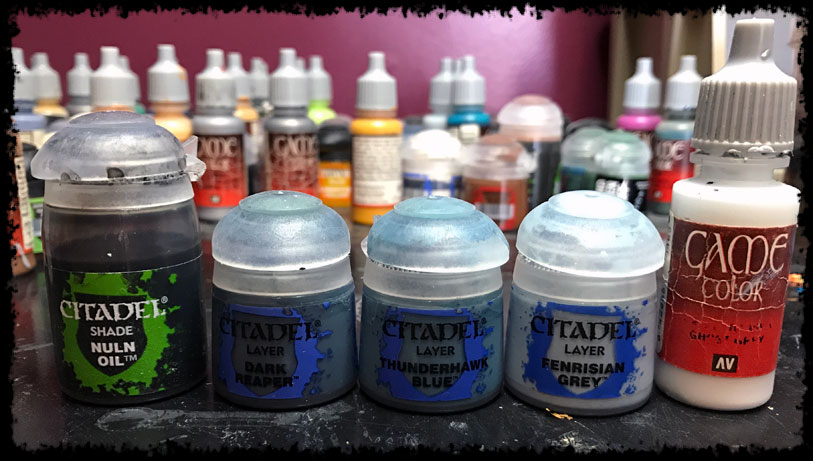
The primary color of the armor is Thunderhawk Blue, so the Dark Reaper is used as a shade, as well as the Nuln Oil. The Fenrisian Grey, and Ghost Grey are used for the highlights. My basic rule is to have 2 colors darker than your intended color and 2 colors brighter.
Step #1 – Base Coating
I used the Thunderhawk Blue to base coat all the armor. Simple stuff.
The areas left black, like the spikes, skull on the knee, etc., are going to be gold, which is covered later.
Step #2 – Shading the Armor
Now for some shading. The first step in the shading is to use the Dark Reaper. This color is very close to the Thunderhawk Blue, so it’s perfect for the first shading layer.
For this step I paint the Dark Reaper on straight. Once the areas are covered that I want to cover, I then thinned the Dark Reaper down a bit to blend it into the top layer, the Thunderhawk Blue. The Lahmian Medium is great for this step, to thin down the Dark Reaper, but you can use just water too. That’s what I did since the transition blend is very easy to make where the colors are so similar.
The blending, as I said in the skin part of the series, is done by starting your brush on the lighter area, and dragging it towards the darker area. So, I started the brush on the Thunderhawk Blue and pulled towards the Dark Reaper, back into itself. This is repeated over and over for a few layers until smoothed out. Don’t try to do it in one layer.
Painting Tip: To work out where the shadows will be, as well as the highlights, put the model underneath a light source. You’ll see where the light naturally reflects from for highlights, as well as the areas that get little to no light. Those darker areas are where the Dark Reaper goes.
Step #3 – More Shading
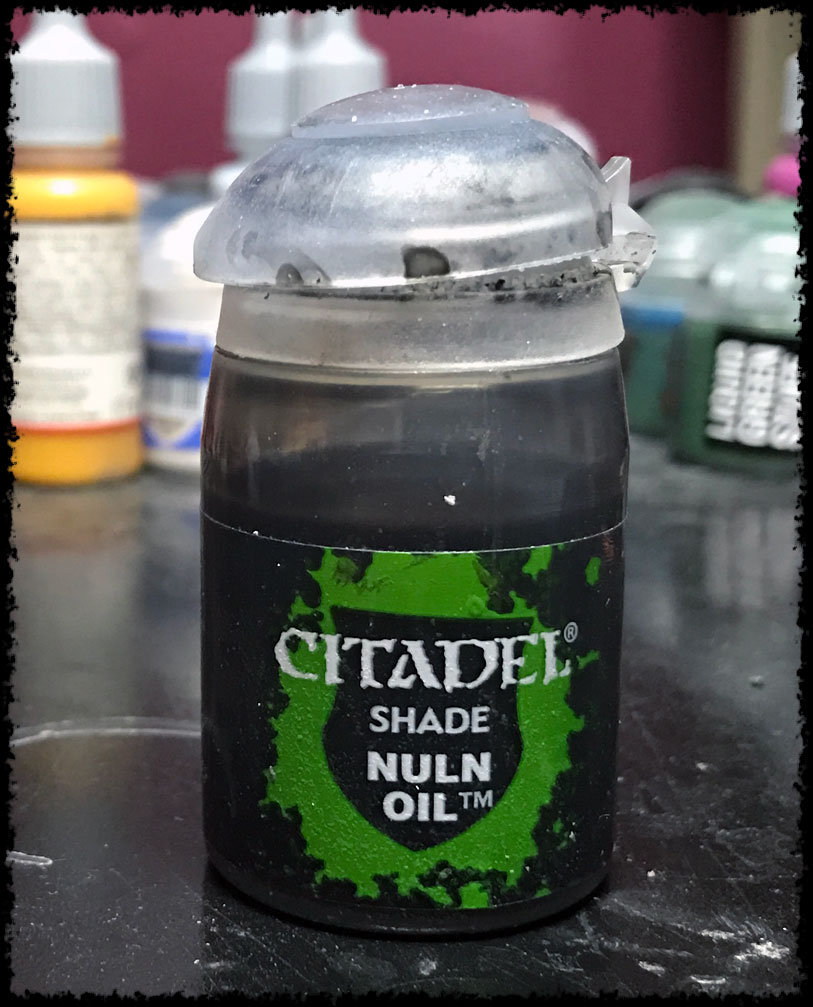
Next I used the Nuln Oil for additional shading. This is done very much the same as the glazing I did on the skin. I don’t add anything to the wash for this step, it’s straight Nuln Oil, but I put very little on my brush. I don’t load up the brush like I would if washing normally. What I do is dip my brush into the wash, and then wipe all the excess off on my palette. The brush should look wet, but not loaded with wash. You will know you have the right amount when you go to brush the model. Where you brush should look wet, but not leave behind a pool.
The Nuln Oil blends over the Dark Reaper in the darkest areas on the model to give a really strong shade. I don’t cover all the Dark Reaper areas, but instead blend it into a darker color where needed. You’ll notice this mostly on the inside of leg armor, then also the lower edges of the other armor plates.
Below is both Dark Reaper and Nuln Oil for shading.
Every dark area you see is the result of Dark Reaper and/or Nuln Oil, not shadows from light. I just want to be clear about that.
Step #4 – Highlighting
I needed to highlight some areas. For this I took the Fenrisian Grey and mixed in some Lahmian Medium – about 50/50. I apply this glaze highlight to a select few areas; the spots that get the most light, like the top of the feet, the flares on the knee armor, etc.
As with any blending, keep the paint thin and put very little on your brush. When you brush it on the model it will look wet, but you won’t really see the paint. The paint should go on very translucent. So, I built up layers this way until it was at the brightness I wanted.
Now, I find it’s harder to blend colors up from dark to light. Often it’s best to start at the brightest color, and then work your way down and darken it. However, doing that would have given my primary color (Thunderhawk Blue), a different tone than I wanted. So, sometimes you have to blend up.
The key to blending colors up is to use your base color to blend them back down after. Once I got the Fenrisian Grey blended on there, I came back in with the Thunderhawk Blue and used that to glaze it down a bit, and blend it all back in together. Sometimes I’ll have to go back and forth a bit here, blend it down, back up, back down, etc., until it’s how I want it. It just takes some time and patience.
For the edge highlights I used the Fenrisian Grey again. I kept the paint thin so that I could build up the highlights. I just keep the brush damp as I load it up with paint, and brush off the excess on my wet palette.
Also, in the below shot you’ll see the Ghost Grey used for extreme highlights. Again, I keep it thin to build up the highlight to where I want it. I’m trying to blend these highlights, not layer them.
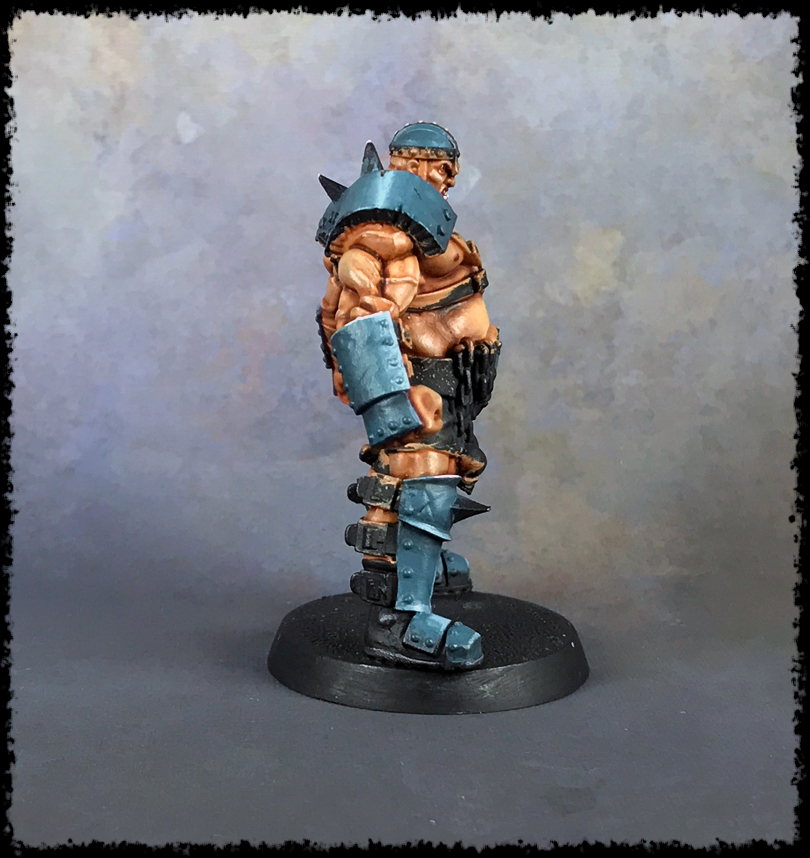
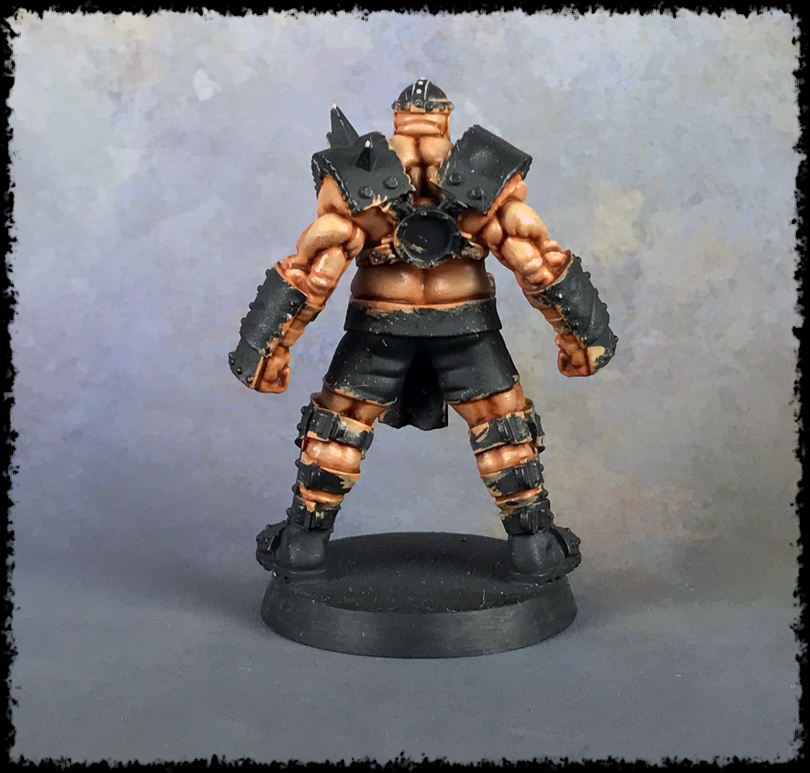
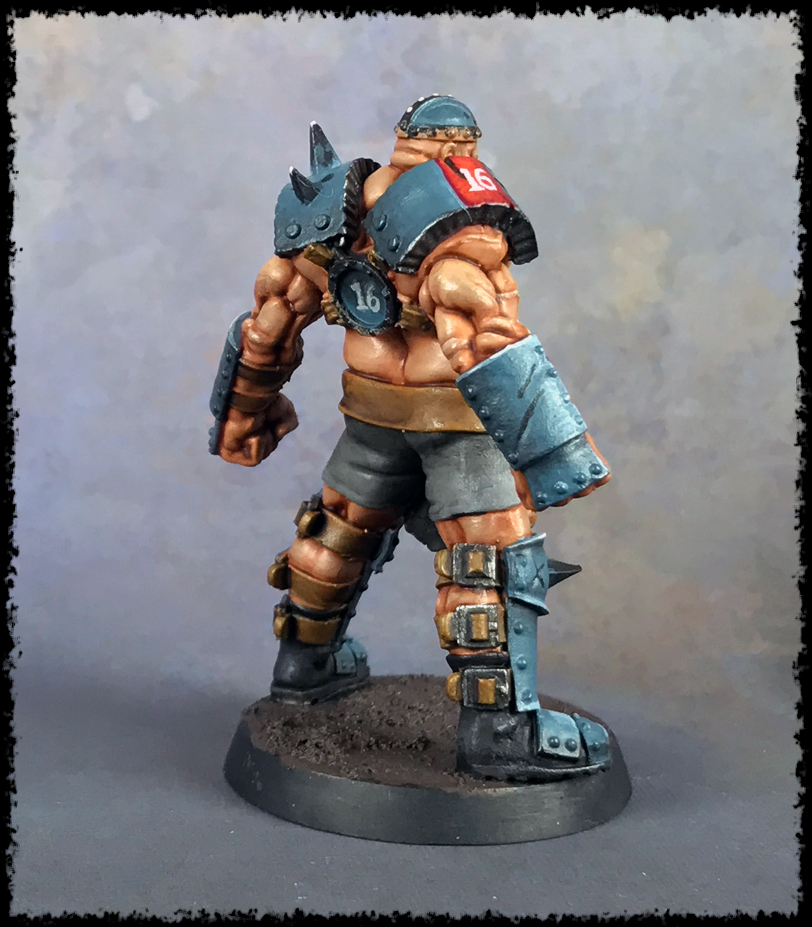
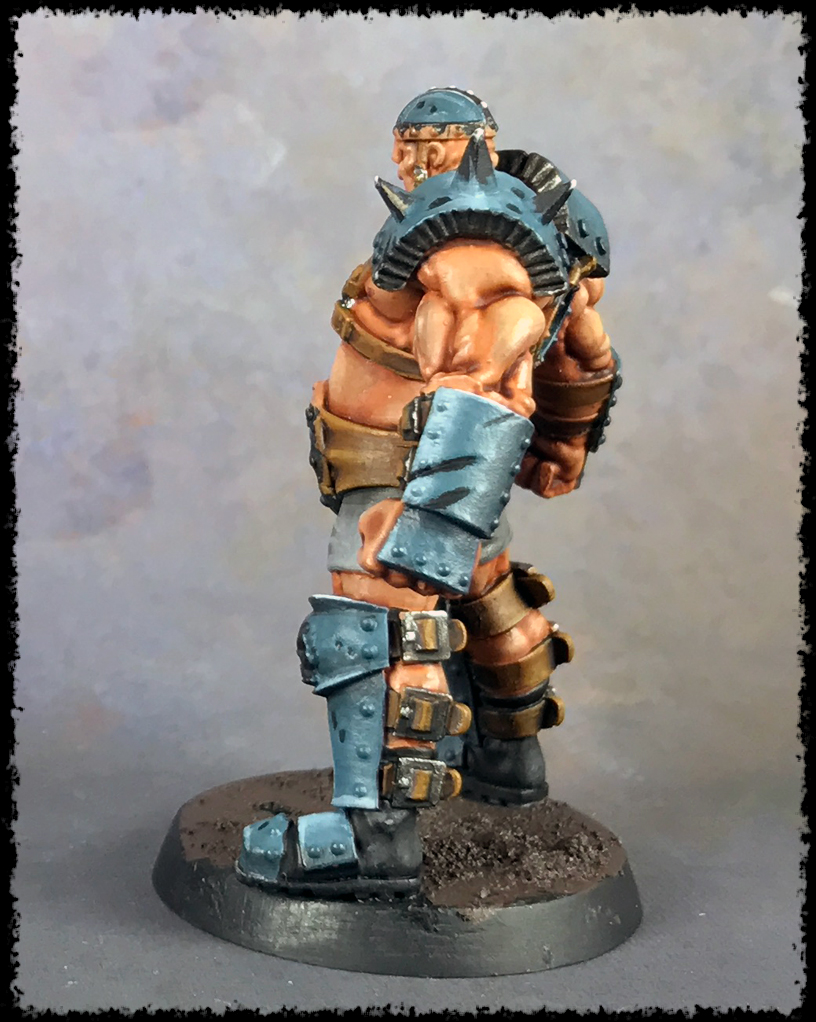
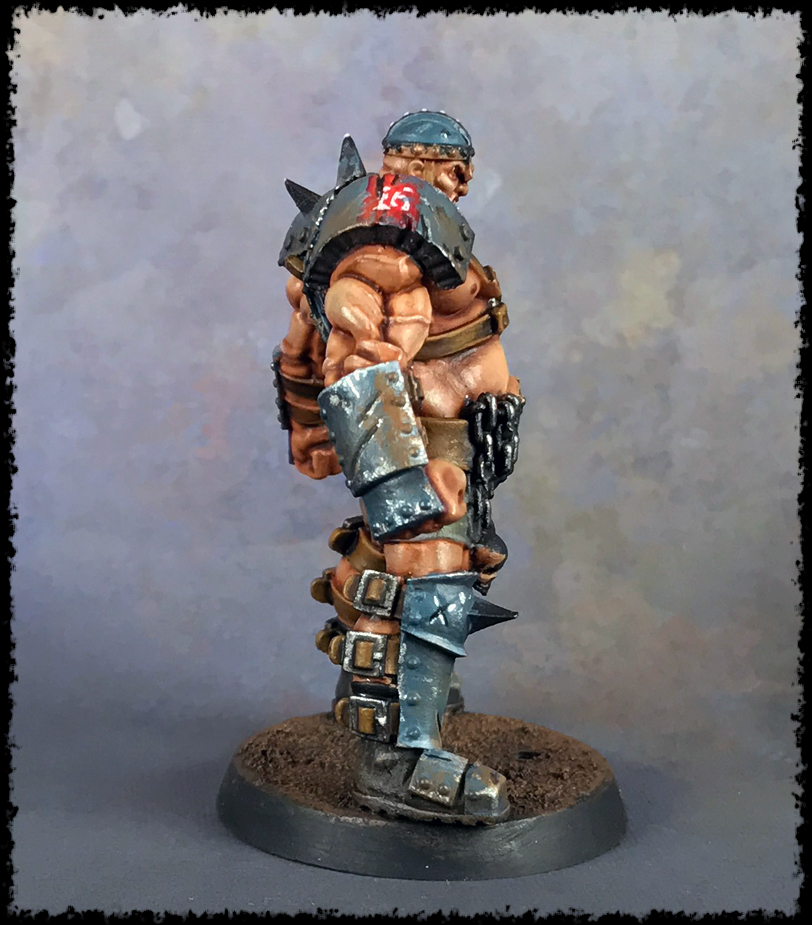
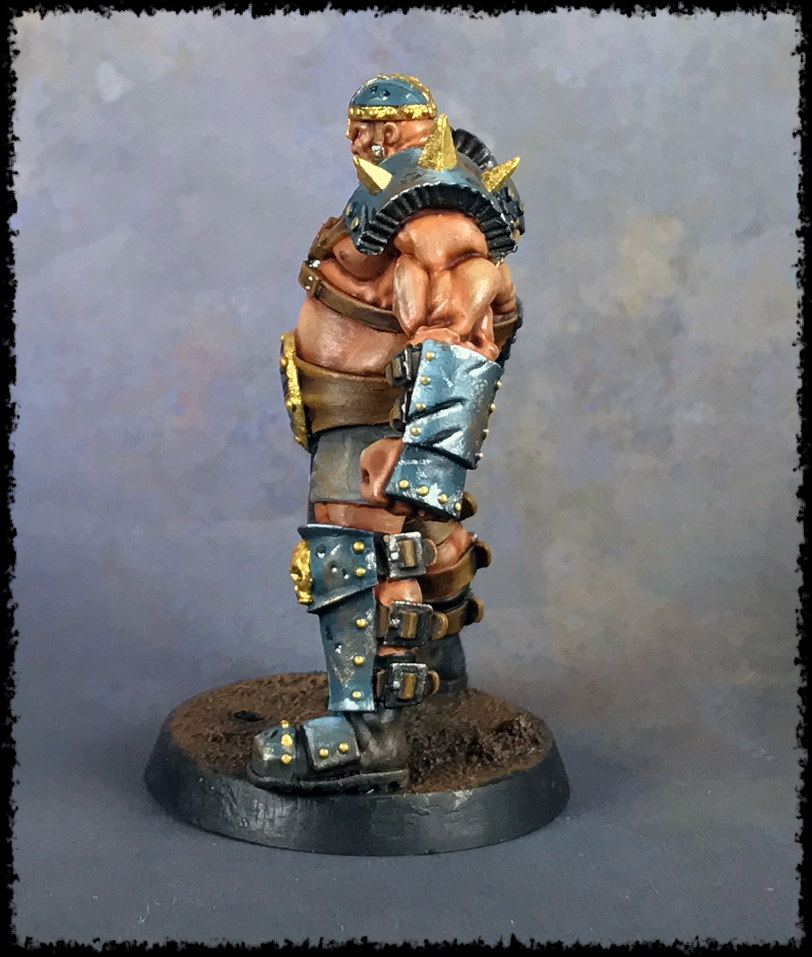
I did not edge highlight the shoulder pads because I will be weathering them heavily, and I’d lose any edge highlights I would have done.
Painting the Leather
This step is easy. The leather areas are base coated with Leather Brown, and then washed with Agrax Earthshade. I go heavy with the wash, and I let it pool up to create very dark areas.
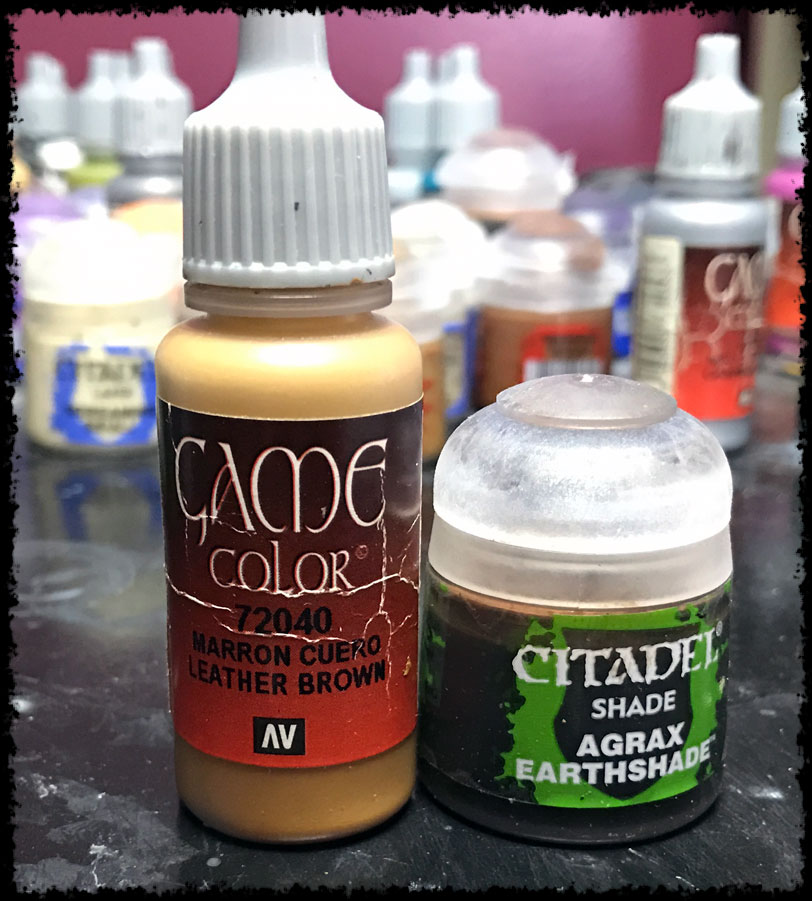
I came back in with the Leather Brown, and picked out some highlights once the wash dried. Then I used the wash again, but much thinner, and went over areas that need to be darker, like where the leather goes under the arms.
Note: A bit out of sequence, but I did base coat the shorts (as you see above), with Cold Grey.
You will also note that the belt is painted in the below shots. I wasn’t sure what color I wanted it at the time I was working on the leather. I later decided to paint it leather like the straps.
The Metal Bits & Shorts
Metal
Nothing special here. You’ll notice the metal areas are picked out and done in the below shots. For those I used Gunmetal Metal, followed by a heavy Nuln Oil wash. I came back in after with the Gunmetal and picked out the highlights.
The Shorts
For the shorts I base coated them with Cold Grey, and then I gave it a heavy wash with Nuln Oil. I then came back in with thinned down Cold Grey and highlight back up where needed. As I noted before, blending colors back up can be tricky, so I used Nuln Oil to blend back down transitions I wasn’t happy with.
Loincloth
For the loin cloth I base coated it with black. Because this is a black cloth, and because of where it is on the model, it’s not going to have very bright highlights. This is a very important thing to consider, and something I feel gets overlooked – the material you are painting. It’s the same with the shorts, it’s a cloth, so highlights are subtle. Things that are metal will reflect more, and in turn have stronger highlights to represent this. When you paint things like leather or cloth, they don’t have the same reflective properties of metal, so more subtle highlighting is required.

My first highlight on the black is Eshin Grey. It’s a near black grey, so it’s perfect for a subtle black highlight. Nothing fancy here. I just used a damp brush to keep the paint thin.
There’s a few spots that I felt needed to be a little brighter, so for those I used thinned down Cold Grey to blend up a little. I didn’t get any shots of this step alone, but you’ll notice it in the below shots with the freehand work.
The same was done on the boots as well. I painted those very early in this process, way before this loincloth, but didn’t take any separate shots of that. So, I used Eshin Grey for a small subtle highlight on the back of the boots, with a very thin layer of Cold Grey over that selectively.
Freehand
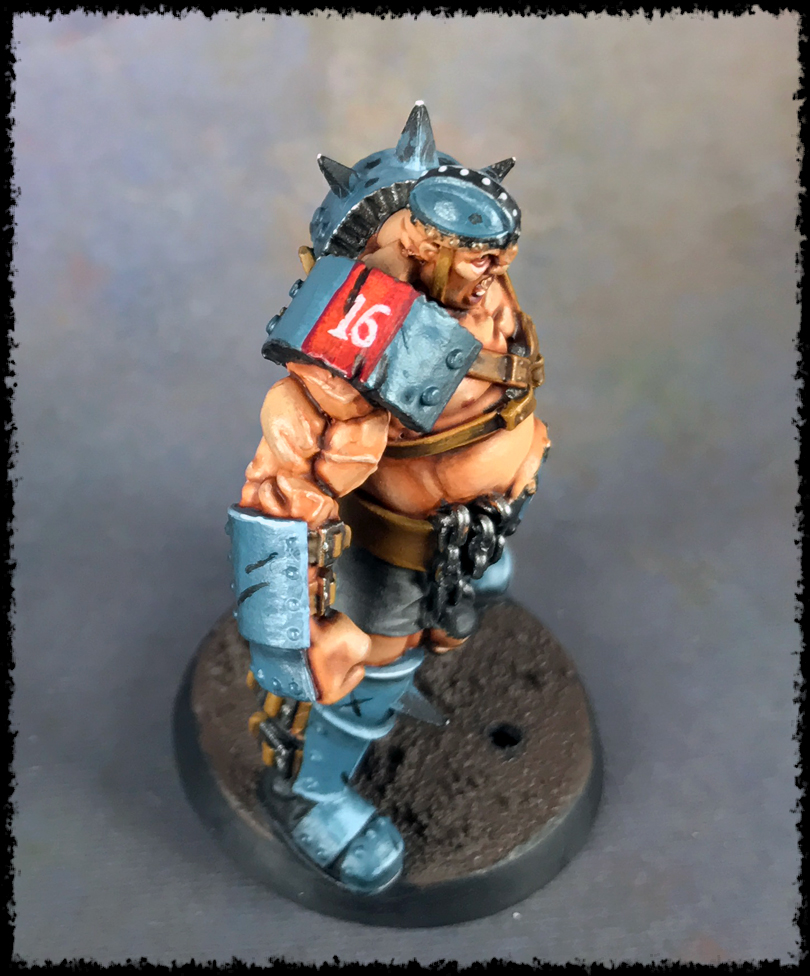
I wanted to put my team’s logo on the loin cloth, which is a hawk’s head.
Step #1 – Outline/Basic Shape
For the basic shape I used Administratum Grey.
You can see the highlighting I did on the loincloth mentioned previously as well.
Step #2 – Shading
I created a glaze with the Cold Grey by adding some Lahmian Medium. Then I went over the previous layer to darken it in the recesses, like a wash. I also thinned down some white to create the highlights on the fold. The logo is white, but because of the lack of light where this is, greys are used instead for a more realistic effect.
I blended up the darker areas a bit with the Administratum Grey to smooth out the transition. You’ll notice it’s not very smooth in the above shot, but in the below shot it’s a lot better.
Step #3 – Details and Cleanup
Lastly, I picked out the eye with Evil Sunz Scarlet, and used the black to create the lines to separate the wings, and clean up the edges a bit.
Wrap-up
As I said in the opening, because I plan to do weathering on the model, I wasn’t aiming to make everything perfectly smooth. Don’t get me wrong, I did try to keep things clean and blended well. However, I knew I could use weathering later on to fix anything I wasn’t 100% happy with. Also, I honestly like the grittier look you get when you don’t do super smooth blends. It’s a personal choice I make with my style.
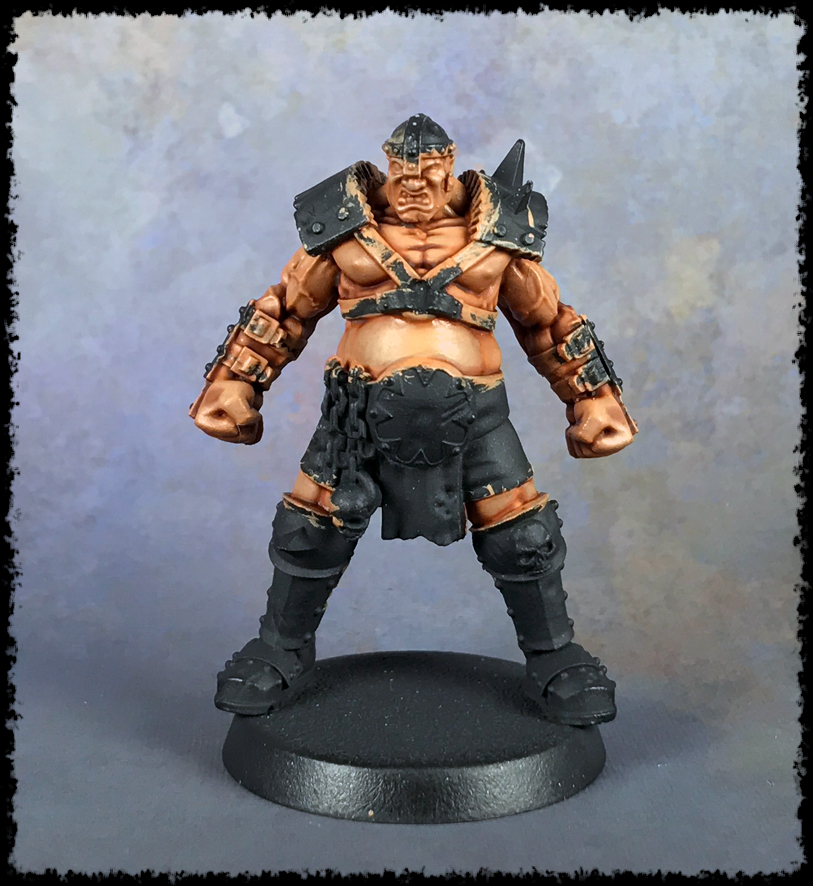
Part #3 – The Final Details
Alright, folks, we’re on to the last part in this painting tutorial for the Blood Bowl Ogre.
Now, sit back and grab a relaxing beverage because this one might get a bit lengthy.
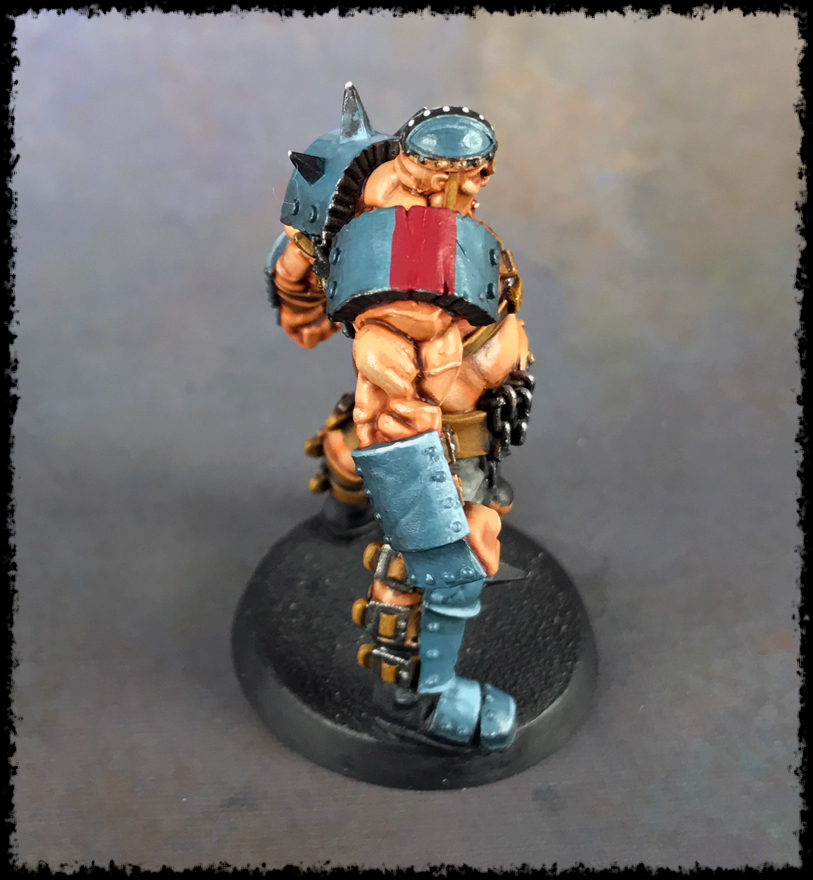
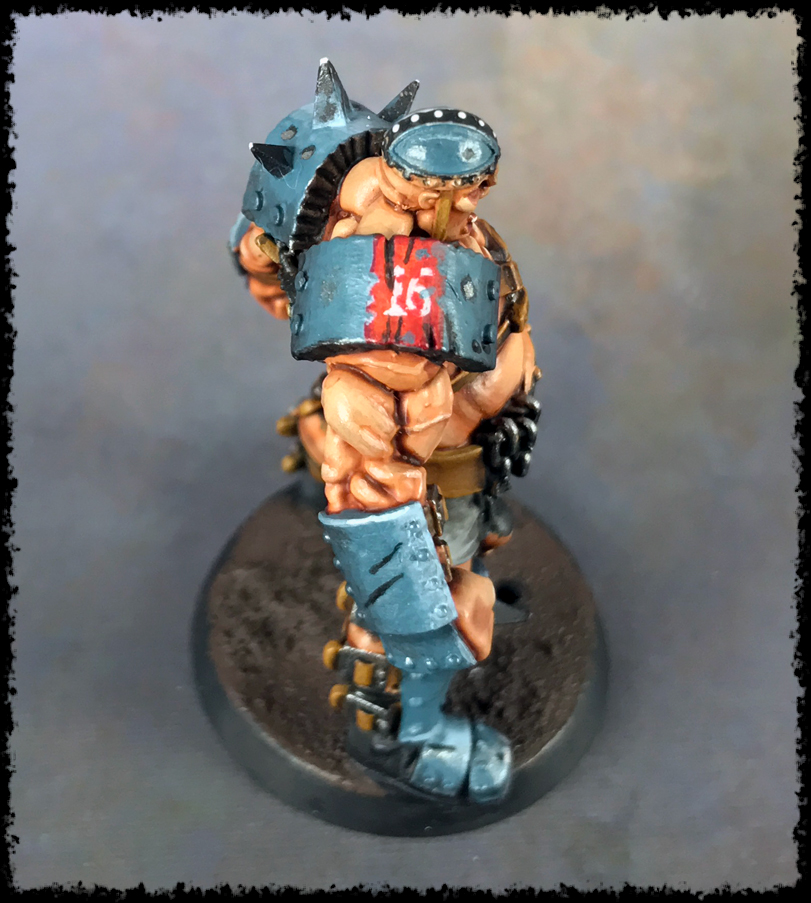
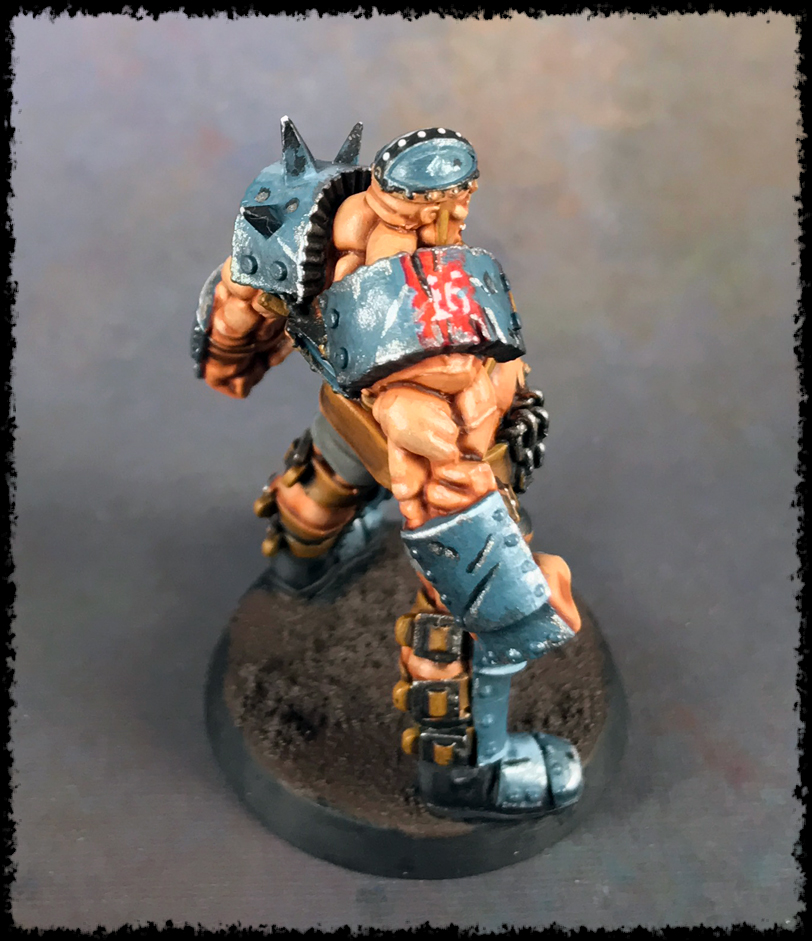
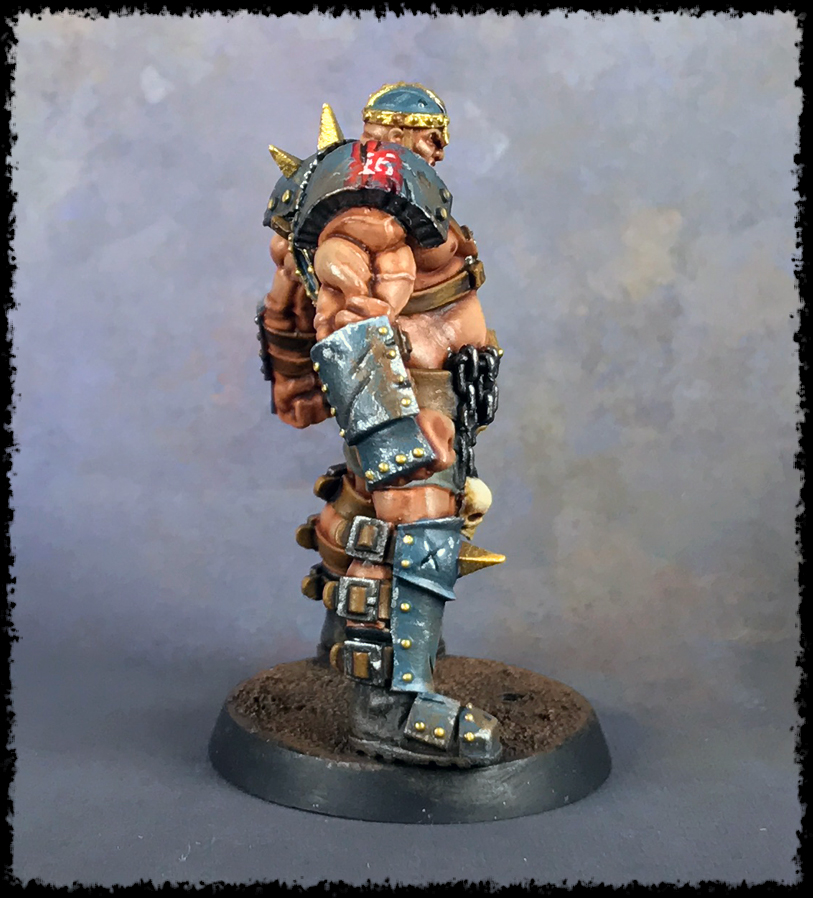
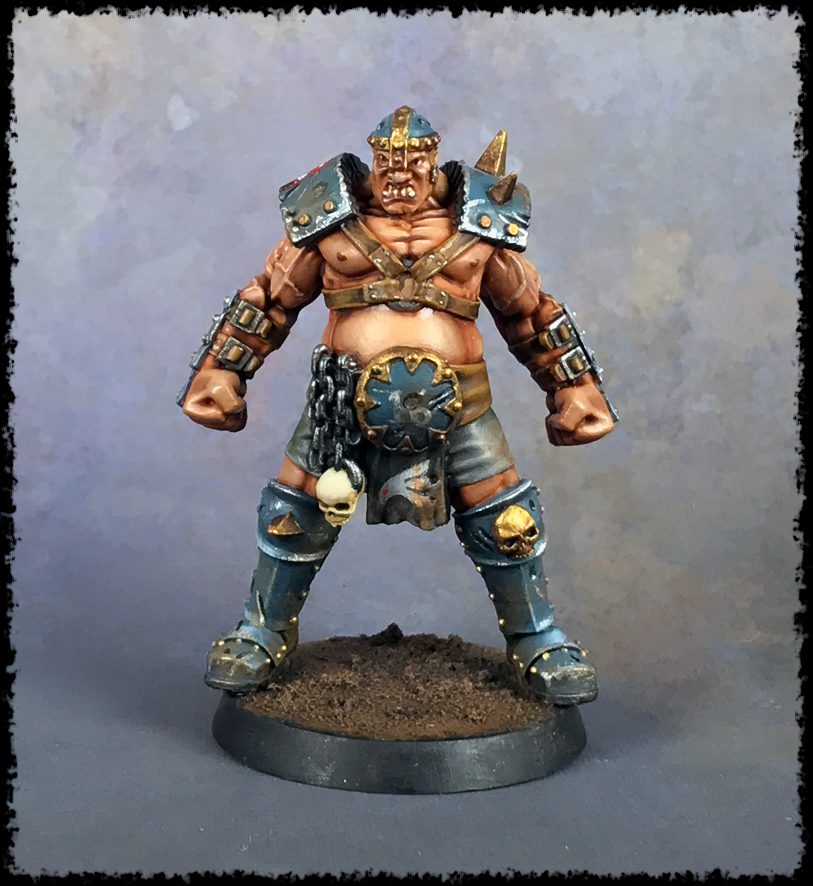
Painting the Red Stripe
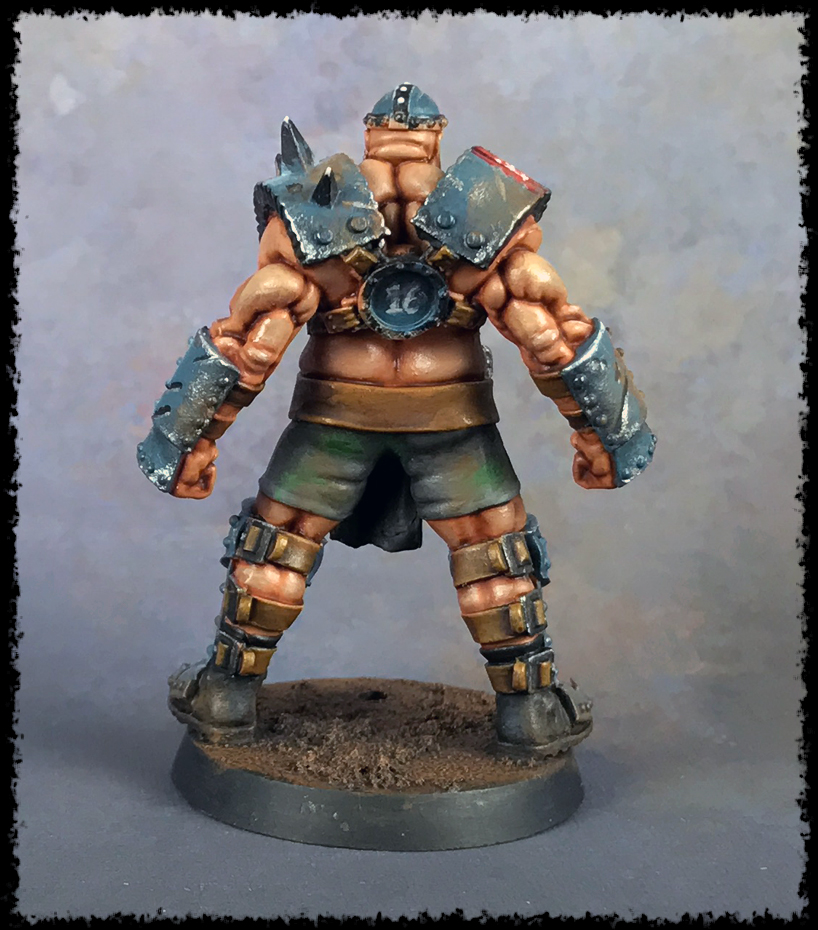
I like to add a red stripe to one shoulder pad. It’s a nice complementary color to the blue, and gives me a place to put the player’s number.
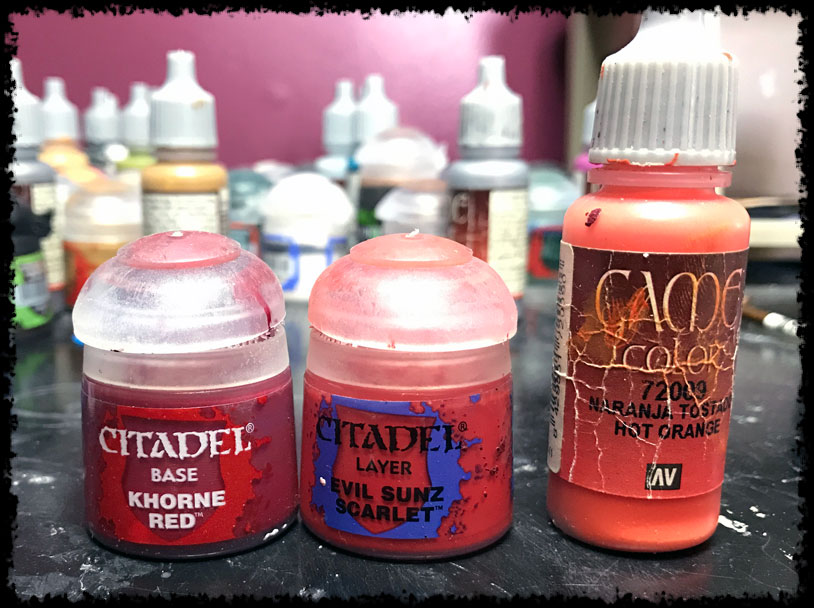
For the stripe there’s 3 colors I used: Khorne Red, Evil Sunz Scarlet, and Hot Orange.
Step #1 – Base Coat
The first part was using the Khorne Red to create the stripe base.
Step #2 – Highlighting
From there I blended up with Evil Sunz Scarlet, and a little Hot Orange at the highest point.
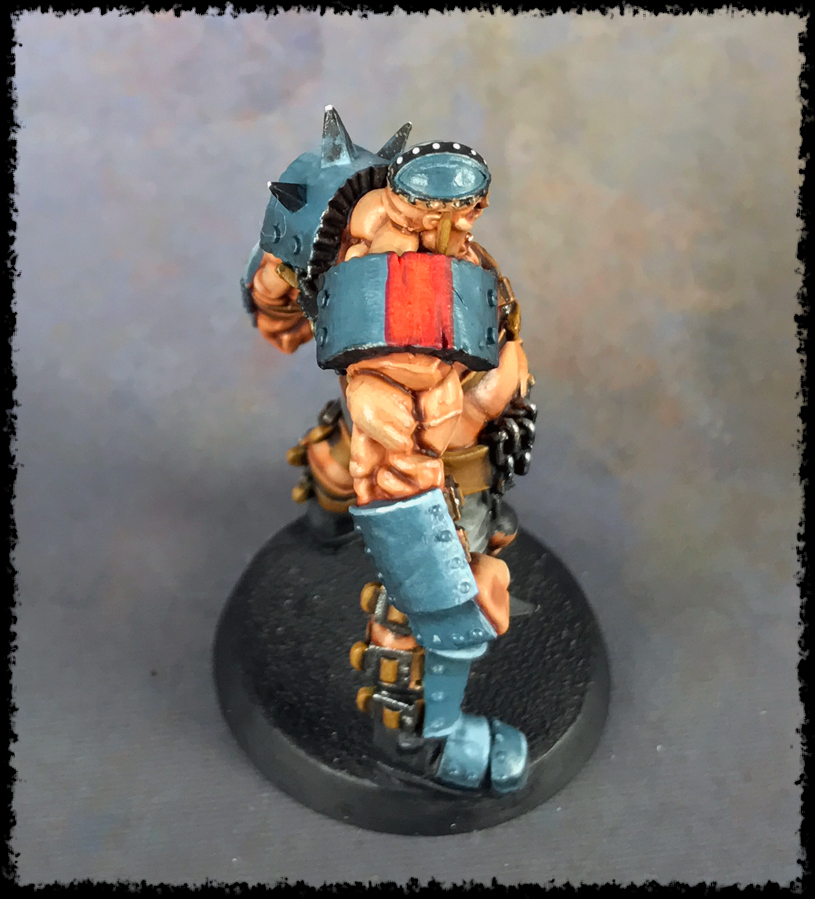
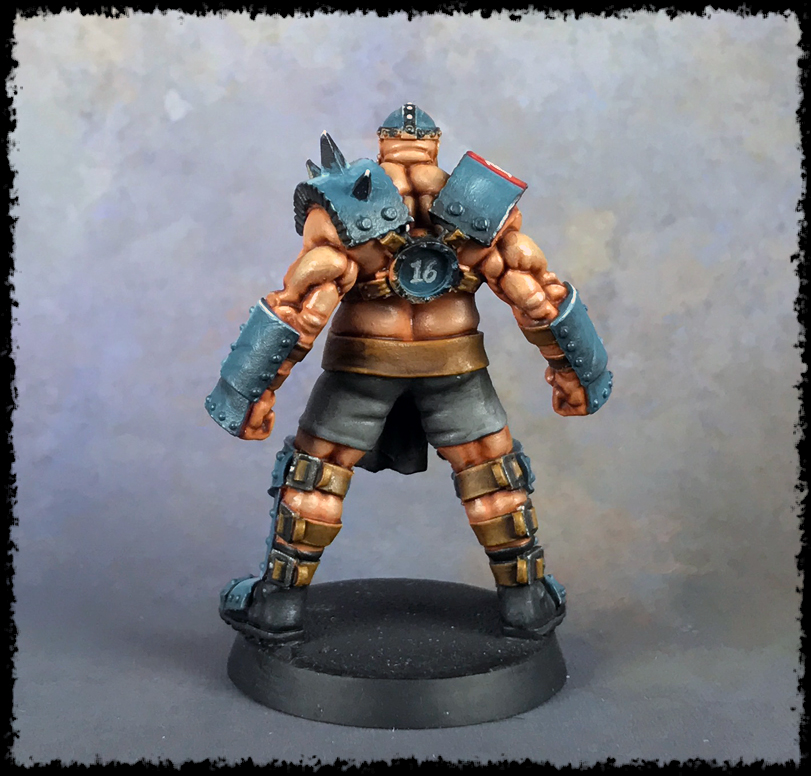
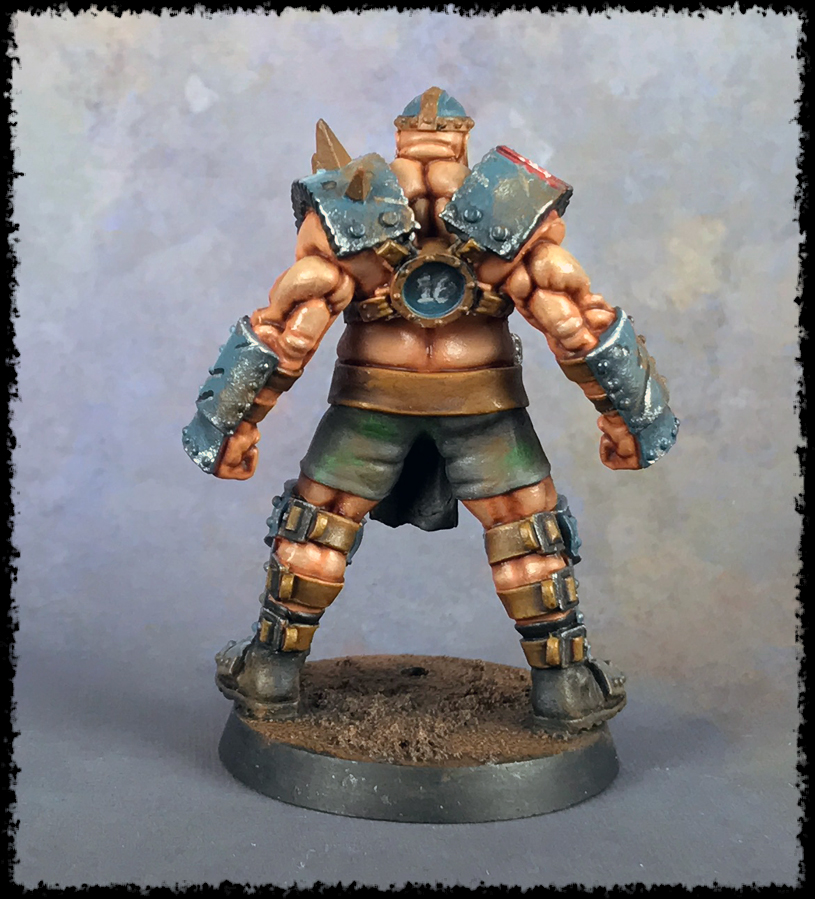
Numbering
For the numbers on the Blood Bowl Ogre I started a few different ways depending on where the number was going.
On the shoulder, where there’s a lot of light, I used a very thin white and painted on his number. This took a few layers.

For the stomach plate, which has less light, I painted on the number with Administratum Grey. I then blended with some Cold Grey to darken the lower areas of the number where less light will hit.
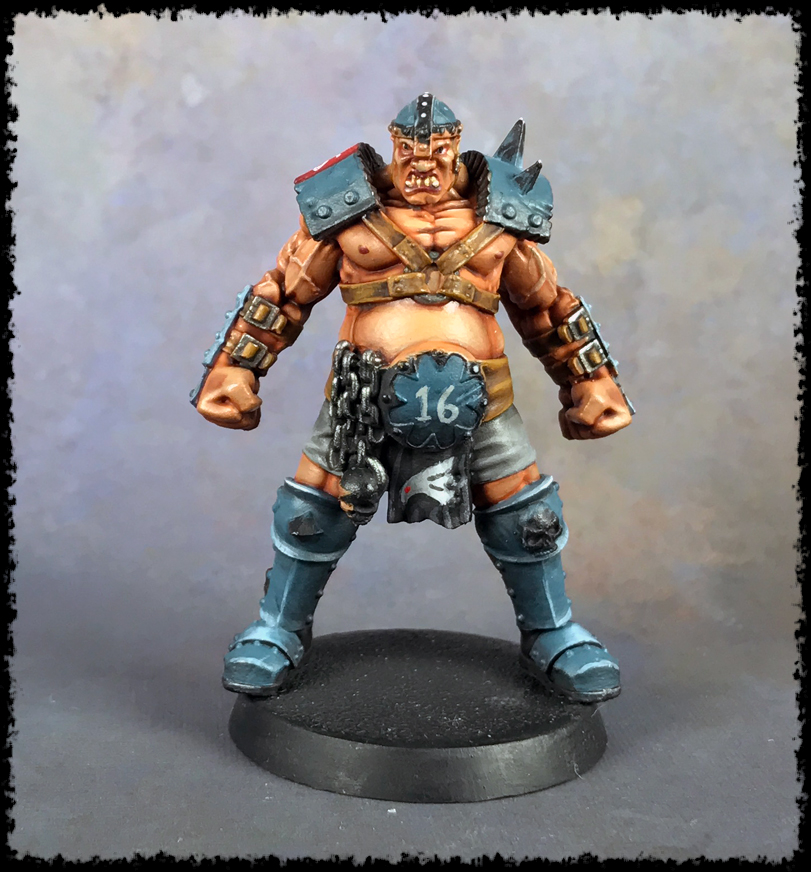
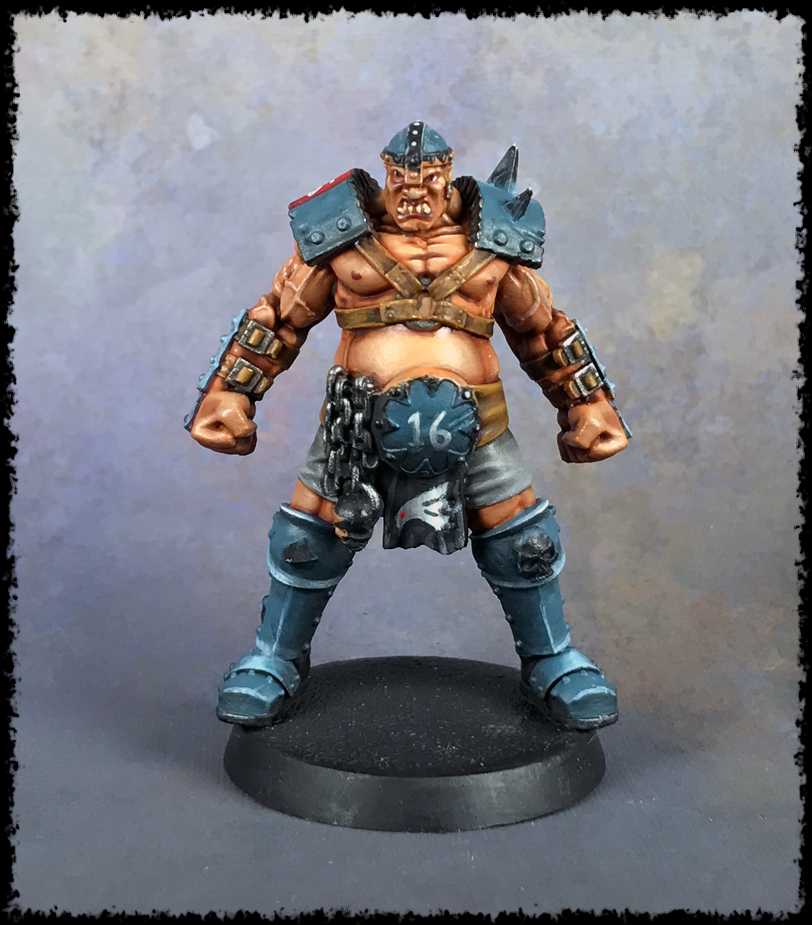
On the back plate, which has the least amount of light, I started off with Cold Grey. I blend up a little, very little, with Administratum Grey just so it’s not too dark and unreadable.
Basing (Part 1)
For this team I have used Stirland Battlemire for the basing. I have always put it on the base and then primed everything. However, I was so excited to start painting this Blood Bowl Ogre that I jumped right into painting, and I totally forgot to add on the basing texture. So, a bit late in the process, but on to the basing!
This is really simple. I just took a brush, and not a good one, and brushed around the Stirland Battlemire on the base. This particular texture paint by Games Workshop is intended to build up in certain areas. The idea being that the grass had gotten churned up during the game.

I will come back to the basing shortly. You’ll understand why in a bit.
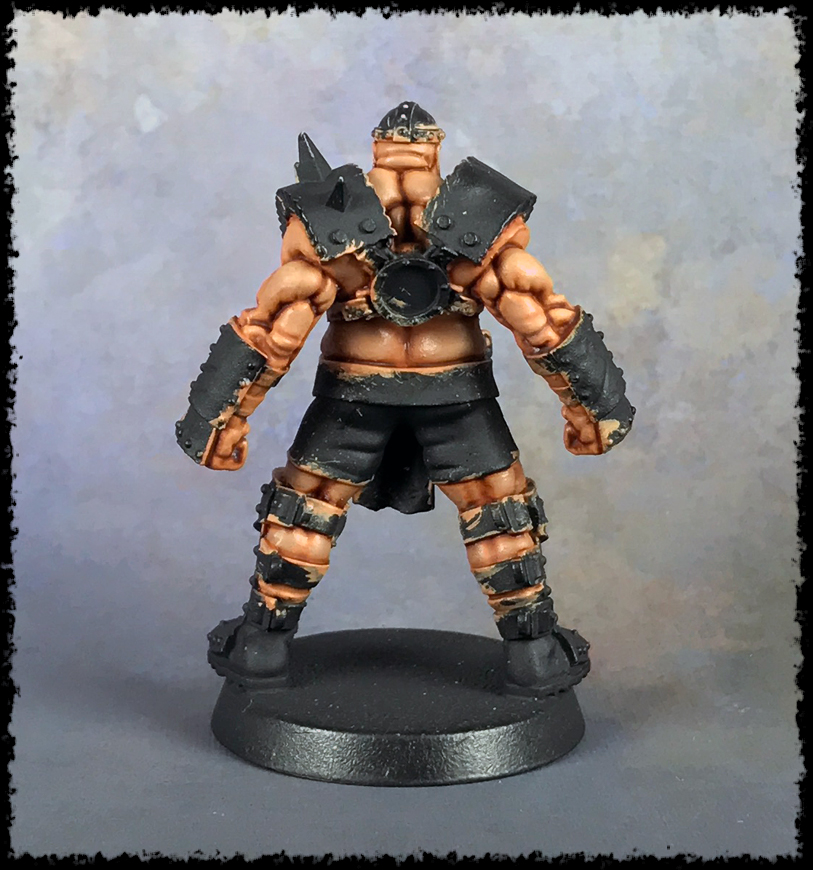
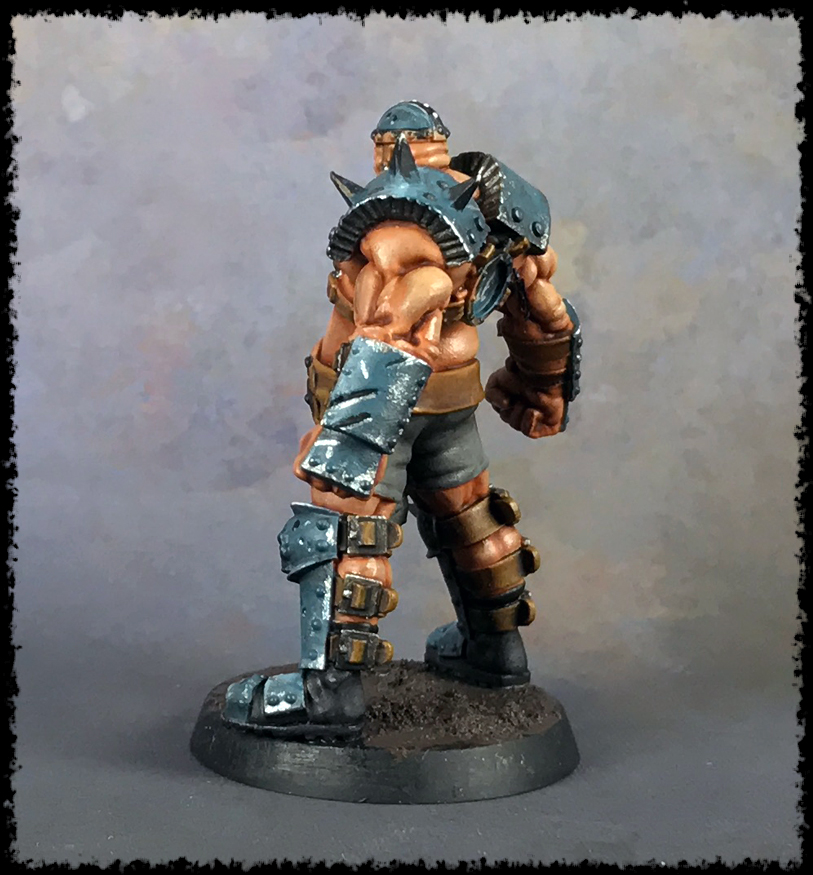
Armor Chips & Scratches
Step #1 – Adding Depth
The armor on the Blood Bowl Ogre has some scratches and chips. To pick these out I simply took a thinned down black paint, and painted into the scratches and chips to give them depth.

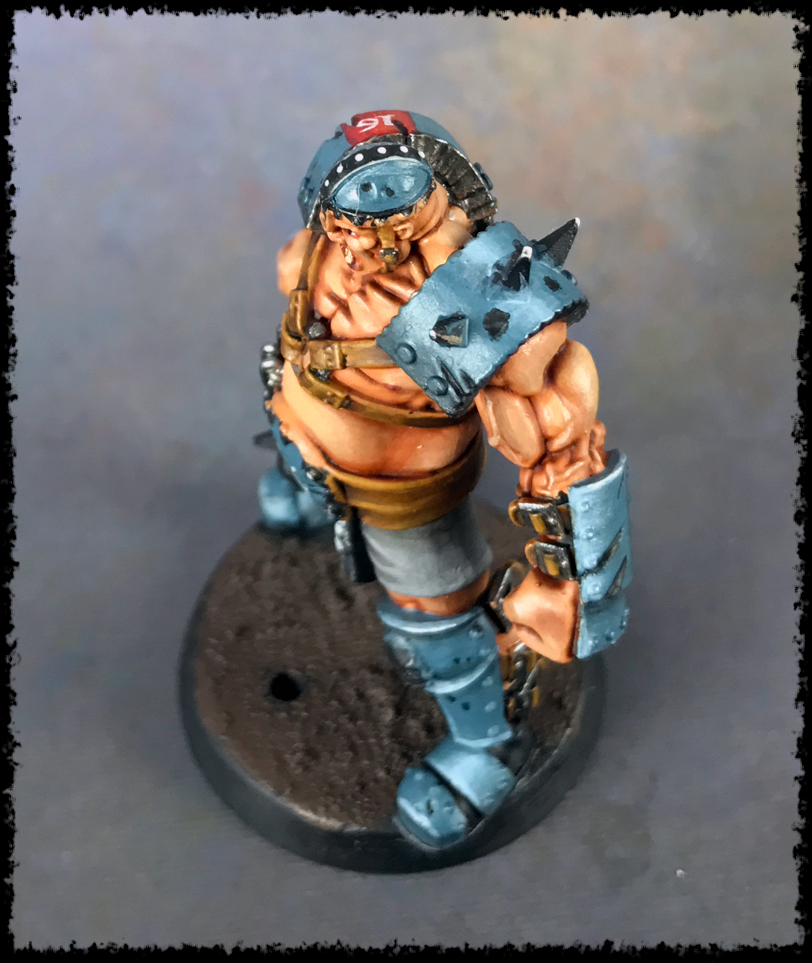
Step #2 – Big Chips
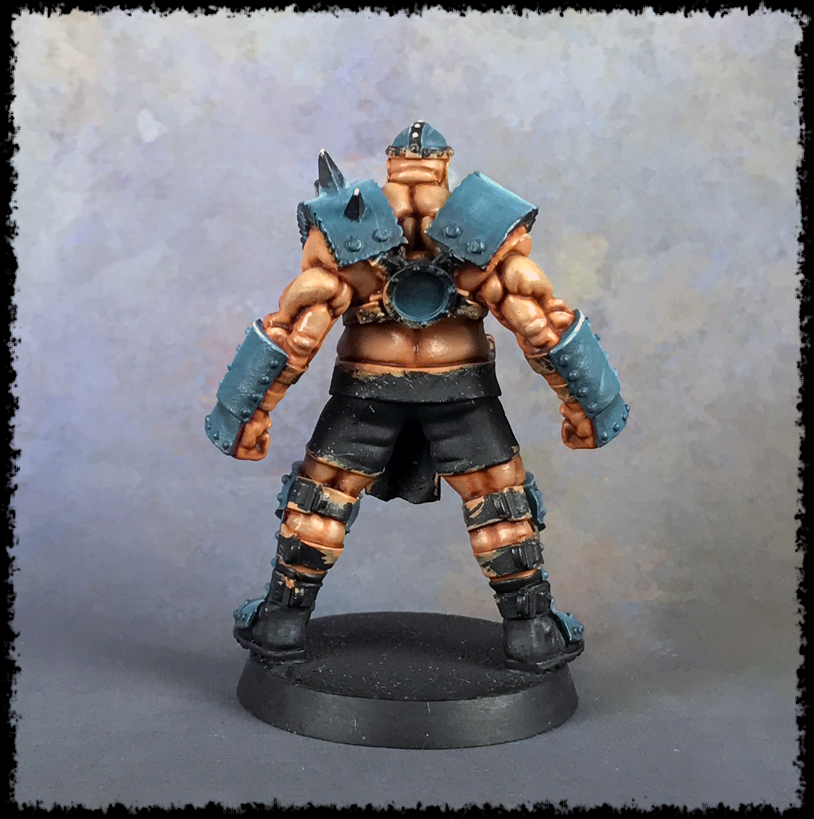
I used Gunmetal Metal to fill in any large chips. I left a line of black at the top as a shadow. See his stomach plate and the tops of the shoulder plates.

Step #3 – Weathering the Paint
I like weathering the stripe and numbers too. For this I took the armor base coat (Thunderhawk Blue), and randomly dabbed on the red stripe with it to make it appear worn off in spots. I did the same with the red over the white lettering.
Step #4 – Worn Metal
Using the same Gunmetal metal, I did some random dry brushed areas with it to create areas where the paint has rubbed off. Apparently I only took one shot of this step, but you’ll notice it in the other shots going forward.
Step #5 – Highlighting
The next part was to highlight the damaged areas. Now, there’s a few ways to do this. The common technique you see quite a lot is to take a brighter version of the armor color and highlight underneath the chip or scratch. It looks good, and it stands out, but it’s not realistic enough for me. Now, I’m all about doing things that aren’t realistic if it looks cool. However, if I can do both (realistic and cool), then it’s what I’ll do.
See, to me it’s unrealistic to use the armor color as a highlight on a scratch. Something tore into the armor – broke it, and that type of damage is going to pull up the paint around the edges and show metal. Unless what caused the scratch was super sharp, it’s going to be damaged around the area.
Something I started doing on this team was to use a metal color for the underside highlight. I think it looks good and it’s more realistic. I don’t paint metal on the top part of the scratch, which would be more realistic, just the underside to highlight. Between the black and the metal highlight, I think it looks pretty good.
Anyway, for the highlight I use Chainmail Silver. It’s a mid-toned silver. At this stage I also use this silver to wear the edges of the armor. For this I focus on spots that would get a lot of wear, like the shoulder pad edges, knee armor, etc.


Basing (Part 2)
The textured base was heavily washed with Nuln Oil to add depth to all the texturing. The next part is covered below.
Dirt & Grass
The paints for this part are:
Step #1 – Dirt/Dust
Using the Beasty Brown, I dry brushed various areas on the Blood Bowl Ogre to create a dusty look. Considering the model is fighting, getting thrown on the ground, etc., pretty much anywhere on the model is fair game for the dust/dirt. I do tend to stick to the feet, legs, arms, and shoulders primarily though, and never on the skin. Sure, realistically his skin would get dirt on it too, but dry brushing this brown onto the Blood Bowl Ogre’s skin would only serve to mute the skin tones.
The base is also dry brushed with the Beasty Brown. Basically, I do this very sloppy and let it hit the model to get the dirt on the feet and legs.
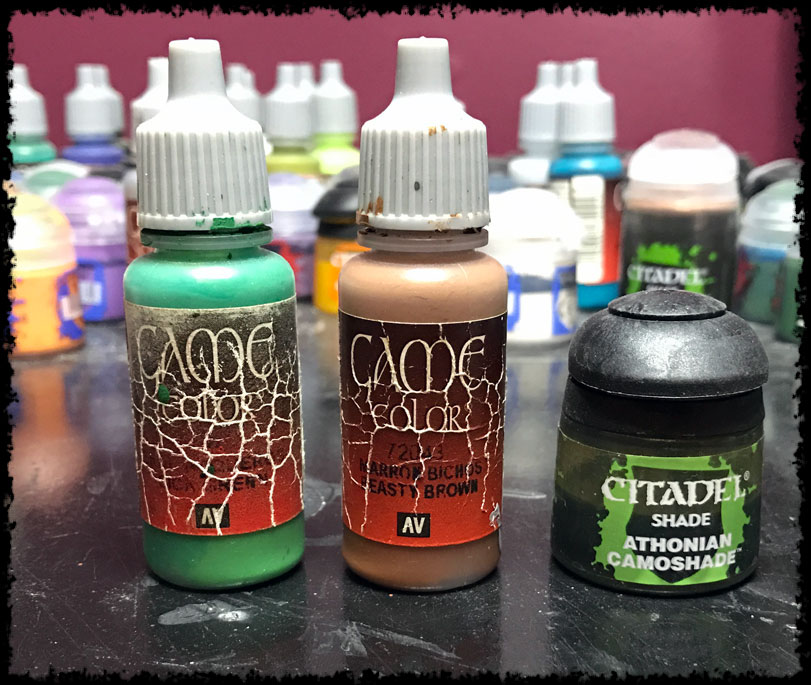
Step #2 – Grass Stains
The Sick Green, and Athonian Camoshade are used to create grass stains. Same concept as the dirt, but this is only applied to the cloth areas; which on the Blood Bowl Ogre is his shorts and loincloth. Seeing as black wouldn’t really show grass stains, it’s just the shorts I worked on.
I dry brushed on the Sick Green randomly, and used the Camoshade in some spots to darken the green. Grass stains tend to have a variation in the green it leaves behind.
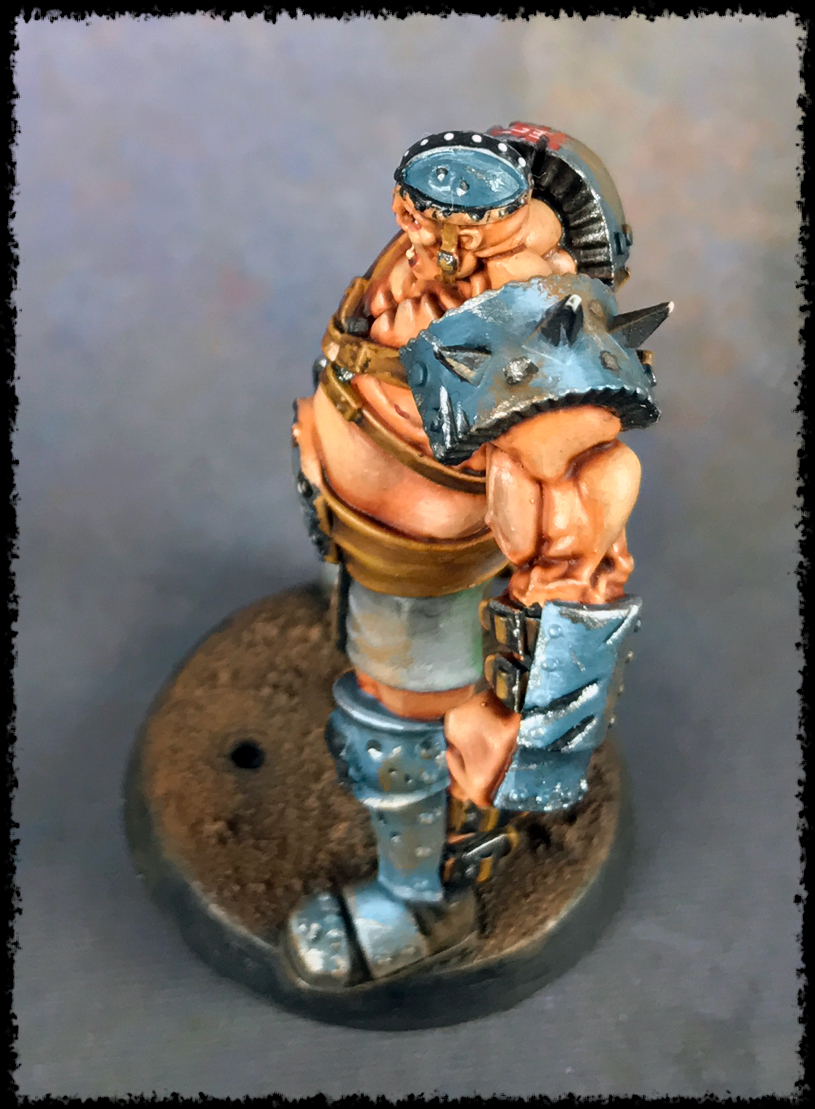
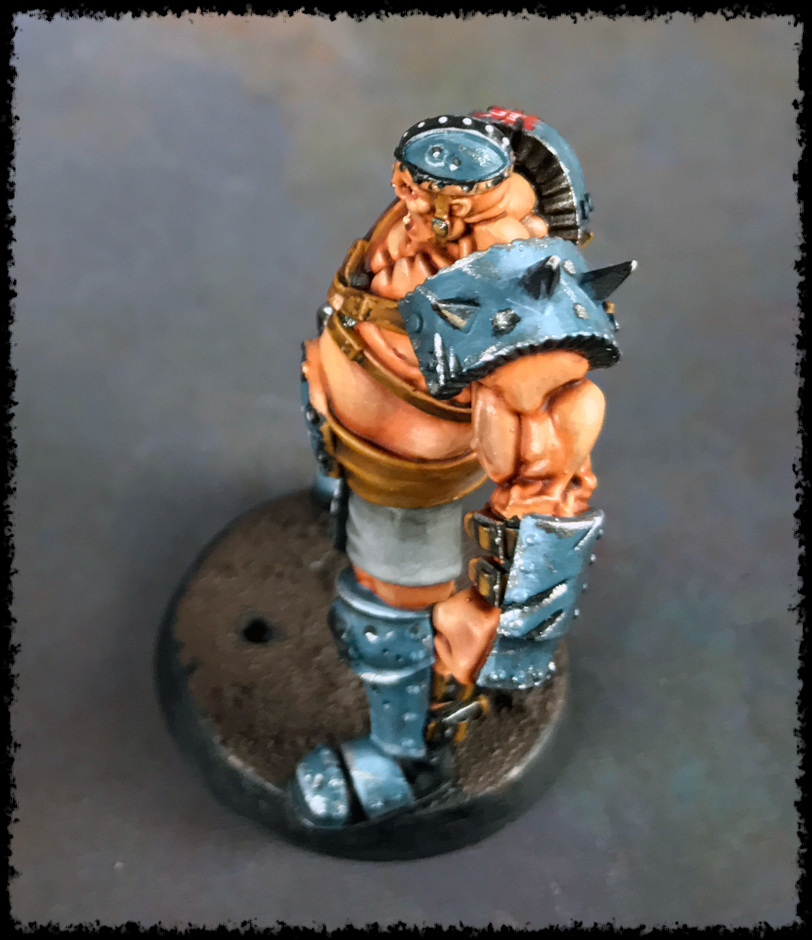
The Skull
During this whole process of painting the Blood Bowl Ogre I forgot about the skull hanging off the chain. For this I use Screaming Skull, White Scar, and Seraphim Sepia.
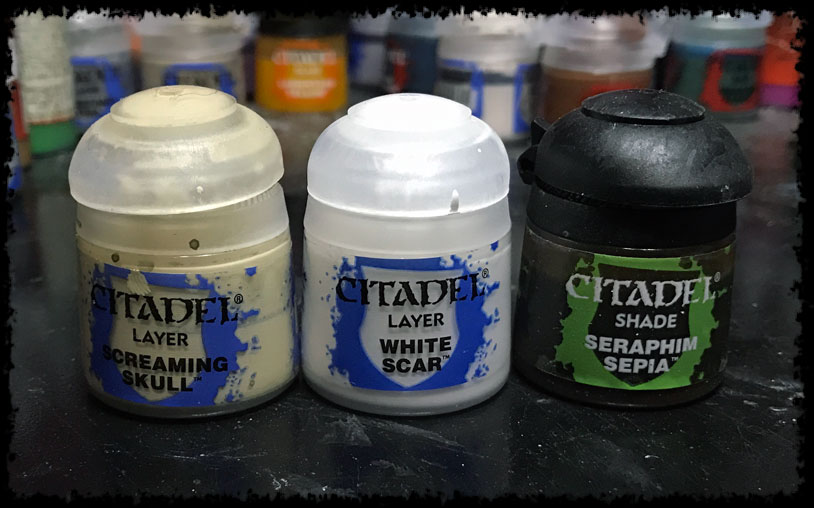
The skull is base coated with Screaming Skull. I then wash it liberally with the Sepia. Once dried, I blend Screaming Skull over it on the higher areas – the top of the skull. Lastly, I blend a little White Scar over that.

Painting the Golds
Step #1 – Base Prep
Because I’m working with a black primer, painting gold straight on never works very well. The first thing I do is use Beasty Brown to cover all the areas that will be gold. The exception is the rivets, which are also painted gold. The rivets are blue from the armor, and the gold goes on that easily enough.
Step #2 – Base Coating
The next step is the gold. For this I used Polished Gold and Glorious Gold.

For the gold areas that are in darker spots, a lot less light, I used the Glorious Gold. Everything else was painted with Polished Gold.
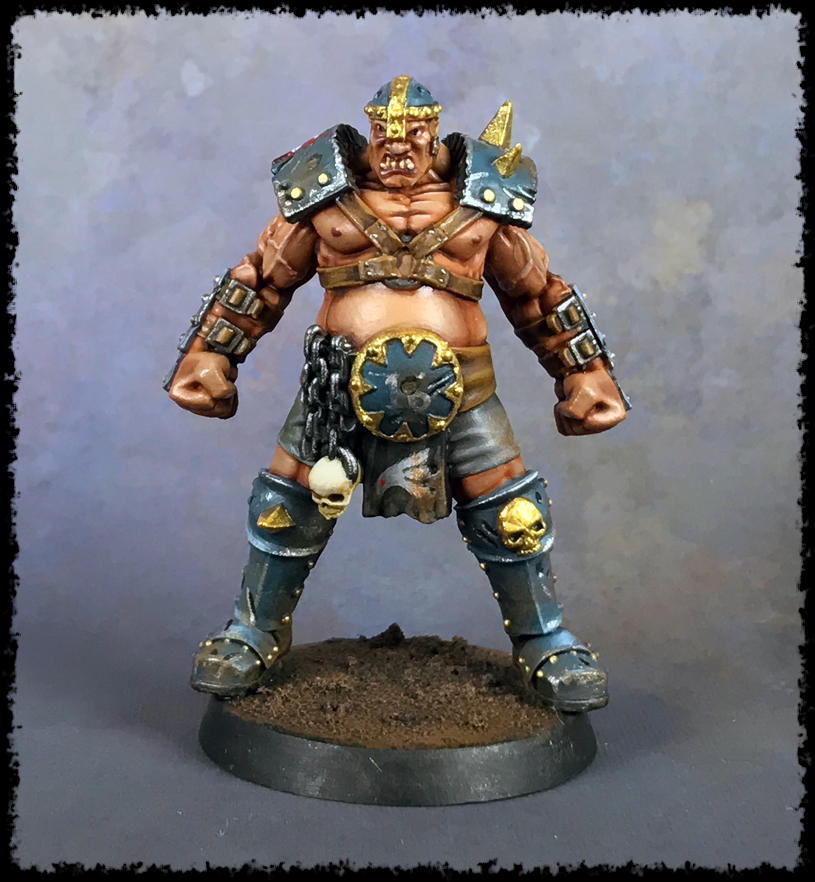
Step #3 – Shading
Now for shading. This is something I picked up from Sable Warlock on the gold tutorial he did.
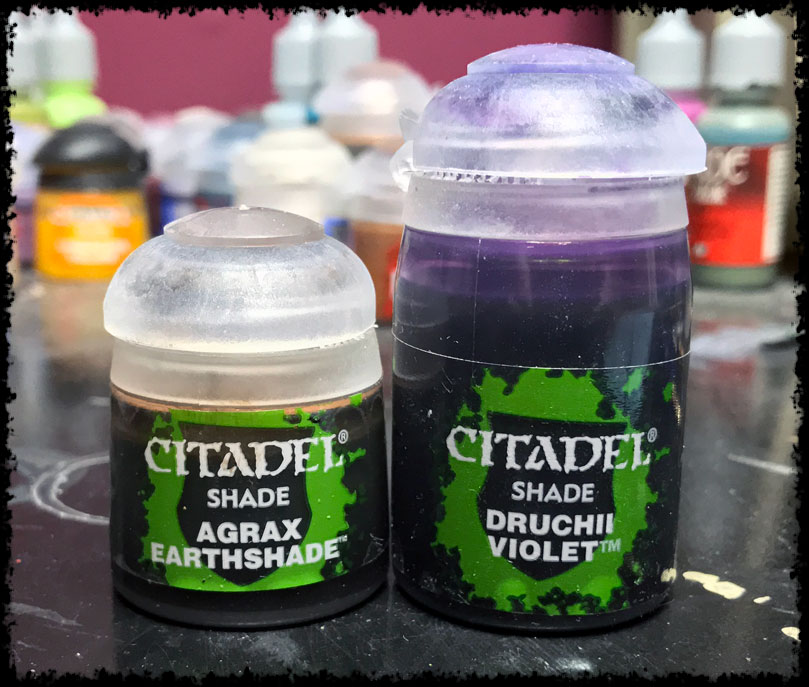
The first step is to use the Agrax Earthshade to wash the golds. The following step is to use the Druchii Violet in the darker areas of the gold. The purple wash compliments the gold, and makes a great shade when used selectively.
Step #4 – Highlighting
Once the washing was done, I came back in with the Polished Gold and layered it on the spots that would get some direct light.
The final thing I did was use Runefang Steel for extreme highlights on the gold. This was very selectively done.
The Final Steps
The final steps, which you will see in the showcase, was finishing the base – simple stuff. I painted the rim of the base black, and used the Sick Green to create a ring around it to designate him as a blocker. The very last step was gluing down static grass over the textured base.
The static grass I used was the Games Workshop Glade Grass. It was something I picked up years ago for a project I never did.
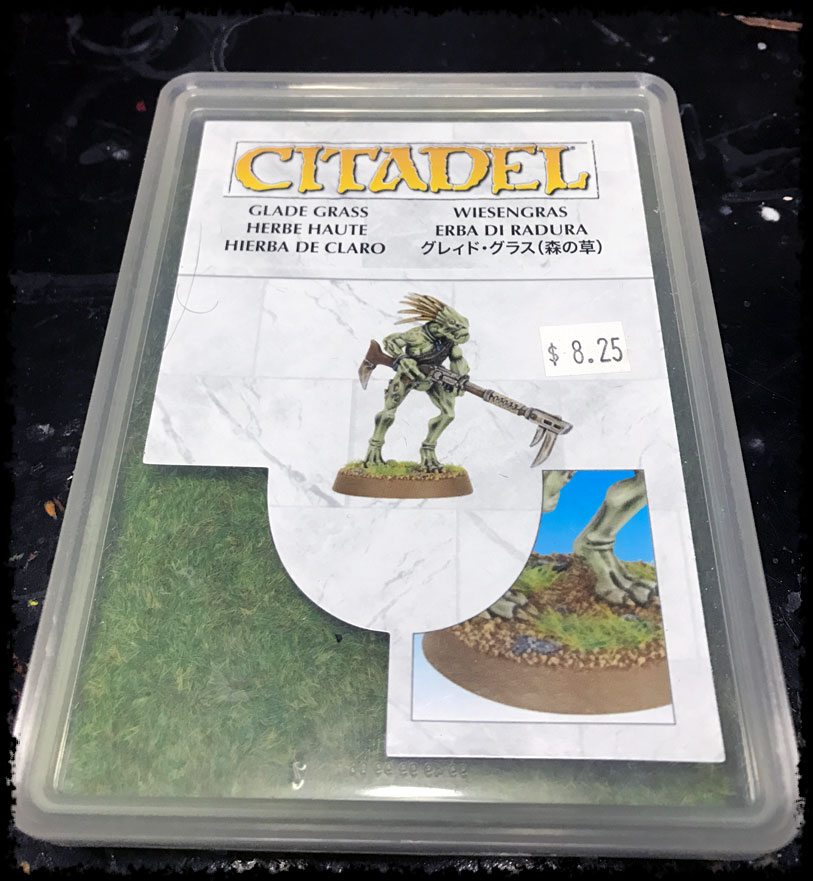
I like it because it has a variation of colors in it – plus I had it on hand, so why not use it?
Conclusion
I really hope I’ve done well with this painting tutorial for a Blood Bowl Ogre. This was my first painting tutorial and I learned a lot doing it. Doing more of these is something I can see doing if the interest is there.
So, thanks for reading, and I hope you learned something in the process!
You can check out the Blood Bowl Ogre painting showcase to see the finished product.
Oh, and of course after I got this Ogre, Games Workshop put out an official Ogre. Bad timing, but then again I honestly like the looks of this one more than the one they did.
Also, for the newer painters reading this, and even the vets, I’ve got a great article on painting supplies that every painter needs that’s worth checking out.
Specific Painting Techniques & Tutorials
Check out these other tutorials covering specific techniques.
I love painting miniatures and teaching people how to paint. I also really love blogging, so I've combined those two passions here.
- Creative Twilight’s Future and My Thoughts (Feedback Welcomed!) - December 4, 2021
- My Top Gift Ideas for Miniature Painters & Hobbyists + Gifts to Avoid - December 2, 2021
- The Year That Was 2020 and Where I’ve Been - January 17, 2021
Nicely done. The glaze sure does smooth out the color transitions. How does sealing the model affect the t transitions? I’ve found Testors Dullcote does some “things” to my colors after it’s dried.
Thanks.
Glazing is one of the simplest things I’ve learned that has a huge impact. I use it in all my blending now.
I can’t say I’ve noticed anything odd with my colors and Testor’s.
Saved for when I find a model I can try do this one. That is so much more work than I normally do but the results pay off!
It’s way more than I typically do too, but I had to with this guy. Doing the skin with my simple method would have really detracted from the overall appearance; there’s just so much of it. Still, I’m glad I took the time though since I learned a lot doing it.
Very nice tutorial! Glazing is such a great technique and I’m a big user of it. I’ve heard a lot of good things about the Lahmian Medium but never tried it myself. I normally use W&N’s glaze medium mixed with water as it comes quite thick. I don’t think I could paint with out using glazes nowadays.
Me too, at least for anything beyond tabletop quality. I won’t be glazing my Chaos Marines any time soon, but when I take the time to really work on something, I use glazes all the time as well.
I do really like the Lahmian Medium. It’s just simple to use, and I’ve had very good luck with it. You work on larger stuff, so I imagine the W&N glazing medium is a much better buy.